<?xml version="1.0" encoding="utf-8"?><feed xmlns="http://www.w3.org/2005/Atom" ><generator uri="https://jekyllrb.com/" version="3.10.0">Jekyll</generator><link href="https://r2rajan.github.io/atom.xml" rel="self" type="application/atom+xml" /><link href="https://r2rajan.github.io/" rel="alternate" type="text/html" /><updated>2026-05-26T02:12:23+00:00</updated><id>https://r2rajan.github.io/atom.xml</id><title type="html">Ramesh’s Security and Technlogy Blogs</title><subtitle>Thoughts on cloud, security, AI, and technology</subtitle><author><name>Ramesh Rajan</name><email>info@rameshrajan.info</email></author><entry><title type="html">Can Your Agents Prove Their Identity Without a Central Authority</title><link href="https://r2rajan.github.io/agentic%20identity/ai/2026/05/25/didpart1/" rel="alternate" type="text/html" title="Can Your Agents Prove Their Identity Without a Central Authority" /><published>2026-05-25T00:00:00+00:00</published><updated>2026-05-25T00:00:00+00:00</updated><id>https://r2rajan.github.io/agentic%20identity/ai/2026/05/25/didpart1</id><content type="html" xml:base="https://r2rajan.github.io/agentic%20identity/ai/2026/05/25/didpart1/"><![CDATA[<h1 id="part-1-can-your-agents-prove-their-identity-without-a-central-authority">Part-1: Can your Agents prove their identity without a central authority?</h1>

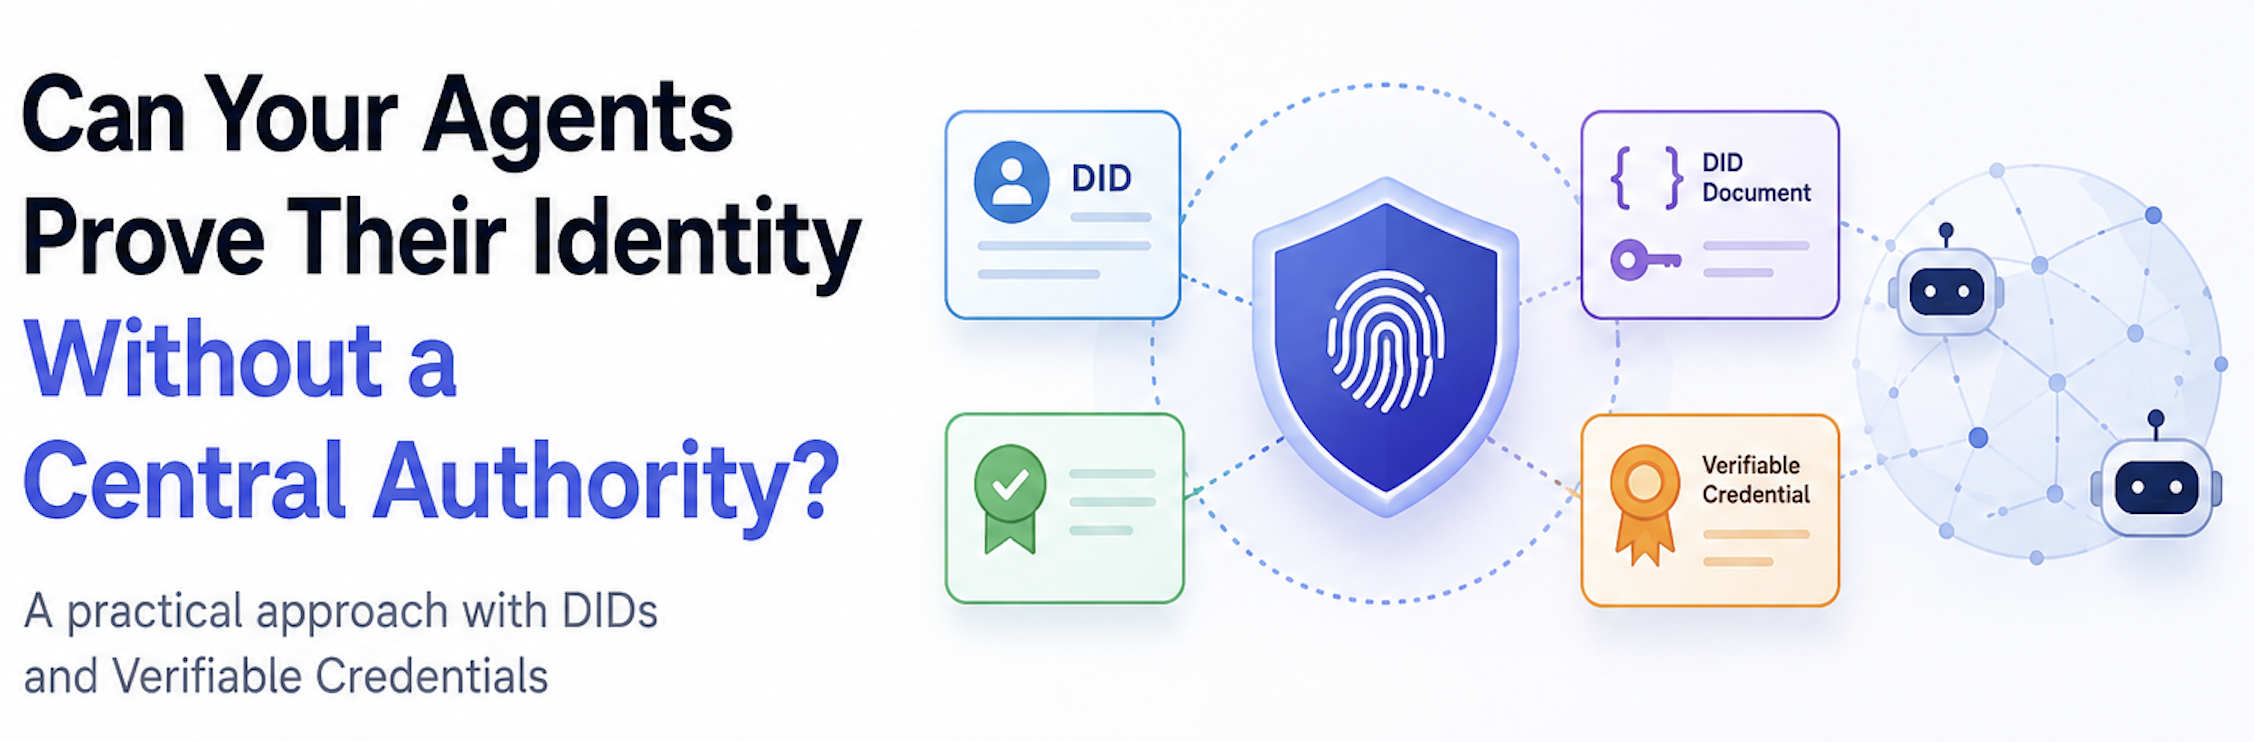
<p><img src="/assets/images/20260525/title.png" alt="Decentralized Identity" /></p>

<p>If you are building multi-agent systems and looking at the future of Agentic identity, this post is for you. As agents become more autonomous and operate across team and organizational boundaries, <strong>who can talk to whom</strong> becomes a security problem, not a routing problem. This post describes a practical approach using W3C Decentralized Identifiers and Verifiable Credentials, with working Python code you can run locally in under 10 minutes.</p>

<hr />

<h2 id="the-problem">The Problem</h2>

<p>Multi-agent systems today rely on shared secrets (API keys) or central registries (service meshes, config files) for trust. Both break down when:</p>

<ul>
  <li>An agent is compromised and you need to revoke access immediately</li>
  <li>Agents span organizational boundaries (different teams, companies, cloud accounts)</li>
  <li>The central registry goes down or is itself compromised</li>
</ul>

<p>These patterns assume you control the entire system. They do not scale to autonomous agents cooperating across trust boundaries.</p>

<hr />

<h2 id="what-is-decentralized-identity">What Is Decentralized Identity?</h2>

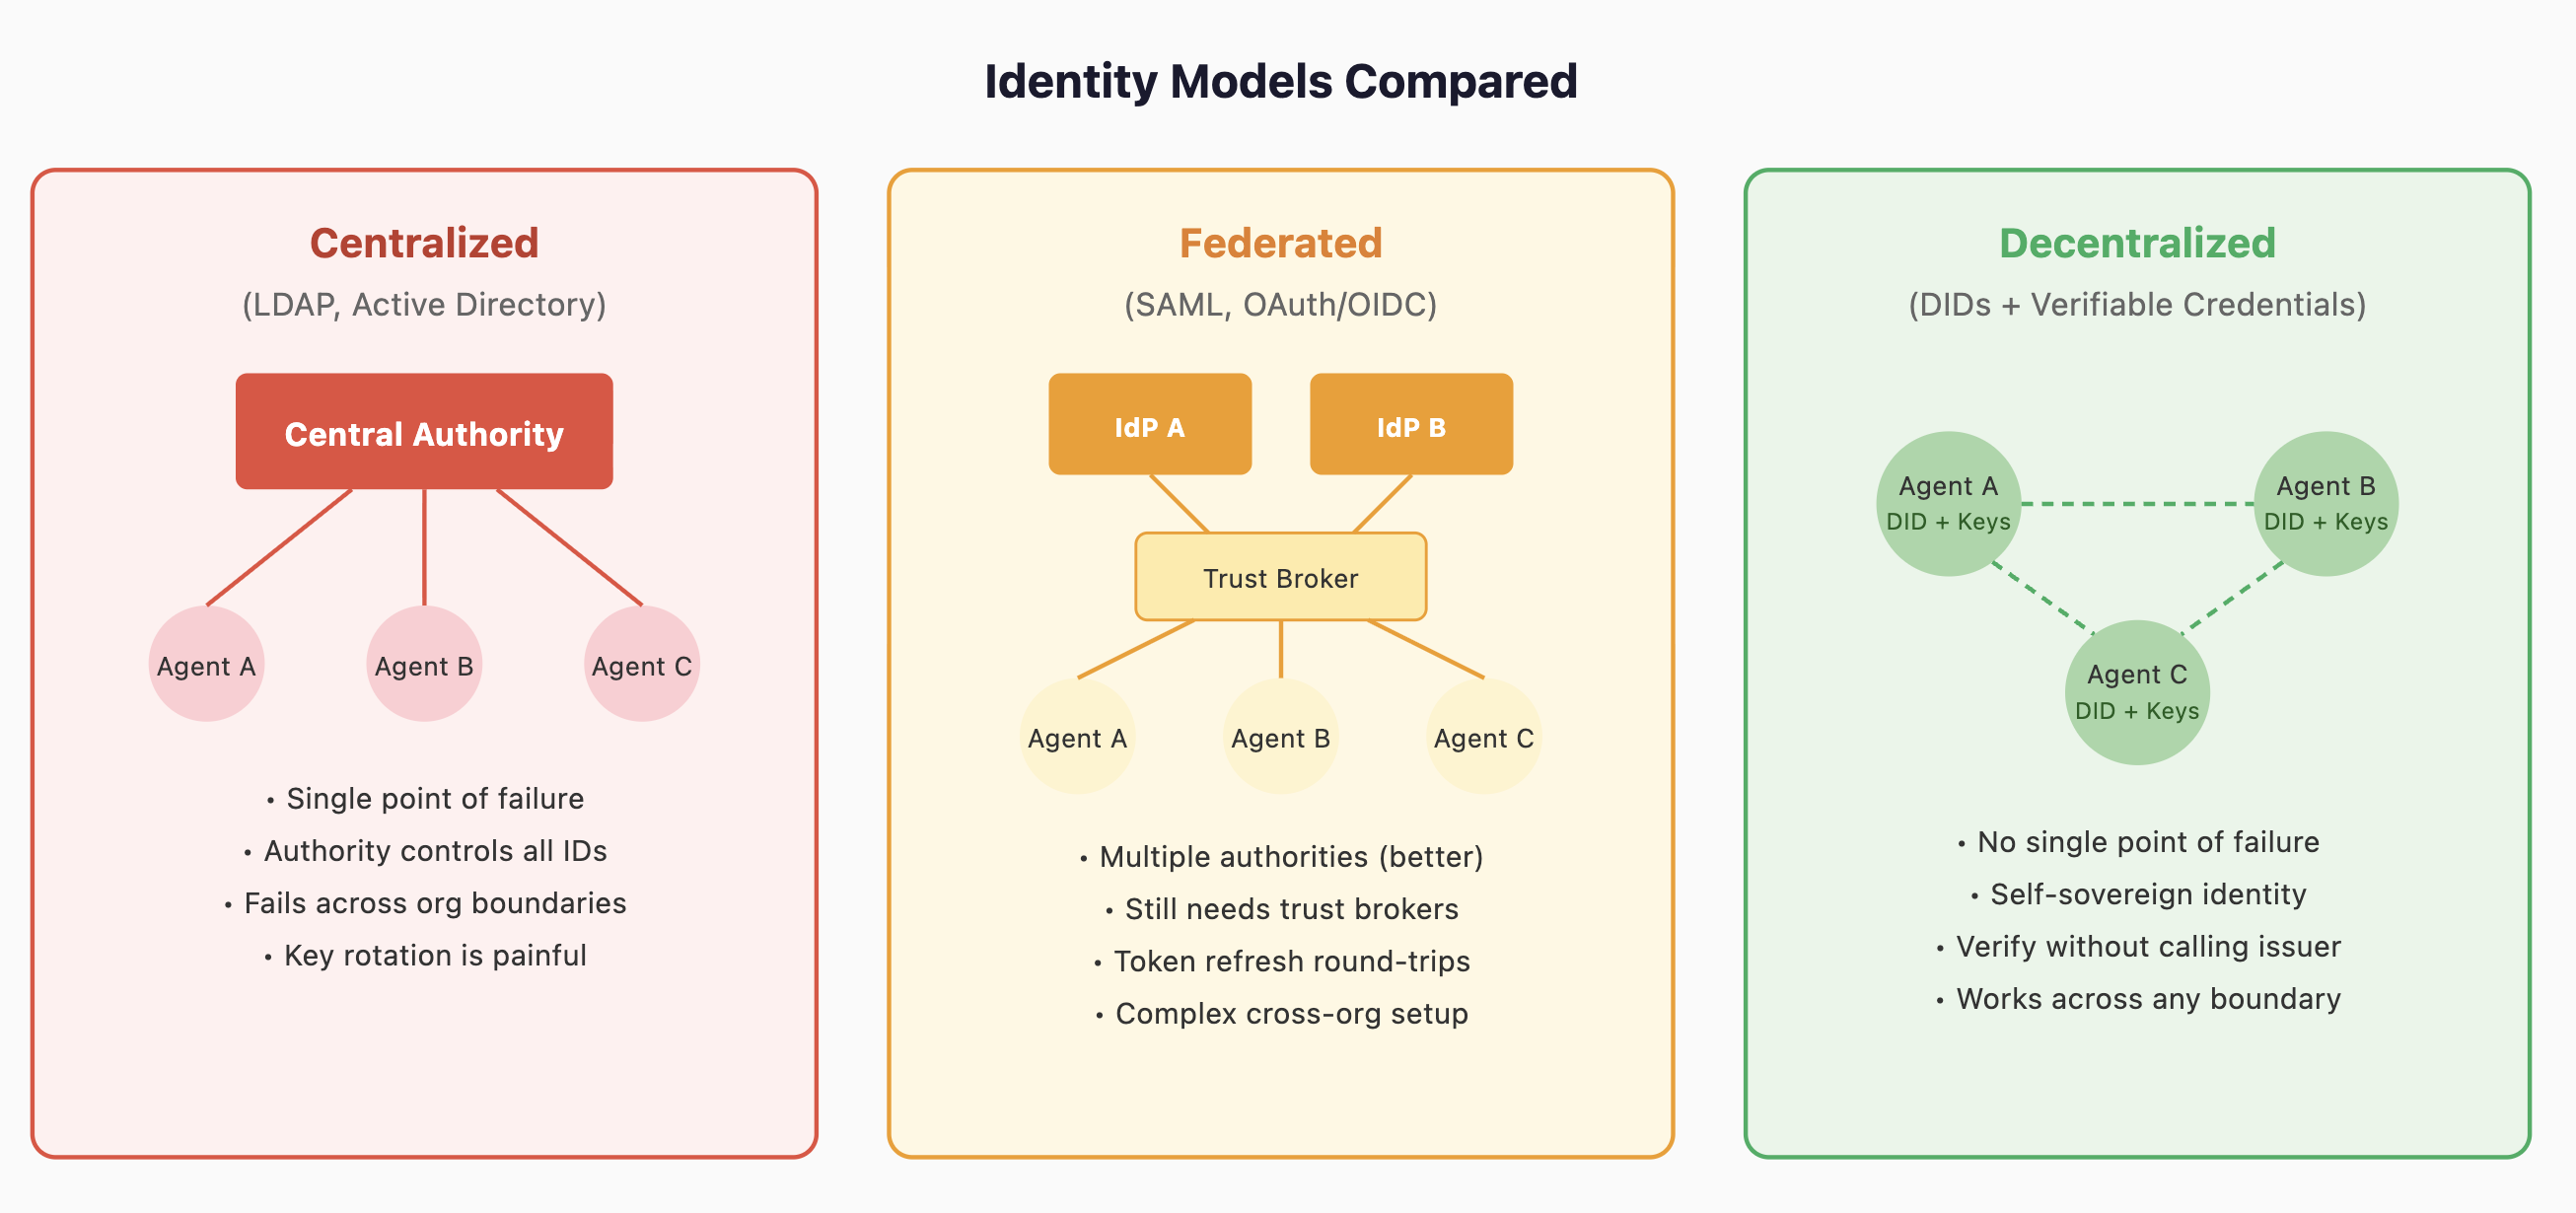
<p>To understand decentralized identity (DID), it helps to see where identity systems have been and why each generation solved one problem while introducing another.</p>

<p><img src="/assets/images/20260525/identity_models.png" alt="Identity Models Compared" /></p>

<h3 id="centralized-identity-ldap-active-directory">Centralized Identity (LDAP, Active Directory)</h3>

<p>In a centralized model, a single authority owns and manages all identities. Microsoft Active Directory is the classic example: every user, every service account, every permission lives in one directory. To determine “is Agent X allowed to do Y?” you query the directory.</p>

<p>This works inside one organization. It creates a single point of failure. If the directory is down, nothing authenticates. If it is compromised, an attacker controls every identity. For multi-agent AI, centralized identity does not work across organizational boundaries. Your LDAP server cannot vouch for an agent running in someone else’s infrastructure.</p>

<h3 id="federated-identity-saml-oauthoidc">Federated Identity (SAML, OAuth/OIDC)</h3>

<p>Federation addresses cross-organization trust. Instead of one authority, multiple Identity Providers (IdPs) agree to trust each other. SAML and OAuth/OIDC enable “log in with Google” or accept tokens from a partner’s IdP.</p>

<p>Federation reduces single-point-of-failure risk but introduces structural dependencies. You need pre-negotiated trust relationships between IdPs. Token verification requires a round-trip to the issuer (or access to a JWKS endpoint). Setting up federation across many parties is operationally heavy.</p>

<h3 id="decentralized-identity-dids--verifiable-credentials">Decentralized Identity (DIDs + Verifiable Credentials)</h3>

<p>Decentralized identity removes the central authority entirely. Each entity creates its own identity (a DID backed by a cryptographic key pair) and carries its own credentials. Verification happens locally. The verifier checks a cryptographic signature, not a database.</p>

<p>The benefit of Decentralized identity is that there is no single point of failure, No pre-negotiated trust relationships and No issuer callback at verification time. All the verification is handled cryptographically.</p>

<table>
  <thead>
    <tr>
      <th> </th>
      <th>Centralized</th>
      <th>Federated</th>
      <th>Decentralized</th>
    </tr>
  </thead>
  <tbody>
    <tr>
      <td><strong>Authority</strong></td>
      <td>Single (LDAP/AD)</td>
      <td>Multiple IdPs</td>
      <td>None (self-sovereign)</td>
    </tr>
    <tr>
      <td><strong>Single point of failure</strong></td>
      <td>Yes</td>
      <td>Reduced</td>
      <td>No</td>
    </tr>
    <tr>
      <td><strong>Cross-org trust</strong></td>
      <td>Not possible</td>
      <td>Requires federation setup</td>
      <td>Built-in</td>
    </tr>
    <tr>
      <td><strong>Verification</strong></td>
      <td>Query the directory</td>
      <td>Token introspection / JWKS</td>
      <td>Local signature check</td>
    </tr>
    <tr>
      <td><strong>Revocation</strong></td>
      <td>Delete from directory</td>
      <td>Token expiry / revoke at IdP</td>
      <td>Revocation list</td>
    </tr>
    <tr>
      <td><strong>Agent suitability</strong></td>
      <td>Poor (designed for humans in one org)</td>
      <td>Moderate (token-based)</td>
      <td>Strong (peer-to-peer, no human in loop)</td>
    </tr>
  </tbody>
</table>

<hr />

<h2 id="components-of-decentralized-identity">Components of Decentralized Identity</h2>

<p>A decentralized identity system has four core components.</p>

<p><strong>1. Decentralized Identifier (DID)</strong> is a globally unique string like <code class="language-plaintext highlighter-rouge">did:web:example.com:flight</code> that the agent owns. The <code class="language-plaintext highlighter-rouge">did:web</code> method means “resolve this DID by fetching a document over HTTPS.” Other methods exist (<code class="language-plaintext highlighter-rouge">did:key</code>, <code class="language-plaintext highlighter-rouge">did:ion</code>, <code class="language-plaintext highlighter-rouge">did:ethr</code>) but <code class="language-plaintext highlighter-rouge">did:web</code> is the simplest for production web services.</p>

<p><strong>2. DID Document</strong> is a JSON document published at the URL derived from the DID. It contains the agent’s public key, what that key can be used for (authentication, signing credentials), and service endpoints (where to reach the agent). Anyone who resolves the DID gets this document.</p>

<p><strong>3. Verifiable Credential (VC)</strong> is a signed assertion from an issuer about a subject. “The Orchestrator certifies that Flight Agent has the capabilities: flight_search, flight_booking.” The credential is portable. The agent holds it and presents it on demand. The verifier checks the issuer’s signature without contacting the issuer.</p>

<p><strong>4. Revocation List</strong> is a list of credential IDs that are no longer valid. The verifier checks this list during authorization. If the credential ID appears, the agent is rejected, even if the signature is perfect and the credential has not expired.</p>

<hr />

<h2 id="how-the-trust-chain-works">How the Trust Chain Works</h2>

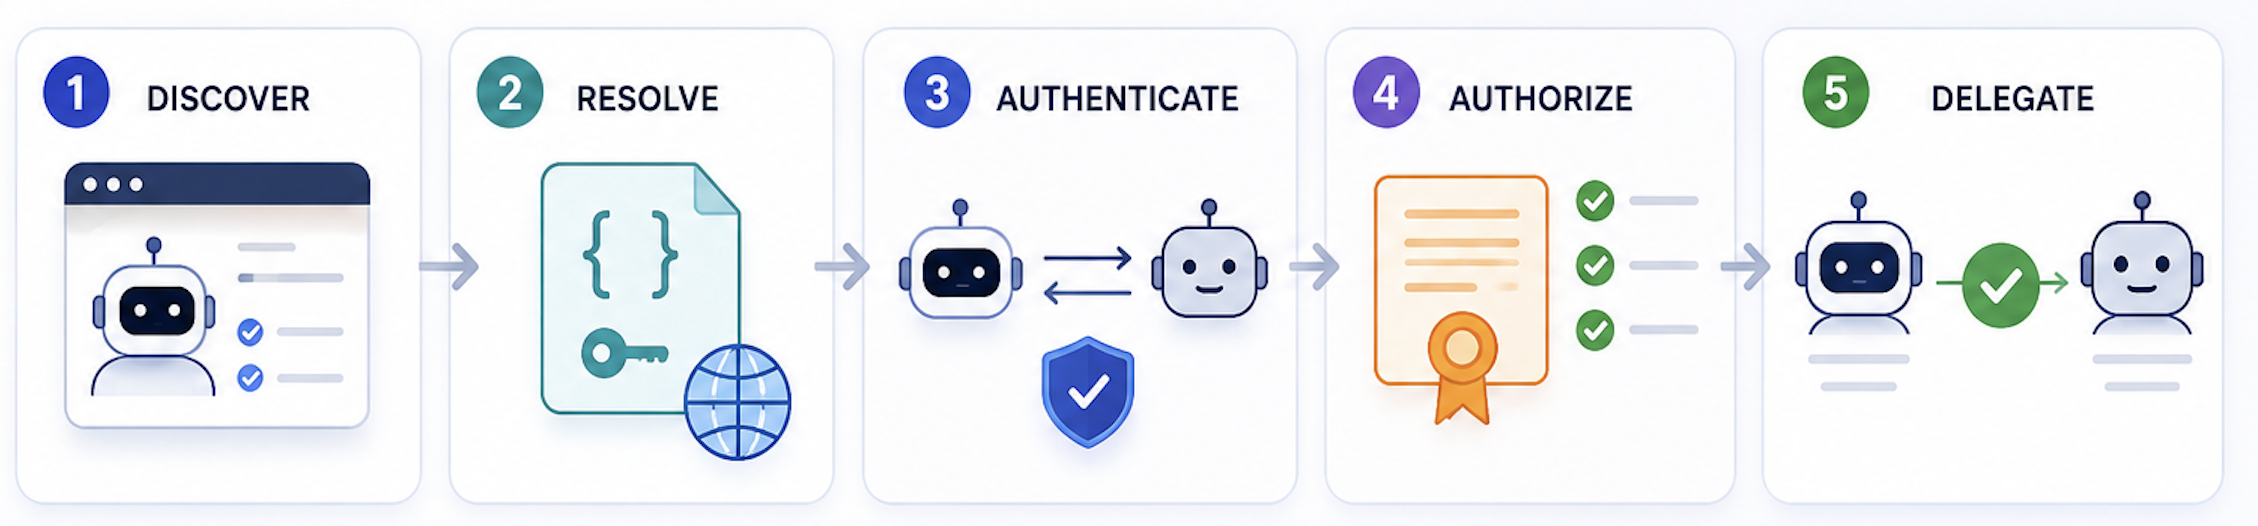
<p>When the Orchestrator needs to delegate a task to the Flight Agent, it runs a 5-step trust chain. Each step builds on the previous one. Failure at any step means the task is never sent.</p>

<p><img src="/assets/images/20260525/trust_chain.png" alt="Trust Chain Flow" /></p>

<p><strong>Step 1, Discovery:</strong> The Orchestrator fetches the Flight Agent’s Agent Card (a JSON file at a well-known URL). The card states: “I am Flight Agent, I can search flights, my DID is <code class="language-plaintext highlighter-rouge">did:web:example.com:flight</code>.”</p>

<p><strong>Step 2, Resolution:</strong> The Orchestrator resolves the DID. It converts <code class="language-plaintext highlighter-rouge">did:web:example.com:flight</code> into <code class="language-plaintext highlighter-rouge">https://example.com/flight/did.json</code>, fetches the document, and extracts the public key and service endpoints.</p>

<p><strong>Step 3, Authentication:</strong> The Orchestrator sends a random 32-byte nonce to the Flight Agent: “sign this.” The Flight Agent signs it with its private key. The Orchestrator verifies the signature using the public key from the DID Document. If it verifies, the agent provably holds the private key. It is who it claims to be.</p>

<p><strong>Step 4, Authorization:</strong> The Orchestrator fetches the Flight Agent’s Verifiable Credential and runs four checks locally: (1) Is the signature from the claimed issuer? (2) Has it expired? (3) Is it on the revocation list? (4) Does it grant the needed capability? All four checks must pass.</p>

<p><strong>Step 5, Delegation:</strong> Only after all checks pass does the task flow. The agent has been discovered, identified, authenticated, and authorized. The Orchestrator sends the task.</p>

<p>The full chain completes in under 200ms. Five HTTP requests. Zero central databases.</p>

<hr />

<h2 id="use-cases-this-solves">Use Cases This Solves</h2>

<p><strong>Cross-organization agent collaboration.</strong> Agents from different companies verify each other without a shared authority. Each agent’s DID is self-sovereign.</p>

<p><strong>Instant revocation without key rotation.</strong> A compromised agent is cut off by adding one credential ID to a revocation list. No restart, no config changes, no cascading updates across services.</p>

<p><strong>Least-privilege enforcement.</strong> Credentials explicitly list granted capabilities. An agent authorized for <code class="language-plaintext highlighter-rouge">flight_search</code> cannot perform <code class="language-plaintext highlighter-rouge">flight_booking</code> unless its credential grants that capability.</p>

<p><strong>Replay attack prevention.</strong> Every authentication uses a fresh 32-byte random nonce. A captured response is useless for future challenges.</p>

<p><strong>Decentralized verification.</strong> Verifiers resolve DIDs and check credential signatures locally. No round-trip to an issuer or central authority at verification time.</p>

<p><strong>Auditable trust decisions.</strong> Every step (discovery, resolution, authentication, authorization) produces a verifiable artifact. You can reconstruct exactly why an agent was trusted or rejected.</p>

<p><strong>Graceful credential rotation.</strong> Credentials expire (for example, after 30 days). New ones are issued without downtime. Old ones naturally stop working.</p>

<hr />

<h2 id="try-it-yourself">Try It Yourself</h2>

<p>The prototype uses three Flask servers (orchestrator, flight agent, hotel agent) with Ed25519 cryptography via PyNaCl. The code is available at <a href="https://github.com/r2rajan/did-vc">github.com/r2rajan/did-vc</a> under the <code class="language-plaintext highlighter-rouge">sample1</code> directory.</p>

<p><strong>Setup:</strong></p>

<div class="language-bash highlighter-rouge"><div class="highlight"><pre class="highlight"><code>git clone https://github.com/r2rajan/did-vc.git
<span class="nb">cd </span>did-vc/sample1
python3 <span class="nt">-m</span> venv .venv <span class="o">&amp;&amp;</span> <span class="nb">source</span> .venv/bin/activate
pip <span class="nb">install</span> <span class="nt">-r</span> requirements.txt
</code></pre></div></div>

<hr />

<h2 id="what-is-next-part-2-from-flask-to-aws">What Is Next: Part 2, From Flask to AWS</h2>

<p>The trust primitives stay the same. The deployment changes into minimum viable product (mvp) to deploy in AWS cloud.</p>

<ul>
  <li>Flask becomes <strong>Lambda</strong> (serverless)</li>
  <li>localhost becomes <strong>API Gateway + CloudFront</strong> (HTTPS, global)</li>
  <li>Files on disk become <strong>DynamoDB + Secrets Manager</strong> (encrypted, managed)</li>
  <li>Hardcoded responses become <strong>Amazon Bedrock</strong> (LLM-powered agent reasoning)</li>
</ul>

<p>The identity layer is independent of the infrastructure layer. That is the value of building on standards.</p>

<hr />

<p><em>Part 1 of a two-part series. Part 2 deploys the system to AWS with Lambda, Bedrock, and use real time agents, LLMs and an UI.</em></p>]]></content><author><name>Ramesh Rajan</name><email>info@rameshrajan.info</email></author><category term="Agentic Identity" /><category term="AI" /><category term="genai" /><category term="iam" /><category term="llm" /><summary type="html"><![CDATA[As agents become more autonomous and operate across team and organizational boundaries, **who can talk to whom** becomes a security problem, not a routing problem. This post describes a practical approach using W3C Decentralized Identifiers and Verifiable Credentials]]></summary></entry><entry><title type="html">JA4 Signatures: The fingerprint that bots find difficult to fake</title><link href="https://r2rajan.github.io/cloud/security/2026/05/21/ja4part1/" rel="alternate" type="text/html" title="JA4 Signatures: The fingerprint that bots find difficult to fake" /><published>2026-05-21T00:00:00+00:00</published><updated>2026-05-21T00:00:00+00:00</updated><id>https://r2rajan.github.io/cloud/security/2026/05/21/ja4part1</id><content type="html" xml:base="https://r2rajan.github.io/cloud/security/2026/05/21/ja4part1/"><![CDATA[<h1 id="ja4-signatures-the-fingerprint-that-bots-find-difficult-to-fake">JA4 Signatures: The fingerprint that bots find difficult to fake</h1>

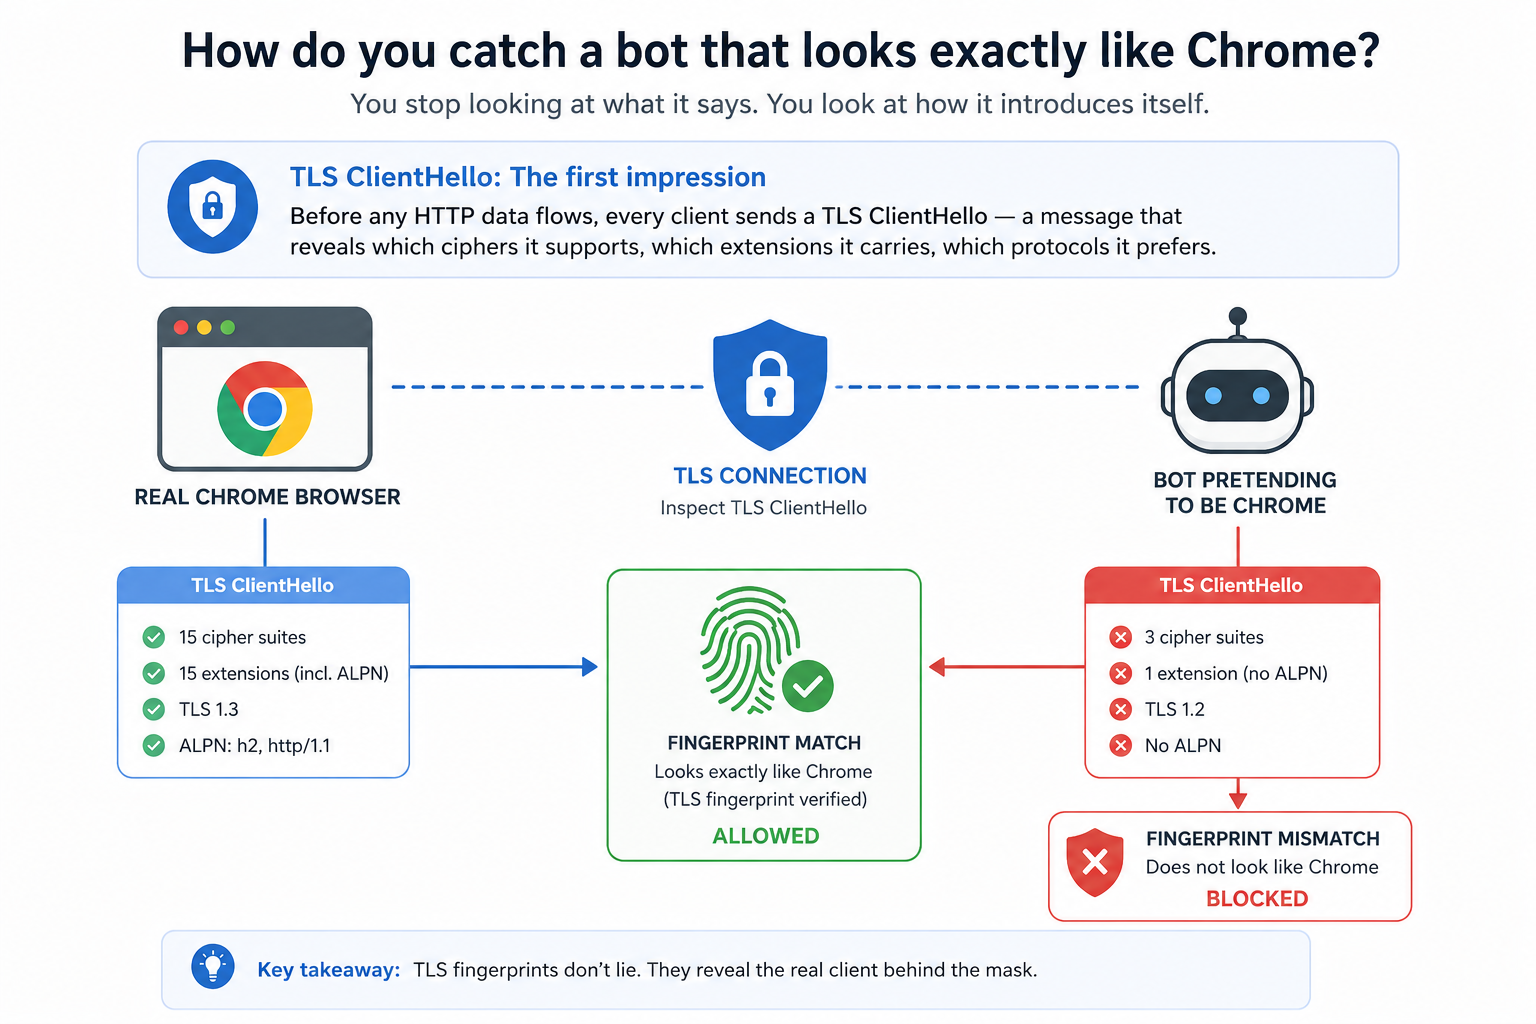
<p>Last week, I encountered a security incident that resulted in a Denial of Service (DoS) for an e-commerce API. Every request carried a Chrome User-Agent header. Valid cookies. Residential IP addresses. Rate limiting didn’t trigger because the requests trickled in at human-like intervals across thousands of IPs.</p>

<p>The question isn’t whether these attacks will reach your infrastructure. It’s whether you can fingerprint each connection and identify what it actually <em>is</em>, regardless of what it claims to be.</p>

<p><img src="/assets/images/20260521/Title.png" alt="JA4 - Title" /></p>

<p>For centuries, people in the Indian state of Kerala have used three composite identifiers to uniquely identify people which still exists today.</p>

<ul>
  <li>Their ancestral house name (<em>veedu peru</em>)</li>
  <li>Their given name (First name and Surname).</li>
  <li>Their village  (<em>desam</em>)</li>
</ul>

<p>The naming system works in layers.</p>

<ol>
  <li>
    <p><strong>The ancestral house name</strong> - ( <em>veedu peru</em> or <em>tharavadu peru</em>)  carries more weight than a family name in the Western sense. It identifies your specific lineage and property. Two families with the surname “kutty” in the same village might be completely unrelated, but their house names distinguish them immediately.</p>
  </li>
  <li>
    <p>Then comes the <strong>given name</strong>.</p>
  </li>
  <li>
    <p>Then the <strong>village or the locality</strong> the family belongs to  (<em>desam</em> or <em>sthalam</em>).</p>
  </li>
</ol>

<p>For example “Ramesh” could be anyone.</p>

<p>The fingerprint quality comes from the combination. “<strong>Ramesh</strong>” alone is common. <strong>“Ramesh from Kottayam</strong>” narrows it. “<strong>Padinjarekara Ramesh from Kottayam</strong>” is essentially unique — you’ve identified not just the person but their lineage, their ancestral property, and their geographic origin in one string.</p>

<p>There’s a layer of network identity that works the same way as the Kerala naming system to uniquely identify each connection. It’s called J<strong>A4 fingerprinting</strong>, and it lives in the TLS handshake which is a three-part signature that reveals what a client actually is, regardless of what it claims to be.</p>

<h2 id="what-happens-before-your-app-even-sees-a-request">What Happens Before Your App Even Sees a Request</h2>

<p>When a client connects to your server over HTTPS, a handshake happens before any application data flows. Think of it like arriving at a building with a security desk. Before you get to your meeting, you show your ID, exchange credentials, agree on how you’ll communicate.</p>

<p>The TCP handshake establishes the connection (SYN, SYN-ACK, ACK). Then the TLS handshake negotiates encryption. The very first message the client sends in TLS is called the <strong>ClientHello</strong>. It contains:</p>

<ul>
  <li>Which TLS versions the client supports</li>
  <li>Which cipher suites it offers (the encryption algorithms it knows)</li>
  <li>Which extensions it wants to use</li>
  <li>What protocols it prefers (HTTP/2, HTTP/1.1, HTTP/3)</li>
</ul>

<p>A real browser, a Python script, a Go binary, and a piece of malware all construct this message differently. They use different libraries, different defaults, different capabilities. The ClientHello is an involuntary fingerprint that the client can’t help but reveal what it actually <em>is</em>.</p>

<p>JA3 was the first widely-adopted method for fingerprinting ClientHellos. It worked, but it produced opaque MD5 hashes that told you nothing at a glance, broke when GREASE values randomized fields, and couldn’t distinguish between similar clients. JA4 fixes all of that.</p>

<h2 id="what-is-ja4">What is JA4?</h2>

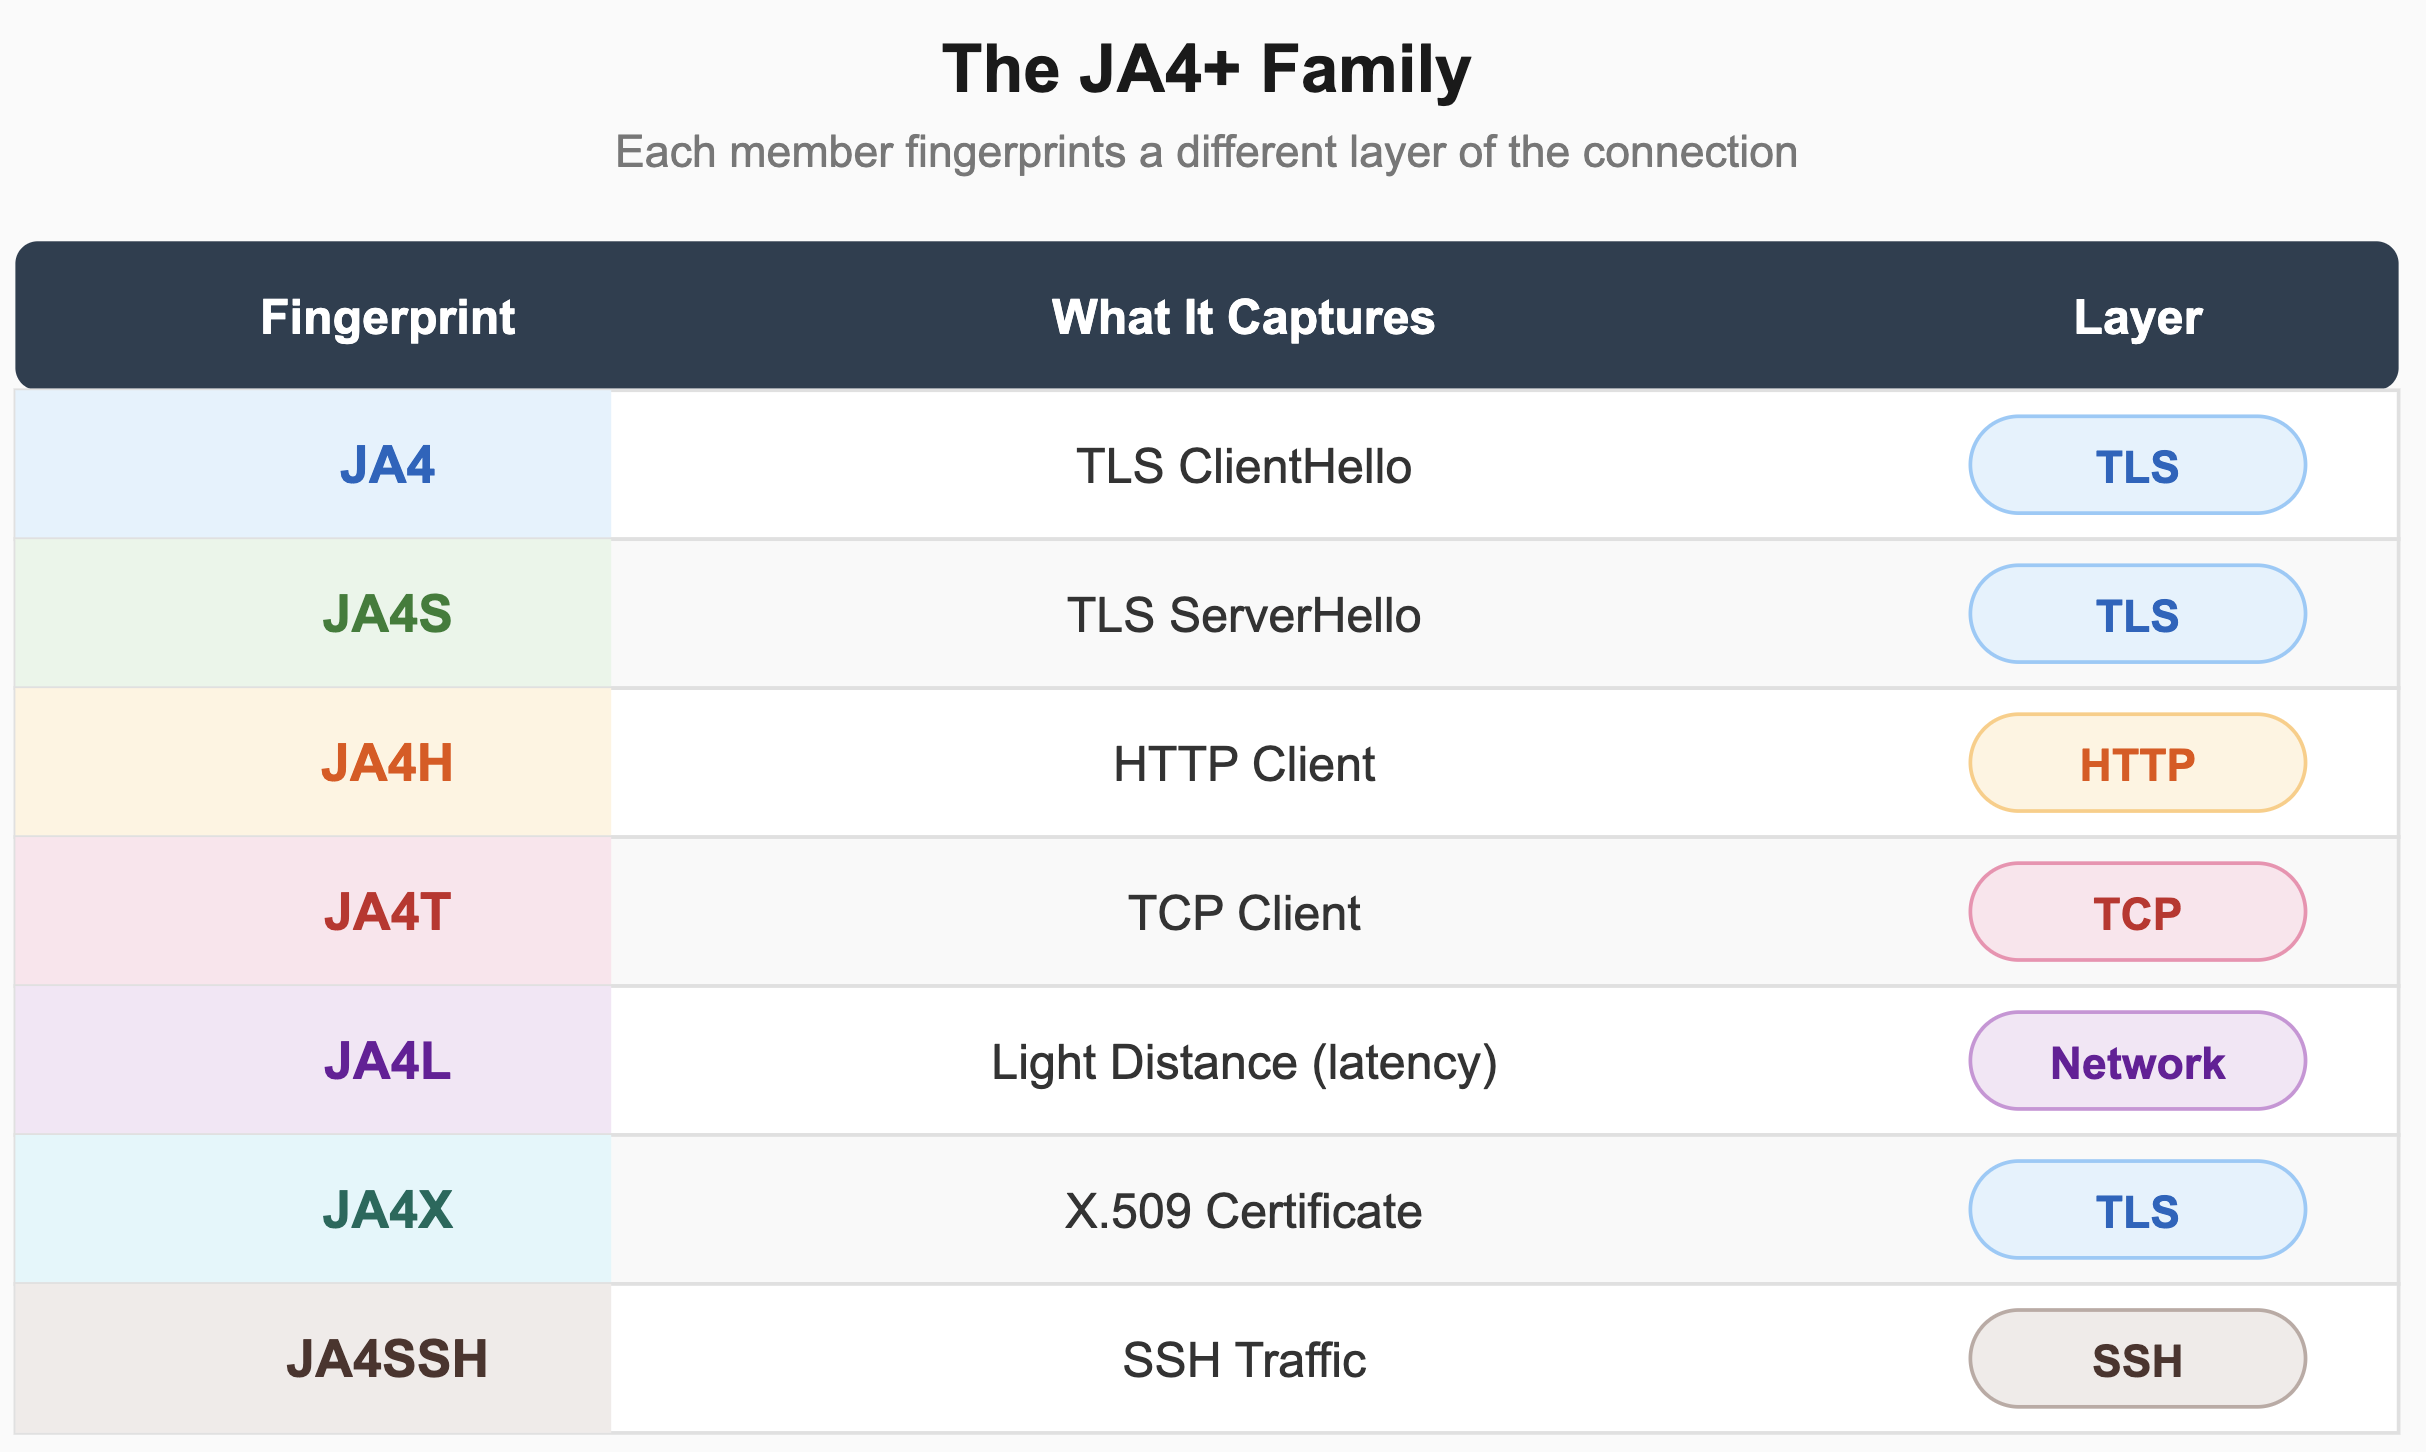
<p>JA4 isn’t a single fingerprint. It’s a family — the JA4+ suite — and each member fingerprints a different layer of the connection.</p>

<p><img src="/assets/images/20260521/ja4_family_table.png" alt="JA4 Family of Signatures" /></p>

<p>Three innovations make JA4 fundamentally better than its predecessors.</p>

<p><strong>It’s human-readable.</strong> A JA4 fingerprint looks like <code class="language-plaintext highlighter-rouge">t13d1515h2_8daaf6152771_e5627efa2ab1</code>. That first section — <code class="language-plaintext highlighter-rouge">t13d1515h2</code> — tells you immediately: TCP connection, TLS 1.3, domain name present, 15 cipher suites, 15 extensions, HTTP/2. You can glance at it and know you’re looking at a modern browser. Compare that to JA3’s <code class="language-plaintext highlighter-rouge">66918128f1b9b03303d77c6f2eefd128</code>. Which one tells you something useful at 3 AM during an incident?</p>

<p><strong>GREASE removal and sorting produce stable fingerprints.</strong> GREASE (Generate Random Extensions And Sustain Extensibility) values are dummy entries browsers inject to prevent server ossification. They change randomly between connections. JA4 strips them and sorts the remaining values, so the same client produces the same fingerprint every time — regardless of GREASE randomization.</p>

<p><strong>Layered fingerprinting catches sophisticated evasion.</strong> A bot might match a browser’s TLS fingerprint by using a patched TLS library. But does its TCP window size match? Does its HTTP header order match? JA4T + JA4 + JA4H together create a multi-dimensional identity that’s expensive to fully replicate.</p>

<h2 id="how-ja4-works--under-the-hood">How JA4 Works — Under the Hood</h2>

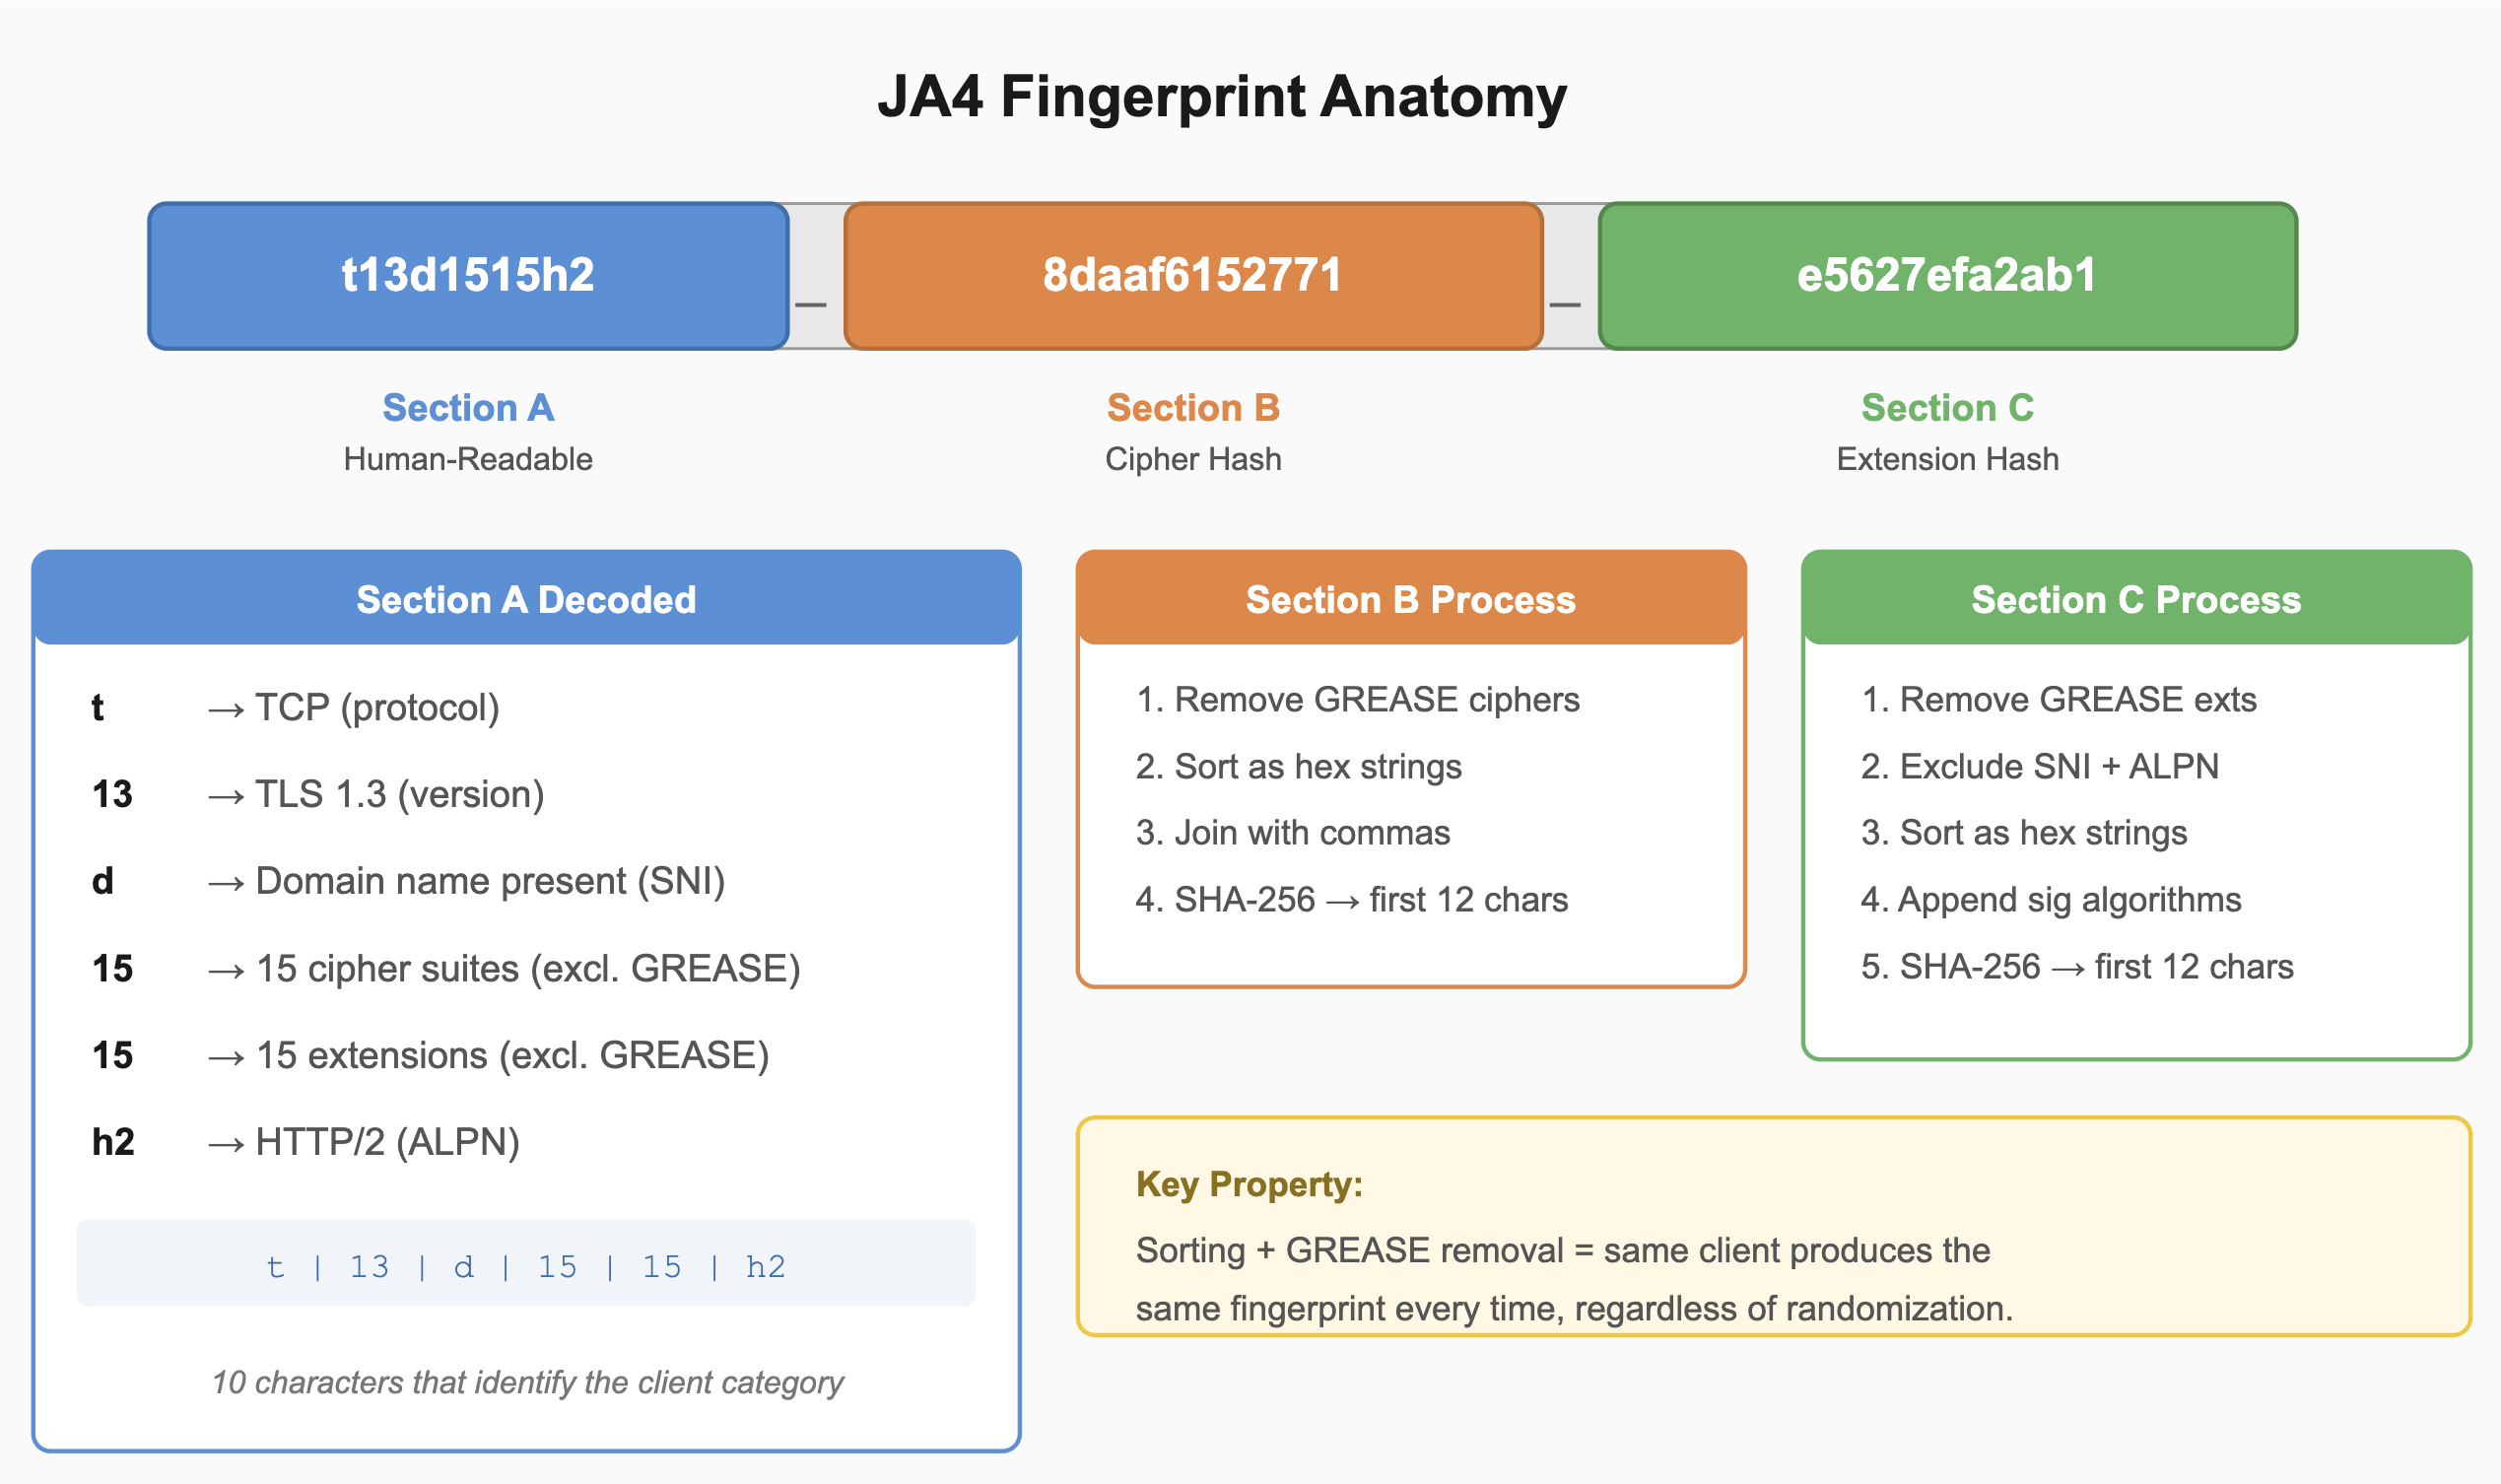
<p>A JA4 fingerprint has three sections separated by underscores:</p>

<p><img src="/assets/images/20260521/ja4_anatomy.png" alt="JA4 Signatures Anatomy" /></p>

<p>Each section adds a layer of specificity.</p>

<p><strong>Section A</strong> is the human-readable metadata. It encodes protocol type, TLS version, whether SNI is present, cipher count, extension count, and ALPN value. Ten characters that tell you immediately what category of client you’re looking at.</p>

<p><strong>Section B</strong> is the first 12 characters of a SHA-256 hash computed over the sorted, GREASE-removed cipher suites. Two clients might share the same Section A (same TLS version, same extension count) but their cipher suite selections reveal different TLS libraries and configurations.</p>

<p><strong>Section C</strong> hashes the extensions (excluding SNI and ALPN, already captured in Section A) plus signature algorithms. Two clients using the same library version might still differ here based on how they’ve been configured.</p>

<p>Any single section has collisions. Together, they produce a composite identifier with enough entropy to differentiate millions of distinct clients.</p>

<p>The sorting step is what gives JA4 its stability. Two connections from the same client will produce identical fingerprints even if the underlying library randomizes the order of ciphers or extensions. The hash truncation keeps things compact while preserving enough uniqueness to differentiate millions of distinct clients.</p>

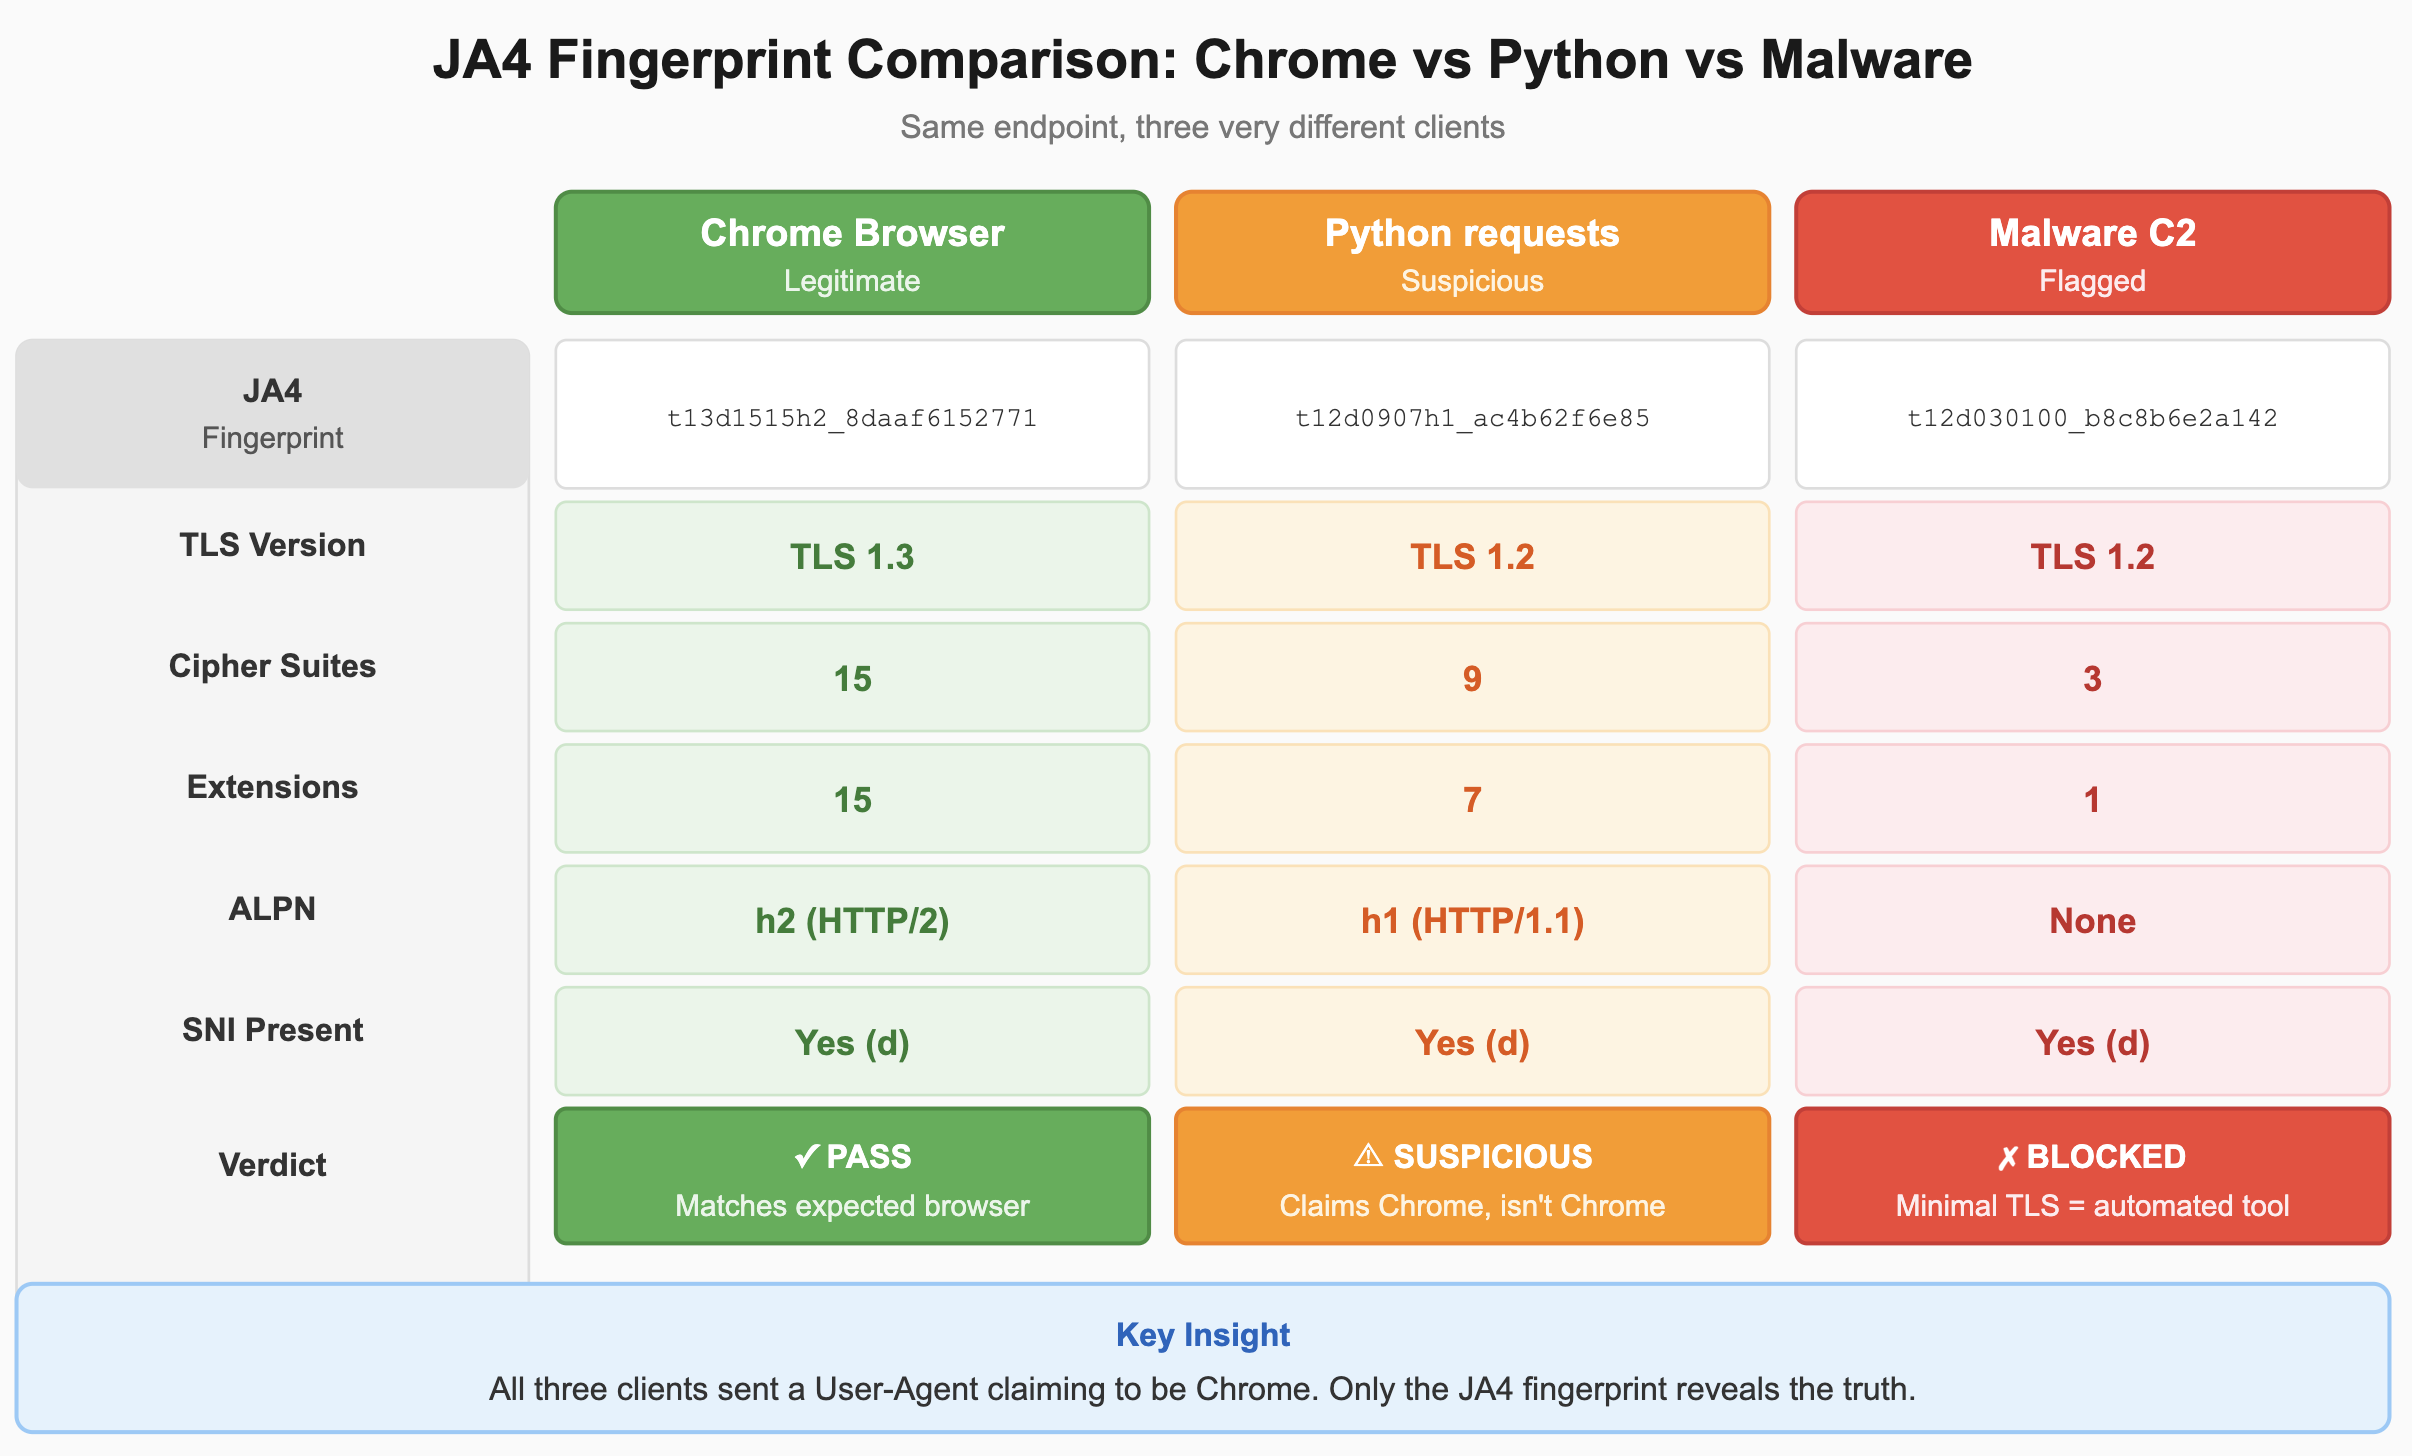
<p>Here’s what the comparison looks like across three very different clients:</p>

<div class="language-plaintext highlighter-rouge"><div class="highlight"><pre class="highlight"><code>Chrome Browser:   t13d1515h2_8daaf6152771_e5627efa2ab1

Python requests: t12d0907h1_ac4b62f6e85_7cdb5ce3f4e2

Malware (minimal): t12d030100_b8c8b6e2a142_3f2e7a9d1bc4
</code></pre></div></div>
<p><img src="/assets/images/20260521/ja4_comparison_table.png" alt="JA4 Comparison of Client Signatures" /></p>

<p>Even without decoding the hashes, Section A alone creates a self indictment for the malware signature. It is a request claiming to be a Chrome browser but showing <code class="language-plaintext highlighter-rouge">t12d0301</code> — TLS 1.2, three cipher suites, no Application Layer Protocol Negotiation (ALPN) is lying. No modern browser looks like that particularly Chrome.</p>

<h2 id="code-demo-building-a-ja4-fingerprint">Code Demo: Building a JA4 Fingerprint</h2>

<p>The following Python script (included in this repo as <code class="language-plaintext highlighter-rouge">ja4_fingerprint_demo.py</code>) demonstrates the complete JA4 construction algorithm. It doesn’t require packet capture — it uses simulated ClientHello messages to show the math clearly.</p>

<p>The key functions:</p>

<div class="language-python highlighter-rouge"><div class="highlight"><pre class="highlight"><code><span class="k">def</span> <span class="nf">remove_grease</span><span class="p">(</span><span class="n">values</span><span class="p">:</span> <span class="nb">list</span><span class="p">)</span> <span class="o">-&gt;</span> <span class="nb">list</span><span class="p">:</span>
    <span class="s">"""Remove all GREASE values from a list of cipher/extension IDs."""</span>
    <span class="k">return</span> <span class="p">[</span><span class="n">v</span> <span class="k">for</span> <span class="n">v</span> <span class="ow">in</span> <span class="n">values</span> <span class="k">if</span> <span class="ow">not</span> <span class="n">is_grease</span><span class="p">(</span><span class="n">v</span><span class="p">)]</span>


<span class="k">def</span> <span class="nf">build_section_a</span><span class="p">(</span><span class="n">hello</span><span class="p">:</span> <span class="n">ClientHello</span><span class="p">)</span> <span class="o">-&gt;</span> <span class="nb">str</span><span class="p">:</span>
    <span class="s">"""
    Build the human-readable section.
    Format: {protocol}{version}{sni}{cipher_count}{ext_count}{alpn}
    Example: t13d1516h2
    """</span>
    <span class="n">proto</span> <span class="o">=</span> <span class="n">hello</span><span class="p">.</span><span class="n">protocol</span>
    <span class="n">version</span> <span class="o">=</span> <span class="n">TLS_VERSION_MAP</span><span class="p">.</span><span class="n">get</span><span class="p">(</span><span class="n">hello</span><span class="p">.</span><span class="n">tls_version</span><span class="p">,</span> <span class="s">"00"</span><span class="p">)</span>
    <span class="n">sni_flag</span> <span class="o">=</span> <span class="s">"d"</span> <span class="k">if</span> <span class="n">hello</span><span class="p">.</span><span class="n">sni</span> <span class="k">else</span> <span class="s">"i"</span>
    <span class="n">ciphers_no_grease</span> <span class="o">=</span> <span class="n">remove_grease</span><span class="p">(</span><span class="n">hello</span><span class="p">.</span><span class="n">cipher_suites</span><span class="p">)</span>
    <span class="n">cipher_count</span> <span class="o">=</span> <span class="sa">f</span><span class="s">"</span><span class="si">{</span><span class="nb">len</span><span class="p">(</span><span class="n">ciphers_no_grease</span><span class="p">)</span><span class="si">:</span><span class="mi">02</span><span class="n">d</span><span class="si">}</span><span class="s">"</span>
    <span class="n">extensions_no_grease</span> <span class="o">=</span> <span class="n">remove_grease</span><span class="p">(</span><span class="n">hello</span><span class="p">.</span><span class="n">extensions</span><span class="p">)</span>
    <span class="n">ext_count</span> <span class="o">=</span> <span class="sa">f</span><span class="s">"</span><span class="si">{</span><span class="nb">len</span><span class="p">(</span><span class="n">extensions_no_grease</span><span class="p">)</span><span class="si">:</span><span class="mi">02</span><span class="n">d</span><span class="si">}</span><span class="s">"</span>

    <span class="k">if</span> <span class="n">hello</span><span class="p">.</span><span class="n">alpn</span><span class="p">:</span>
        <span class="n">first_alpn</span> <span class="o">=</span> <span class="n">hello</span><span class="p">.</span><span class="n">alpn</span><span class="p">[</span><span class="mi">0</span><span class="p">]</span>
        <span class="n">alpn_mapped</span> <span class="o">=</span> <span class="n">ALPN_MAP</span><span class="p">.</span><span class="n">get</span><span class="p">(</span><span class="n">first_alpn</span><span class="p">,</span> <span class="sa">f</span><span class="s">"</span><span class="si">{</span><span class="n">first_alpn</span><span class="p">[</span><span class="mi">0</span><span class="p">]</span><span class="si">}{</span><span class="n">first_alpn</span><span class="p">[</span><span class="o">-</span><span class="mi">1</span><span class="p">]</span><span class="si">}</span><span class="s">"</span><span class="p">)</span>
    <span class="k">else</span><span class="p">:</span>
        <span class="n">alpn_mapped</span> <span class="o">=</span> <span class="s">"00"</span>

    <span class="k">return</span> <span class="sa">f</span><span class="s">"</span><span class="si">{</span><span class="n">proto</span><span class="si">}{</span><span class="n">version</span><span class="si">}{</span><span class="n">sni_flag</span><span class="si">}{</span><span class="n">cipher_count</span><span class="si">}{</span><span class="n">ext_count</span><span class="si">}{</span><span class="n">alpn_mapped</span><span class="si">}</span><span class="s">"</span>
</code></pre></div></div>

<p>Section B sorts cipher suites as hex strings and hashes them:</p>

<div class="language-python highlighter-rouge"><div class="highlight"><pre class="highlight"><code><span class="k">def</span> <span class="nf">build_section_b</span><span class="p">(</span><span class="n">hello</span><span class="p">:</span> <span class="n">ClientHello</span><span class="p">)</span> <span class="o">-&gt;</span> <span class="nb">str</span><span class="p">:</span>
    <span class="n">ciphers</span> <span class="o">=</span> <span class="n">remove_grease</span><span class="p">(</span><span class="n">hello</span><span class="p">.</span><span class="n">cipher_suites</span><span class="p">)</span>
    <span class="n">cipher_hex</span> <span class="o">=</span> <span class="nb">sorted</span><span class="p">([</span><span class="sa">f</span><span class="s">"</span><span class="si">{</span><span class="n">c</span><span class="si">:</span><span class="mi">04</span><span class="n">x</span><span class="si">}</span><span class="s">"</span> <span class="k">for</span> <span class="n">c</span> <span class="ow">in</span> <span class="n">ciphers</span><span class="p">])</span>
    <span class="n">cipher_string</span> <span class="o">=</span> <span class="s">","</span><span class="p">.</span><span class="n">join</span><span class="p">(</span><span class="n">cipher_hex</span><span class="p">)</span>
    <span class="k">return</span> <span class="n">hashlib</span><span class="p">.</span><span class="n">sha256</span><span class="p">(</span><span class="n">cipher_string</span><span class="p">.</span><span class="n">encode</span><span class="p">()).</span><span class="n">hexdigest</span><span class="p">()[:</span><span class="mi">12</span><span class="p">]</span>
</code></pre></div></div>

<p>Section C does the same for extensions, but excludes SNI and ALPN (already captured in Section A) and appends signature algorithms:</p>

<div class="language-python highlighter-rouge"><div class="highlight"><pre class="highlight"><code><span class="k">def</span> <span class="nf">build_section_c</span><span class="p">(</span><span class="n">hello</span><span class="p">:</span> <span class="n">ClientHello</span><span class="p">)</span> <span class="o">-&gt;</span> <span class="nb">str</span><span class="p">:</span>
    <span class="n">extensions</span> <span class="o">=</span> <span class="p">[</span>
        <span class="n">e</span> <span class="k">for</span> <span class="n">e</span> <span class="ow">in</span> <span class="n">hello</span><span class="p">.</span><span class="n">extensions</span>
        <span class="k">if</span> <span class="ow">not</span> <span class="n">is_grease</span><span class="p">(</span><span class="n">e</span><span class="p">)</span> <span class="ow">and</span> <span class="n">e</span> <span class="ow">not</span> <span class="ow">in</span> <span class="p">{</span><span class="mh">0x0000</span><span class="p">,</span> <span class="mh">0x0010</span><span class="p">}</span>
    <span class="p">]</span>
    <span class="n">ext_hex</span> <span class="o">=</span> <span class="nb">sorted</span><span class="p">([</span><span class="sa">f</span><span class="s">"</span><span class="si">{</span><span class="n">e</span><span class="si">:</span><span class="mi">04</span><span class="n">x</span><span class="si">}</span><span class="s">"</span> <span class="k">for</span> <span class="n">e</span> <span class="ow">in</span> <span class="n">extensions</span><span class="p">])</span>
    <span class="n">ext_string</span> <span class="o">=</span> <span class="s">","</span><span class="p">.</span><span class="n">join</span><span class="p">(</span><span class="n">ext_hex</span><span class="p">)</span>
    <span class="n">sig_algs</span> <span class="o">=</span> <span class="p">[</span><span class="sa">f</span><span class="s">"</span><span class="si">{</span><span class="n">s</span><span class="si">:</span><span class="mi">04</span><span class="n">x</span><span class="si">}</span><span class="s">"</span> <span class="k">for</span> <span class="n">s</span> <span class="ow">in</span> <span class="n">hello</span><span class="p">.</span><span class="n">signature_algorithms</span><span class="p">]</span>
    <span class="n">sig_string</span> <span class="o">=</span> <span class="s">","</span><span class="p">.</span><span class="n">join</span><span class="p">(</span><span class="n">sig_algs</span><span class="p">)</span>
    <span class="n">combined</span> <span class="o">=</span> <span class="sa">f</span><span class="s">"</span><span class="si">{</span><span class="n">ext_string</span><span class="si">}</span><span class="s">_</span><span class="si">{</span><span class="n">sig_string</span><span class="si">}</span><span class="s">"</span>
    <span class="k">return</span> <span class="n">hashlib</span><span class="p">.</span><span class="n">sha256</span><span class="p">(</span><span class="n">combined</span><span class="p">.</span><span class="n">encode</span><span class="p">()).</span><span class="n">hexdigest</span><span class="p">()[:</span><span class="mi">12</span><span class="p">]</span>
</code></pre></div></div>

<p>Run <code class="language-plaintext highlighter-rouge">python ja4_fingerprint_demo.py</code> to see the full output with three simulated clients — Chrome, Python requests, and a minimal malware implementation. The difference is immediately visible.</p>

<p>For production use, see <a href="https://github.com/FoxIO-LLC/ja4">FoxIO’s official JA4+ implementation</a> which handles the full spec including edge cases around QUIC, raw packet parsing, and integration with common network tools.</p>

<h2 id="real-world-security-use-cases">Real-World Security Use Cases</h2>

<p><strong>Bot detection.</strong> This is one use case where JA4 is effective. A credential-stuffing bot sets its User-Agent to <code class="language-plaintext highlighter-rouge">Mozilla/5.0 (Windows NT 10.0; Win64; x64) AppleWebKit/537.36...</code> — identical to Chrome. But it’s written in Go using a standard <code class="language-plaintext highlighter-rouge">net/http</code> client. Its JA4 fingerprint reveals TLS 1.2, 9 cipher suites, no ALPN. Chrome hasn’t looked like that since 2019. Blocked.</p>

<p><strong>Malware hunting.</strong> Command-and-control frameworks leave distinctive fingerprints. Cobalt Strike’s default HTTPS beacon, Metasploit’s Meterpreter, Sliver, BruteRatel — they all use specific TLS libraries with specific defaults. Security teams publish known-bad JA4 fingerprints the same way they publish known-bad IP addresses, except fingerprints are harder for attackers to rotate.</p>

<p><strong>API protection.</strong> Your mobile app uses certificate pinning and a specific HTTP client. You know its JA4 fingerprint. When someone reverse-engineers your API and makes calls from a Python script using stolen tokens, the fingerprint mismatch gives them away — even if every other header is perfect.</p>

<p><strong>WAF enhancement.</strong> JA4 rules complement traditional signatures. A request might pass every content-based rule but get flagged because no legitimate client produces that fingerprint for that endpoint. The <a href="https://ja4db.com">ja4db.com</a> database catalogs fingerprints for known applications, making rule authoring straightforward.</p>

<h2 id="limitations-and-considerations">Limitations and Considerations</h2>

<p>JA4 isn’t a silver bullet. Sophisticated attackers using <strong>headless Chrome or patched browsers</strong> produce legitimate-looking fingerprints because they <em>are</em> legitimate browsers — just automated ones. Fingerprinting catches the gap between what traffic claims to be and what it is, but when the traffic genuinely is what it claims to be (just automated), you need behavioral analysis on top.</p>

<p>There are <strong>privacy</strong> implications. The same properties that let you fingerprint bots let you fingerprint users. JA4 is less granular than canvas fingerprinting or font enumeration, but it still contributes to a trackable identity. Use it for security, not surveillance.</p>

<p>Encrypted <strong>Client Hello (ECH)</strong>, currently in draft, will eventually encrypt the ClientHello contents. When ECH reaches widespread adoption, passive fingerprinting becomes harder. Active fingerprinting techniques and server-side analysis will matter more.</p>

<p>JA4 works best as one signal in an ensemble — combined with behavioral analysis, rate limiting, device fingerprinting, and challenge-response mechanisms.</p>

<h2 id="getting-started">Getting Started</h2>

<p>JA4 is already integrated into tools you probably run:</p>

<ul>
  <li><strong>Zeek</strong> — native JA4 support via package</li>
  <li><strong>Suricata</strong> — JA4 keywords in rules</li>
  <li><strong>Wireshark</strong> — JA4 column available in recent versions</li>
  <li><strong>Cloudflare, AWS WAF, Fastly</strong> — various levels of JA4 support in CDN/WAF products</li>
</ul>

<p>For the fastest path to value: start with JA4, the TLS fingerprint, to identify what each client actually is at the handshake layer. Then combine JA4 with JA4H (HTTP fingerprint) for deeper coverage — TLS-layer identity plus HTTP-layer behavior together catches the widest range of automated traffic with minimal false positives.</p>

<p>FoxIO maintains the <a href="https://github.com/FoxIO-LLC/ja4">open-source reference implementation</a> with libraries for multiple languages and integration guides for common platforms.</p>

<p>Try it on your own traffic. Capture a few minutes of TLS sessions, compute the JA4 fingerprints, and see how many distinct client types appear. You’ll likely find that 80% of your traffic produces fewer than 10 unique fingerprints — and anything outside that set deserves a closer look.</p>

<hr />

<p><em>The naming analogy in this post is inspired by the traditional naming conventions of the people of Kerala, India.  Their system that achieved unique identification through layered context long before centralized identity systems existed. Credit and gratitude to the Malayali community for a cultural practice that elegantly illustrates how composite identifiers work.</em></p>]]></content><author><name>Ramesh Rajan</name><email>info@rameshrajan.info</email></author><category term="cloud" /><category term="security" /><category term="security" /><summary type="html"><![CDATA[How do you catch a Bot that looks exactly like Chrome. Same User-Agent. Same cookies. Same headers. Residential IPs. Human-like request intervals. You stop looking at what it says. You look at how it introduces itself.]]></summary></entry><entry><title type="html">What recent military conflicts teach us about Kinetic Resilience</title><link href="https://r2rajan.github.io/cloud/security/2026/05/13/Physicalhardening/" rel="alternate" type="text/html" title="What recent military conflicts teach us about Kinetic Resilience" /><published>2026-05-13T00:00:00+00:00</published><updated>2026-05-13T00:00:00+00:00</updated><id>https://r2rajan.github.io/cloud/security/2026/05/13/Physicalhardening</id><content type="html" xml:base="https://r2rajan.github.io/cloud/security/2026/05/13/Physicalhardening/"><![CDATA[<h1 id="what-recent-military-conflicts-teach-us-about-kinetic-resilience">What recent military conflicts teach us about kinetic resilience</h1>

<hr />

<p>I have always been drawn to military history. The strategies, the engineering, the way wars force innovation at a pace that peacetime never does. From Alexander to the <a href="https://en.wikipedia.org/wiki/Bernard_Montgomery">General Bernard Montgomery</a>, I find myself reading about how leaders and armies adapted to new threats in real time. So when the conflict in Ukraine began reshaping land warfare in Europe, I followed it closely. Not the politics of it, but the engineering of it. Specifically, how aerial threats have rendered the Main Battle Tank, a platform that dominated land warfare for a century, vulnerable in ways its designers never anticipated.</p>

<p>The Leopard 2, the T-90, the Challenger, the M1 Abrams are some of the best of the breed Main Battle Tanks. It does not matter whose flag was painted on the hull. A first-person-view drone costing a few hundred dollars, piloted by a soldier with a headset and a gaming controller, can disable or even destroy a sixty-tonne machine worth several million. The threat comes from above. The armour was designed for the front and the sides.</p>

<p>What fascinated me was the response and not the destruction. Crews in the field, with limited resources and no time, began improvising defences. Welded metal cages on turret roofs. Netting draped over vehicles. Electronic jammers strapped to hulls. These were not elegant solutions. They were born of necessity, built from whatever was available, and they worked well enough to keep crews alive and protect their equipment.</p>

<p>Then in March 2026, military strikes damaged cloud data centre facilities in the Middle East for the first time. The threat I had been watching on the battlefield had arrived at the doorstep of digital infrastructure. In my<a href="https://r2rajan.github.io/cloud/security/2026/05/02/KineticResilience/">previous post</a>, I explored how to architect workloads to survive the loss of a facility. But that post deliberately left one question underexplored. Can the battlefield improvisations, be adapted to add a layer of physical protection to data centre itself?</p>

<p>This post is my attempt to answer that question. I lean more on curiosity and creative thinking than hard facts or core engineering. Consider this post as a thought experiment, not a technical specification.</p>

<hr />

<h2 id="the-roof-nobody-thought-about">The Roof Nobody Thought About</h2>

<p>Data centre physical security is a mature discipline. Perimeter fencing with anti-climb measures. Vehicle bollards rated to stop a lorry at speed. Mantraps with biometric authentication. Security operations centres monitoring every door and corridor. Access control systems that would make a bank vault envious. All of these measures were focused on the ground.</p>

<p>The roof, by contrast, is where the HVAC systems sit. Where the skylights are. Where the cable trays run. It is protected against weather, against water ingress, against the occasional bird strike. It is not protected against a deliberate aerial threat.</p>

<p>This was perfectly reasonable for decades. The threat model for a data centre did not include someone flying an explosive device into the roof at 120 kilometres per hour. That threat model has now changed. The Ukraine conflict demonstrated that small, inexpensive drones can deliver shaped charges with precision. The recent conflict in middle-east on cloud infrastructure confirmed that data centres are real targets.</p>

<hr />

<h2 id="lessons-from-the-battlefield">Lessons from the Battlefield</h2>

<p>The soldiers in Ukraine did not have the luxury of waiting for a perfect solution. They needed something that worked today, built from materials they could source this week. The data centre industry has more time and more resources, but the engineering principles are the same.</p>

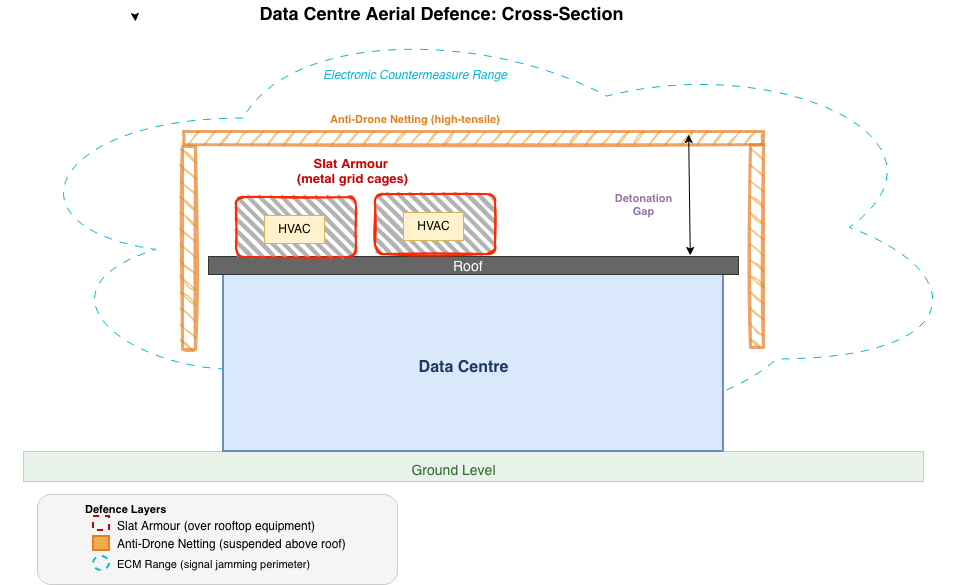
<p><img src="/assets/images/20260513/datacenter.png" alt="Data center Physical Hardening" /></p>

<h3 id="netting-as-a-first-line-of-defence">Netting as a First Line of Defence</h3>

<p>In Izyum, in northeastern Ukraine, high-tensile netting is suspended over civilian infrastructure to protect against daily FPV drone attacks. The nets serve three functions. They physically trap incoming drones, entangling rotors and arresting forward motion. They can detonate a drone’s payload at a safe distance above the roof surface, dissipating the blast energy before it reaches the structure. And they create uncertainty for the drone operator, who cannot be certain whether the payload will reach the intended target.</p>

<p>For a data centre, the same principle applies. Netting suspended above the roofline, at sufficient height to create a detonation gap, provides a passive defence layer that requires no power, no operator, and no maintenance beyond periodic inspection. It does not stop every threat. But it raises the difficulty and reduces the probability of a clean strike.</p>

<h3 id="slat-armour-for-critical-rooftop-equipment">Slat Armour for Critical Rooftop Equipment</h3>

<p>Tank crews in Ukraine weld rigid metal grids, known as cope cages or slat armour, to their turret roofs. The engineering is straightforward. A shaped charge warhead, the type carried by most FPV drones, requires a specific standoff distance to form its penetrating jet. A metal grid detonates the warhead prematurely, before it reaches the optimal standoff distance, causing the jet to disperse rather than penetrate.</p>

<p>Data centre roofs have specific vulnerable points. HVAC units, skylights, cable penetrations, and exhaust vents. These are the points where a shaped charge could breach the roof envelope and damage equipment below. Rigid metal grids installed over these points replicate the cope cage principle. They do not make the equipment invulnerable. They make a successful penetration far less likely.</p>

<h3 id="electronic-countermeasures">Electronic Countermeasures</h3>

<p>The third layer is electronic. FPV drones rely on a radio link between the operator and the aircraft. Disrupt that link and the drone becomes uncontrollable. It either crashes, flies off course, or enters a failsafe mode that takes it away from the target.</p>

<p>Electronic warfare systems that emit interference across the frequency bands used by commercial and military drones are already deployed on vehicles in the Ukraine conflict. They create a protective bubble within which drone control signals cannot reach the aircraft.</p>

<p>For data centres, the challenge is specificity. A facility that jams drone control frequencies indiscriminately will also disrupt its own wireless networks, cellular connectivity, and potentially GPS-dependent systems. The implementation requires directional emission, careful frequency selection, and coordination with telecommunications regulators. It is not a simple installation. But the technology exists and is proven in the field.</p>

<h3 id="visual-obscuration">Visual Obscuration</h3>

<p>The simplest and cheapest measure is making the target harder to find and identify. FPV drone operators navigate visually. They identify the target through a camera feed, often at speed, and guide the drone to a specific point on the structure.</p>

<p>Reflective netting, camouflage patterns, and visual disruption materials on rooftops interfere with this process. They do not make the building invisible. They make it harder to identify the precise aim point, which reduces the accuracy of a manual strike. Against autonomous drones that navigate by GPS coordinates rather than visual identification, this measure is less effective. Against the manually piloted FPV drones that constitute the majority of the current threat, it adds a meaningful layer of difficulty.</p>

<hr />

<h2 id="conclusion-the-cope-cage-is-not-the-strategy">Conclusion: The Cope Cage is Not the Strategy</h2>

<p>If you think any of these measures, would make the datacenter completely invulnerable to an aerial threat, then you are living in a mirage. A determined adversary with sufficient resources will find a way through netting, past jammers, and around camouflage.</p>

<p>The soldiers in Ukraine understood this. The cope cage on a tank is not a guarantee of survival. It is a way to improve the odds. It buys time. It turns a certain kill into a probable miss. It keeps the crew alive long enough to reach cover or for the electronic countermeasures to take effect.</p>

<p><img src="/assets/images/20260513/iceberg.png" alt="Iceberg Model" /></p>

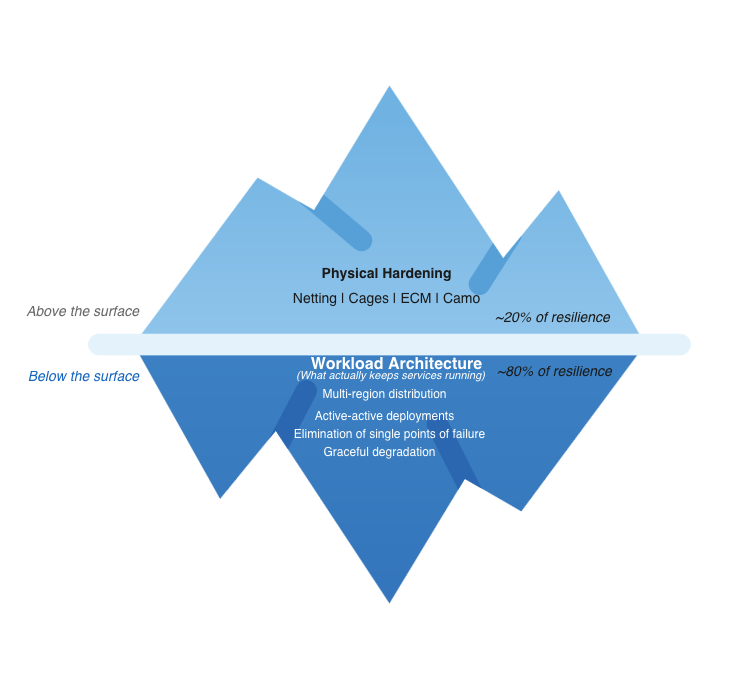
<p>The same logic applies to data centres. Physical hardening is not a strategy in itself. It is one layer in a defence that must also include architectural resilience at the workload level.  The netting buys you time at the roof level. The cages keep the HVAC running a bit longer. The jammers might stop the drone before it arrives at all. But none of them guarantee the building survives, which is why the workload architecture underneath matters more than any of them.</p>

<h2 id="harden-the-facility-to-improve-the-odds-architect-the-workload-to-survive-regardless"><strong>Harden the facility to improve the odds. Architect the workload to survive regardless.</strong></h2>

<h2 id="after-thoughts">After Thoughts</h2>

<p>The data centre industry has not yet had its “cope cage moment.” The improvised, field driven solutions that emerged in Ukraine were born out of immediate necessity. Data centre operators have the advantage of time, resources, and engineering rigour. They can design these defences properly rather than welding them together under fire.</p>

<p>But the window for preparation is not unlimited. The threat has moved from theoretical to demonstrated. The engineering principles are proven. The materials and technologies exist. What remains is the decision to act.</p>

<p>The roof deserves the same attention we have given the perimeter. The sky is no longer empty and will no longer be considered safe based on land borders.</p>

<hr />]]></content><author><name>Ramesh Rajan</name><email>info@rameshrajan.info</email></author><category term="cloud" /><category term="security" /><category term="security" /><summary type="html"><![CDATA[Traditional data center resilience assumes the building survives. Kinetic resilience assumes it does not. Kinetic resilience shifts the unit of survival from the facility to the workload, using geographic distribution, elimination of single points of failure, graceful degradation, and physical hardening to ensure services continue even when the building does not]]></summary></entry><entry><title type="html">Part-3: Who are you? How client Registration works in the Agentic World</title><link href="https://r2rajan.github.io/agentic%20identity/ai/2026/05/10/Whoareyou/" rel="alternate" type="text/html" title="Part-3: Who are you? How client Registration works in the Agentic World" /><published>2026-05-10T00:00:00+00:00</published><updated>2026-05-10T00:00:00+00:00</updated><id>https://r2rajan.github.io/agentic%20identity/ai/2026/05/10/Whoareyou</id><content type="html" xml:base="https://r2rajan.github.io/agentic%20identity/ai/2026/05/10/Whoareyou/"><![CDATA[<h1 id="part-3-who-are-you-how-client-registration-works-in-the-agentic-world">Part-3: Who Are You? How Client Registration works in the Agentic World</h1>

<p>Everytime i go to Las Vegas for attending technology conferences, I am always worried about the soul-crushing, velvet-rope maze at the hotel front desk where you stand for forty minutes to register and prove your identity to get that plastic key card.</p>

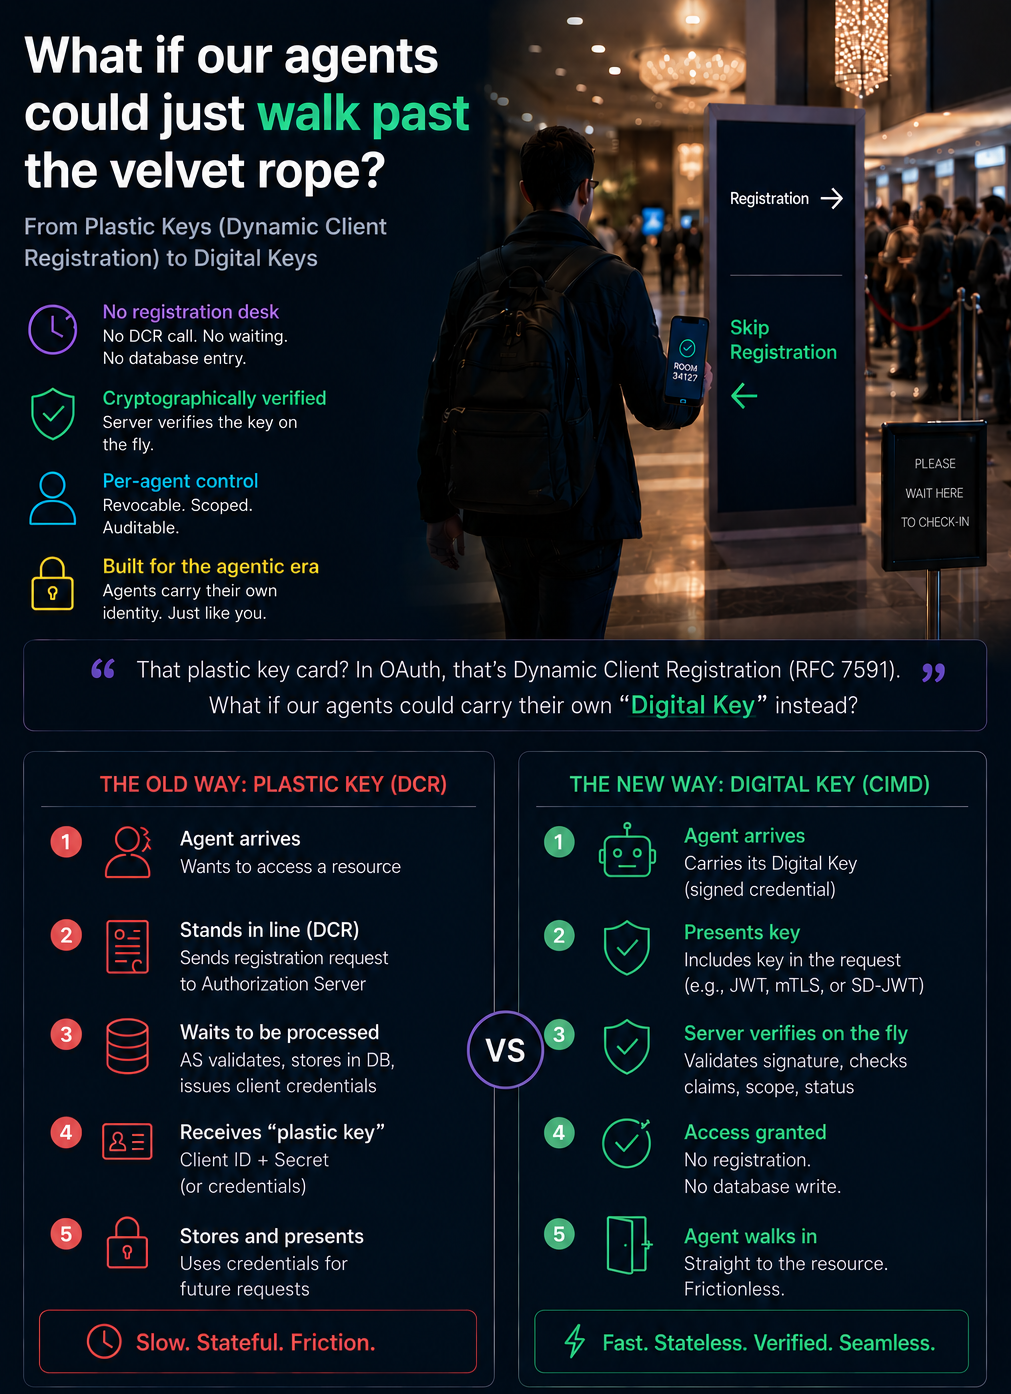
<p>Recently, I landed in Las Vegas in December 2025 to speak at AWS’s flagship conference <strong>re:invent</strong>. With over 50,000 in-person attendees descending on the city in a single week, this time as I walked into the lobby <strong>and</strong> I didn’t stop. While a sea of people stood in line to <strong>register</strong> by handing over IDs, waiting for the front desk to manually type data into a database, and receive a piece of plastic, I kept moving. My room was assigned, my identity was verified, and my phone was already a functioning key. I bypassed the <strong>front desk</strong> entirely and went straight to my room. It was a frictionless experience.</p>

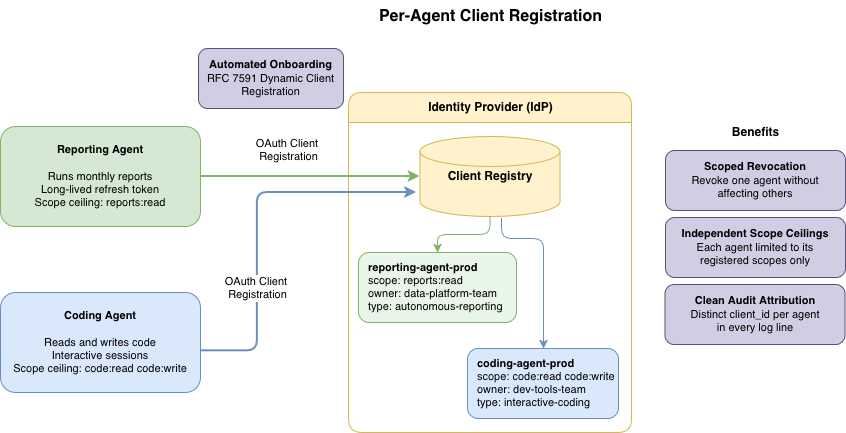
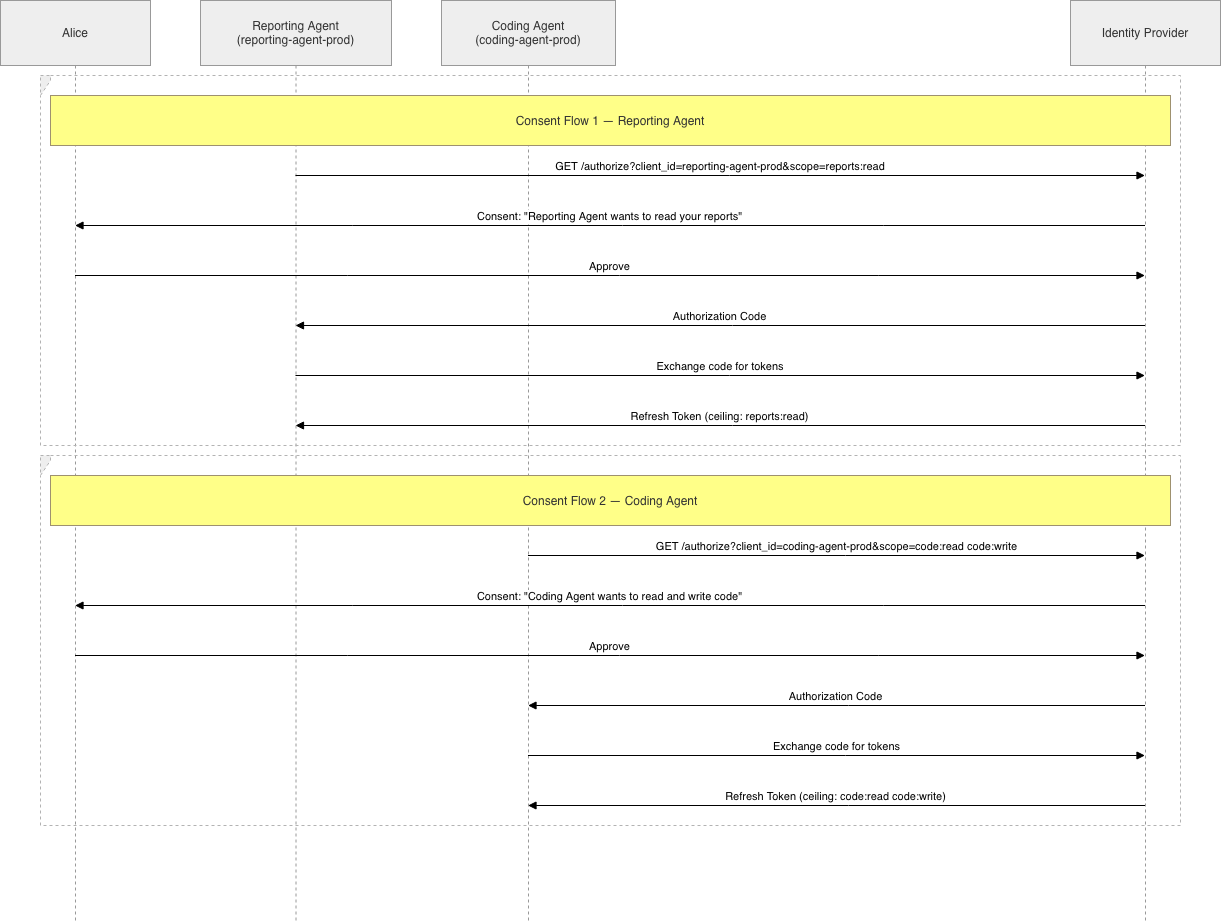
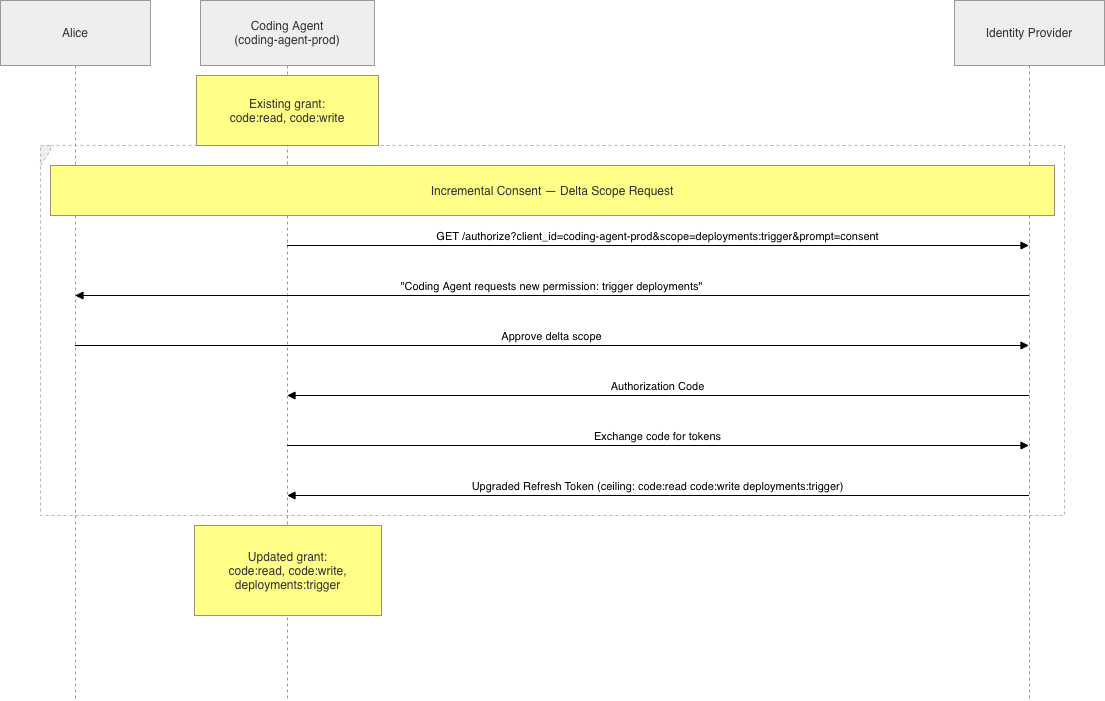
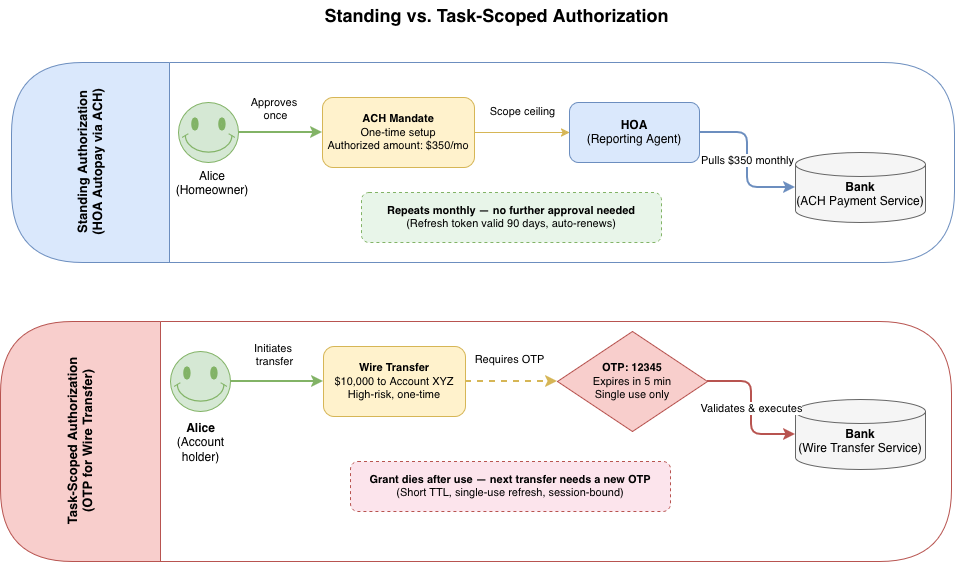
<p>That plastic key card, in the world of OAuth, we call it Dynamic Client Registration (DCR). We’ve spent years getting applications to stand in that same “front desk” line, registering with an authorization server, waiting for credentials, storing them in a database. In my <a href="https://r2rajan.github.io/agentic%20identity/ai/2026/04/21/Whosaidyes/">previous post</a>, I walked through how Alice grants consent to individual agents using exactly this model. Each agent registers as its own OAuth client via DCR (RFC 7591), getting per-agent revocation, independent scope ceilings, and clean audit trails.</p>

<p>But what if our agents could just walk past the velvet rope? What if they could carry their own <strong>Digital Key</strong> that a server could verify on the fly? No registration desk, no waiting, no database entry.</p>

<p><img src="/assets/images/20260510/Intro.png" alt="Introduction" /></p>

<p>That’s the promise of Client ID Metadata Documents (CIMD). This post breaks down both models, when each applies, and how they work in the agentic world.</p>

<h2 id="the-registration-problem-in-agentic-systems">The Registration Problem in Agentic Systems</h2>

<p>Traditional OAuth assumes a small, known set of clients registered with a small, known set of authorization servers. An admin creates a client in the IdP dashboard, copies the <code class="language-plaintext highlighter-rouge">client_id</code> and <code class="language-plaintext highlighter-rouge">client_secret</code>, and hardcodes them into the app config.</p>

<p>Agents break this assumption in two directions:</p>

<p><strong>Agent-side explosion.</strong> An enterprise might deploy dozens of agents (reporting-agent, coding-agent, deployment-agent), each needing its own identity. Manual registration doesn’t scale.</p>

<p><strong>Server-side explosion.</strong> In MCP, a single agent might connect to hundreds of tool servers. If each server requires separate registration, the agent needs hundreds of <code class="language-plaintext highlighter-rouge">client_id</code> values, one per server.</p>

<p>DCR and CIMD each address one side of this problem.</p>

<h2 id="dynamic-client-registration-dcr-the-server-managed-model">Dynamic Client Registration (DCR): The Server-Managed Model</h2>

<p>DCR (RFC 7591) lets a client programmatically register with an authorization server by POSTing its metadata to a <code class="language-plaintext highlighter-rouge">/register</code> endpoint. The server validates, stores the registration, and returns credentials.</p>

<div class="language-plaintext highlighter-rouge"><div class="highlight"><pre class="highlight"><code>POST /register HTTP/1.1
Content-Type: application/json

{
  "client_name": "Reporting Agent",
  "redirect_uris": ["https://agents.example.com/callback"],
  "grant_types": ["authorization_code", "refresh_token"],
  "scope": "reports:read",
  "agent_metadata": {
    "owner": "data-platform-team",
    "agent_type": "autonomous-reporting",
    "capability_version": "2.3.0"
  }
}
</code></pre></div></div>

<p>The server responds with a unique <code class="language-plaintext highlighter-rouge">client_id</code> and (for confidential clients) a <code class="language-plaintext highlighter-rouge">client_secret</code>. From that point forward, the agent authenticates using those credentials.</p>

<h3 id="why-dcr-works-for-agent-fleets">Why DCR Works for Agent Fleets</h3>

<p>In my <a href="https://r2rajan.github.io/agentic%20identity/ai/2026/04/21/Whosaidyes/">previous post</a>, I made the case for per-agent registration: automated onboarding, scoped revocation, independent scope ceilings, and clean audit attribution. DCR makes all of that practical. Each agent gets its own <code class="language-plaintext highlighter-rouge">client_id</code>, its own scope ceiling, and its own entry in the registry that doubles as your source of truth for what agents exist and who owns them.</p>

<h3 id="where-dcr-breaks-down">Where DCR Breaks Down</h3>

<p>DCR was designed for a world where the number of clients is bounded and the authorization server is a known entity. In the world of agents and open ecosystems, three problems emerge:</p>

<p><strong>Unbounded database growth.</strong> If 10,000 users each run the same coding-agent, that’s 10,000 registrations for what is logically one application.</p>

<p><strong>The open endpoint problem.</strong> The <code class="language-plaintext highlighter-rouge">/register</code> endpoint must be accessible to unauthenticated clients. This makes it a target for DDoS attacks and registration flooding.</p>

<p><strong>N × M coordination.</strong> If an agent connects to M different MCP servers, each with its own AS, it needs M separate registrations. This is the “registration wall” that blocks agent-to-server connectivity.</p>

<p>To make matters worse, many identity providers (Entra ID, some Okta configurations) don’t expose a public DCR endpoint or require a pre-provisioned API key to access the registration_endpoint. Teams end up building OAuth proxy infrastructure just to work around this.</p>

<h2 id="client-id-metadata-documents-cimd-the-client-hosted-model">Client ID Metadata Documents (CIMD): The Client-Hosted Model</h2>

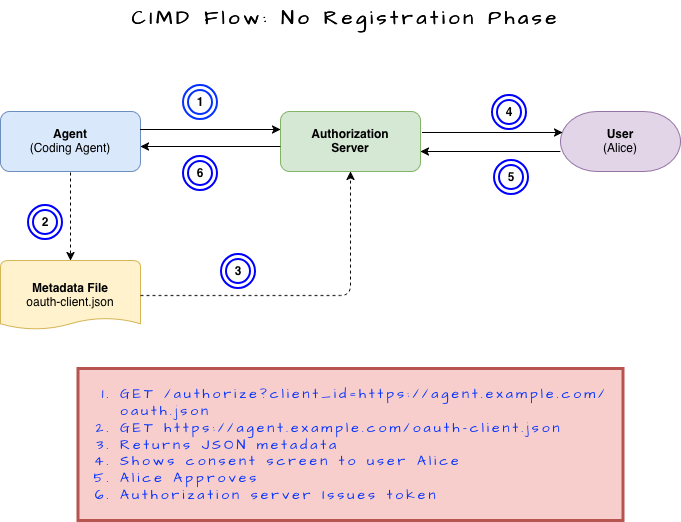
<p>CIMD flips the registration model entirely. Instead of the client registering <strong>with</strong> the authorization server (AS), the client hosts its own identity document <em>for</em> the AS to fetch.</p>

<p><img src="/assets/images/20260510/cimdflow.png" alt="cimdflow" /></p>

<p>The <code class="language-plaintext highlighter-rouge">client_id</code> is an HTTPS URL. The authorization server fetches that URL, reads the JSON metadata, and validates it on demand.</p>

<div class="language-json highlighter-rouge"><div class="highlight"><pre class="highlight"><code><span class="p">{</span><span class="w">
  </span><span class="nl">"client_id"</span><span class="p">:</span><span class="w"> </span><span class="s2">"https://coding-agent.example.com/.well-known/oauth-client.json"</span><span class="p">,</span><span class="w">
  </span><span class="nl">"client_name"</span><span class="p">:</span><span class="w"> </span><span class="s2">"Coding Agent"</span><span class="p">,</span><span class="w">
  </span><span class="nl">"redirect_uris"</span><span class="p">:</span><span class="w"> </span><span class="p">[</span><span class="w">
    </span><span class="s2">"https://coding-agent.example.com/callback"</span><span class="p">,</span><span class="w">
    </span><span class="s2">"http://localhost:3000/callback"</span><span class="w">
  </span><span class="p">],</span><span class="w">
  </span><span class="nl">"grant_types"</span><span class="p">:</span><span class="w"> </span><span class="p">[</span><span class="s2">"authorization_code"</span><span class="p">],</span><span class="w">
  </span><span class="nl">"response_types"</span><span class="p">:</span><span class="w"> </span><span class="p">[</span><span class="s2">"code"</span><span class="p">],</span><span class="w">
  </span><span class="nl">"token_endpoint_auth_method"</span><span class="p">:</span><span class="w"> </span><span class="s2">"none"</span><span class="w">
</span><span class="p">}</span><span class="w">
</span></code></pre></div></div>

<p>The agent hosts this file. Any MCP server that supports CIMD can fetch it, validate it, and proceed with the OAuth flow.</p>

<h3 id="the-cimd-flow">The CIMD Flow</h3>

<div class="language-plaintext highlighter-rouge"><div class="highlight"><pre class="highlight"><code>1. Agent sends authorization request with client_id = https://coding-agent.example.com/.well-known/oauth-client.json
2. AS fetches that URL via HTTP GET
3. AS validates: client_id in JSON matches the URL, redirect_uris are consistent
4. AS shows consent screen using client_name and logo_uri from the metadata
5. AS caches the metadata (respecting HTTP cache headers)
6. OAuth flow proceeds normally
</code></pre></div></div>

<p>No registration phase and importantly there are no credentials. The AS verifies identity by confirming the agent controls the domain where the metadata lives.</p>

<h3 id="how-cimd-prevents-impersonation">How CIMD Prevents Impersonation</h3>

<p>The obvious question is what stops a malicious agent at <code class="language-plaintext highlighter-rouge">evil.com</code> from claiming to be <code class="language-plaintext highlighter-rouge">coding-agent.example.com</code>?</p>

<p>The answer is <strong>redirect_uri validation</strong>. The attacker sends an authorization request using the legitimate agent’s <code class="language-plaintext highlighter-rouge">client_id</code> URL but includes their own <code class="language-plaintext highlighter-rouge">redirect_uri</code> (<code class="language-plaintext highlighter-rouge">https://evil.com/callback</code>). The AS fetches the metadata from <code class="language-plaintext highlighter-rouge">coding-agent.example.com</code>, reads the <code class="language-plaintext highlighter-rouge">redirect_uris</code> list, and sees that <code class="language-plaintext highlighter-rouge">evil.com</code> isn’t in it. Request denied.</p>

<p>The attacker can’t modify the metadata file because they don’t control <code class="language-plaintext highlighter-rouge">coding-agent.example.com</code>. Domain ownership <em>is</em> the identity proof.</p>

<h3 id="confidential-clients-with-cimd">Confidential Clients with CIMD</h3>

<p>DCR gives confidential clients a <code class="language-plaintext highlighter-rouge">client_secret</code> from the server. CIMD takes a different approach: the client proves identity using its own private key.</p>

<div class="language-json highlighter-rouge"><div class="highlight"><pre class="highlight"><code><span class="p">{</span><span class="w">
  </span><span class="nl">"client_id"</span><span class="p">:</span><span class="w"> </span><span class="s2">"https://coding-agent.example.com/.well-known/oauth-client.json"</span><span class="p">,</span><span class="w">
  </span><span class="nl">"client_name"</span><span class="p">:</span><span class="w"> </span><span class="s2">"Coding Agent"</span><span class="p">,</span><span class="w">
  </span><span class="nl">"redirect_uris"</span><span class="p">:</span><span class="w"> </span><span class="p">[</span><span class="s2">"https://coding-agent.example.com/callback"</span><span class="p">],</span><span class="w">
  </span><span class="nl">"token_endpoint_auth_method"</span><span class="p">:</span><span class="w"> </span><span class="s2">"private_key_jwt"</span><span class="p">,</span><span class="w">
  </span><span class="nl">"jwks_uri"</span><span class="p">:</span><span class="w"> </span><span class="s2">"https://coding-agent.example.com/.well-known/jwks.json"</span><span class="w">
</span><span class="p">}</span><span class="w">
</span></code></pre></div></div>

<p>When the agent authenticates at the token endpoint, it signs a JWT with its private key. The AS fetches the public key from <code class="language-plaintext highlighter-rouge">jwks_uri</code> and verifies the signature. No shared secret required.</p>

<h2 id="when-to-use-dcr-for-agents">When to Use DCR for Agents?</h2>

<p>DCR earns its complexity in one specific scenario: you own the authorization server and you need per-instance control over your agent fleet.</p>

<p>If you’re running an enterprise where security teams need to revoke a single compromised agent without touching the rest, DCR is your tool. If compliance requires a registry of every authorized agent with its owner, permission history, and lifecycle state, DCR gives you that registry as a byproduct of registration.</p>

<p>The concrete cases:</p>

<ul>
  <li>You need the AS to enforce scope ceilings at registration time. Reporting-agent caps at <code class="language-plaintext highlighter-rouge">reports:read</code>. Coding-agent gets <code class="language-plaintext highlighter-rouge">code:read code:write</code>. The ceiling is set before the user ever sees a consent screen.</li>
  <li>Your agents evolve. Coding-agent ships a new capability next quarter that requires <code class="language-plaintext highlighter-rouge">deployments:trigger</code>. You want the AS to track that scope escalation and force re-consent. DCR’s registration record gives you the audit trail.</li>
  <li>An agent gets compromised at 2am. You revoke its <code class="language-plaintext highlighter-rouge">client_id</code> and every token tied to it dies immediately. The other 15 agents in your fleet keep running.</li>
</ul>

<p>The pattern: DCR works when the number of agents is bounded, the AS is a known entity you control, and governance matters more than onboarding speed.</p>

<h2 id="when-cimd-is-useful">When CIMD is useful?</h2>

<p>For most agent-to-server connections in the MCP world, CIMD should be your default and the reason is that your agent will connect to servers it has never seen before. If each connection requires a registration step, you’ve built a toll booth on every on-ramp. CIMD removes the toll booth.</p>

<p>Where it shines:</p>

<ul>
  <li>Your agent connects to 20+ external MCP servers (GitHub tools, Slack tools, monitoring APIs). One metadata file at <code class="language-plaintext highlighter-rouge">https://your-agent.com/oauth.json</code> works for all of them. No per-server credentials to manage.</li>
  <li>You ship an IDE extension or CLI tool used by 10,000 developers. With DCR, that’s 10,000 registrations in every server’s database. With CIMD, it’s one URL.</li>
  <li>You want new server connections to work the moment a user clicks “connect.” No admin tickets, no API keys, no waiting for IT to provision a client.</li>
</ul>

<p>In short, if your agent needs to talk to servers you don’t control, CIMD is the path of least resistance.</p>

<h2 id="the-hybrid-model-dcr-internally-cimd-externally">The Hybrid Model: DCR Internally, CIMD Externally</h2>

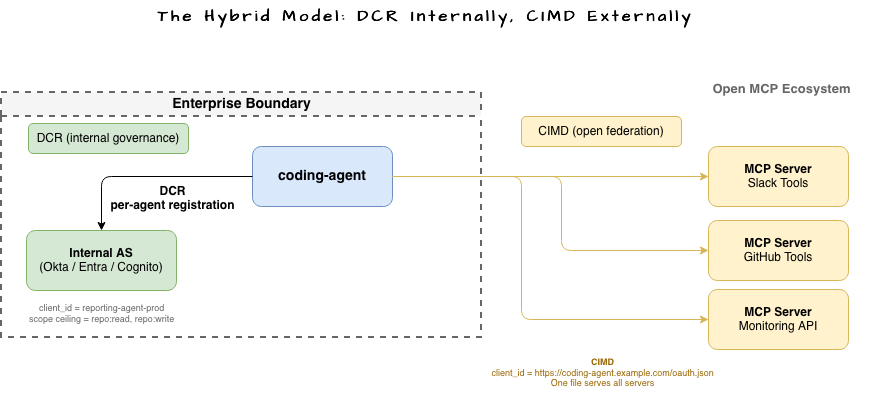
<p>These two models aren’t mutually exclusive. They solve different problems at different layers. Now consider this architecture where both DCR and CIMD work together to solve different problems.</p>

<p><img src="/assets/images/20260510/hybrid.png" alt="HybridDCRandCIMD" /></p>

<p><strong>Internally:</strong> coding-agent registers via DCR with your enterprise AS. It gets a unique <code class="language-plaintext highlighter-rouge">client_id</code>, scope ceilings, and all the governance benefits. Alice’s consent is managed through the patterns from my previous post,  standing authorization for routine work, task-scoped grants for sensitive operations.</p>

<p><strong>Externally:</strong> When coding-agent needs to connect to an external MCP server (GitHub tools, Slack tools, third-party APIs), it presents its CIMD. No registration required. The external server fetches the metadata, validates the domain, and proceeds.</p>

<p>The agent holds two identities:</p>
<ul>
  <li>An internal DCR-issued <code class="language-plaintext highlighter-rouge">client_id</code> for enterprise governance</li>
  <li>A CIMD URL for open federation</li>
</ul>

<p>This gives you governance internally and speed externally</p>

<h2 id="security-trade-offs">Security Trade-offs</h2>

<p>Let’s understanad the security threat surface of each model to help you make informed decisions.</p>

<h3 id="dcr-risks">DCR Risks</h3>

<p>DCR’s biggest exposure is the <code class="language-plaintext highlighter-rouge">/register</code> endpoint itself. It’s open by design, which means an attacker can flood it with junk registrations until your AS database chokes. Rate limiting and requiring initial access tokens help, but you’re still defending an open door. Beyond flooding, there’s impersonation: nothing stops an attacker from registering with <code class="language-plaintext highlighter-rouge">client_name: "Official Coding Agent"</code> and tricking users on the consent screen. Software statements can mitigate this, but few teams implement them today. And then there’s the long tail problem. Agents get decommissioned, teams move on, but the registrations stay in the database. Without TTLs or periodic cleanup, you accumulate dead entries that bloat storage and complicate audits.</p>

<h3 id="cimd-risks">CIMD Risks</h3>

<p>CIMD trades the open registration endpoint for a different risk: your AS now fetches URLs from strangers. A malicious client could submit <code class="language-plaintext highlighter-rouge">https://169.254.169.254/</code> as its <code class="language-plaintext highlighter-rouge">client_id</code> and trick your AS into hitting internal infrastructure. You need a hardened fetcher that blocks private IP ranges, enforces timeouts, and caps response size. The localhost problem is subtler: if a client claims <code class="language-plaintext highlighter-rouge">http://localhost:1234</code> as its identity, the AS can’t verify which application is actually listening on that port. In production, restrict CIMD to non-localhost HTTPS URLs. Finally, domain ownership proves identity but not intent. Anyone can register <code class="language-plaintext highlighter-rouge">my-evil-agent.io</code> and host valid metadata there. The AS knows <em>who</em> is asking, but not whether they should be <strong>trusted</strong>. Trust policies, warning messages for unknown domains, and eventually Software Statements are the path forward here.</p>

<h2 id="whats-next-software-statements-and-platform-attestation">What’s Next: Software Statements and Platform Attestation</h2>

<p>Both DCR and CIMD have a gap: neither proves the agent is <em>who it claims to be</em> beyond domain ownership or registration-time trust.</p>

<p>The emerging answer is <strong>Software Statements</strong> (defined in RFC 7591 §2.3). These are signed JWTs issued by a trusted third party (an app store, an OS vendor, a corporate registry) that attest to the agent’s identity.</p>

<ol>
  <li>coding-agent hosts its CIMD at <code class="language-plaintext highlighter-rouge">https://coding-agent.example.com/oauth.json</code></li>
  <li>The metadata includes a <code class="language-plaintext highlighter-rouge">software_statement</code>, a JWT signed by your enterprise’s agent registry</li>
  <li>The external MCP server validates the statement against the registry’s public key</li>
  <li>Trust is established not just by domain ownership, but by a verifiable chain of attestation</li>
</ol>

<p>This bridges the gap between CIMD’s scalability and DCR’s trust guarantees. The agent gets frictionless connectivity <em>and</em> verifiable identity.</p>

<h2 id="conclusion">Conclusion</h2>

<p>DCR and CIMD aren’t competitors. They answer different questions at different trust boundaries. DCR answers “should this agent be allowed to exist in my system?” CIMD answers “how does this agent introduce itself to a server it’s never met?”</p>

<p>Use DCR inside your enterprise where you need the AS to gatekeep. Use CIMD at the edges where your agents meet the open world. Most teams will end up running both.</p>

<p>The consent patterns from my <a href="https://r2rajan.github.io/agentic%20identity/ai/2026/04/21/Whosaidyes/">previous post</a> still apply here. Per-agent scope ceilings, incremental consent, standing vs. task-scoped authorization: all of that operates at the DCR layer, governing what Alice approves and how those approvals evolve over time. CIMD operates one layer below, solving the connectivity problem so your agents can actually reach the servers where those tokens need to work without friction of registration.</p>

<hr />]]></content><author><name>Ramesh Rajan</name><email>info@rameshrajan.info</email></author><category term="Agentic Identity" /><category term="AI" /><category term="genai" /><category term="AI" /><category term="iam" /><category term="llm" /><summary type="html"><![CDATA[We've spent years making sure applications register with Oauth. Does this model still work in the Agentic world? What if your agents could carry their own digital key and walk straight past it? A look at DCR and CIMD and when each earns its place in your agent architecture.]]></summary></entry><entry><title type="html">Designing Workloads for Kinetic Resilience</title><link href="https://r2rajan.github.io/cloud/security/2026/05/02/KineticResilience/" rel="alternate" type="text/html" title="Designing Workloads for Kinetic Resilience" /><published>2026-05-02T00:00:00+00:00</published><updated>2026-05-02T00:00:00+00:00</updated><id>https://r2rajan.github.io/cloud/security/2026/05/02/KineticResilience</id><content type="html" xml:base="https://r2rajan.github.io/cloud/security/2026/05/02/KineticResilience/"><![CDATA[<h1 id="designing-workloads-for-kinetic-resilience">Designing Workloads for Kinetic Resilience</h1>

<p>Early in my career, I worked for a construction equipment company in Peoria, Illinois. Every week, I drove to a facility in Mossville, Illinois to rotate backup tapes. The first time I made that drive, I expected a data center. What I found was a factory floor, rows of diesel engines painted bright yellow, lined up in neat formation. The “<strong>computer room</strong>” sat underground, accessed through a walkway cut into the middle of the factory. Next to it was a safe room, built for the people working above.</p>

<p>I grew up in the South of India known for its dry and tropical and predicatable climate and I had never experienced a tornado. My only reference to a Tornado was the movie <strong>Twister</strong>. But Mossville sits in central Illinois, where tornadoes are not a hypothetical risk. They are a recurring one. The factory’s designers understood this. They placed the computer room underground, beside the shelter, because they recognized that protecting digital infrastructure meant accounting for physical destruction.</p>

<p>That underground computer room was our disaster recovery facility. It was not elegant. But it reflected a design principle that remains relevant today. Infrastructure must survive the loss of the building above it.</p>

<p>Decades later in 2026, the threat landscape has changed. Data centers no longer face only tornadoes, floods, or earthquakes. Recent geopolitical events have exposed a different category of risk i.e. deliberate, targeted, physical attacks on digital infrastructure. Drone strikes have disabled power stations in Ukraine. Undersea cables have been severed in the Baltic Sea. Governments are reassessing the physical vulnerability of facilities they once considered secure.</p>

<p>The question is no longer whether a data center can withstand an equipment failure or a natural disaster. The question is whether your workloads can survive the intentional destruction of the facility that hosts them.</p>

<p>This post examines what it means to design for that scenario.</p>

<h2 id="the-problem-infrastructure-built-for-accidents-not-attacks">The Problem, Infrastructure Built for Accidents, Not Attacks</h2>

<p>Data center design has been driven by a single objective for decades. Maintain availability in the face of failure. The industry has built mature approaches to achieve this through redundant power, backup cooling, multiple availability zones, automated failover, and cross-region replication. These practices work. But they share a common assumption that the facility itself continues to exist.</p>

<p>Kinetic threats break that assumption. A drone strike does not cause a recoverable hardware fault. A missile does not trigger a graceful failover. The destruction of a facility can be permanent, immediate, and total.</p>

<p>Since 2022, military strikes have destroyed power infrastructure that data centers depended on. Undersea cables have been severed. Attacks on maritime chokepoints have threatened cable routes carrying an estimated 17% of global internet traffic. And in 2026, drone strikes directly damaged cloud data center facilities for the first time, marking the moment kinetic threats moved from adjacent infrastructure to the cloud infrastructure itself. The World Economic Forum responded by calling for digital infrastructure to be treated as critical infrastructure on par with power grids and water systems (<a href="https://www.weforum.org/stories/2026/04/ai-infrastructure-critical-infrastructure/">source</a>).</p>

<h2 id="the-limits-of-traditional-availability-models">The Limits of Traditional Availability Models</h2>

<p>Traditional high availability works through layered redundancy. Redundant power, cooling, and network paths at the facility level. Load balancing and automated instance replacement at the application level. Multiple availability zones at the regional level. A 2025 Uptime Institute report found that 55% of data center outages were power-related, and the majority were resolved within hours through existing redundancy. The model works because it addresses the failure modes that occur with the highest frequency.</p>

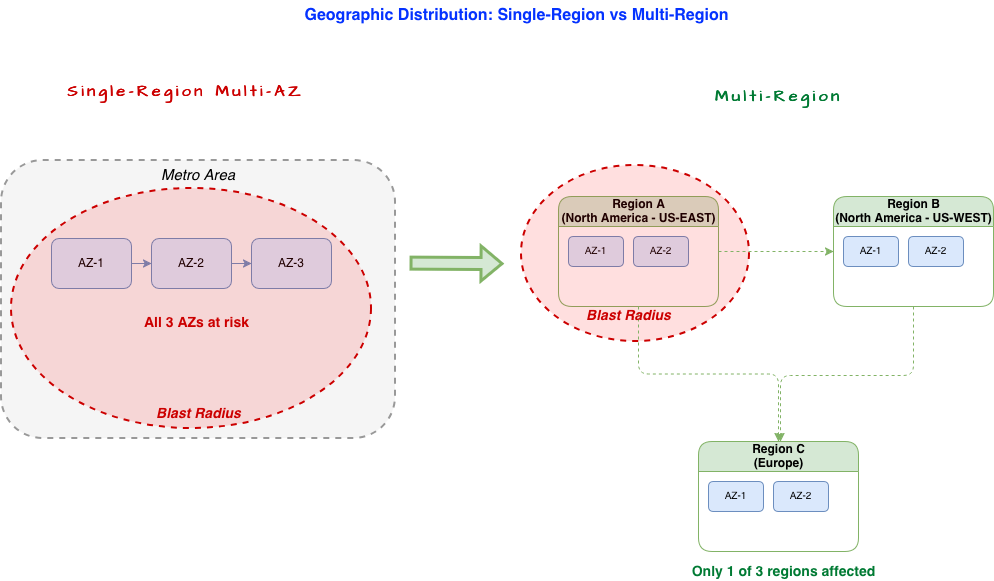
<p>The gap appears when you examine the assumptions underneath. Availability zones within a single region are typically located within the same metropolitan area, within 100 kilometers of each other. They share the same power grid, the same internet exchange points, and the same political jurisdiction. A localized natural disaster can affect one zone while sparing others. A coordinated physical attack does not respect availability zone boundaries. If three zones sit within the same city and that city becomes a conflict zone, all three are at risk simultaneously.</p>

<p>Multi-region architectures reduce this exposure, but a majority of organizations default to a primary-secondary model where one availability zone in a region handles writes and the other serves as a warm standby. In a kinetic scenario, the loss of the primary region means the loss of all data not yet replicated, and a failover process that has never been tested under real conditions.</p>

<p>The result is a gap between what organizations believe their architecture can survive and what it actually can. Closing that gap is what kinetic resilience is about.</p>

<h2 id="from-availability-to-kinetic-resilience">From Availability to Kinetic Resilience</h2>

<p>Traditional resilience asks, “What happens when a component fails?” Kinetic resilience asks a different question. “What happens when the facility no longer exists?”</p>

<p>Component failure is temporary and recoverable. Facility destruction can be permanent and total. The recovery playbook for the first scenario does not apply to the second. There is no hardware to replace. There is no facility to restore into.</p>

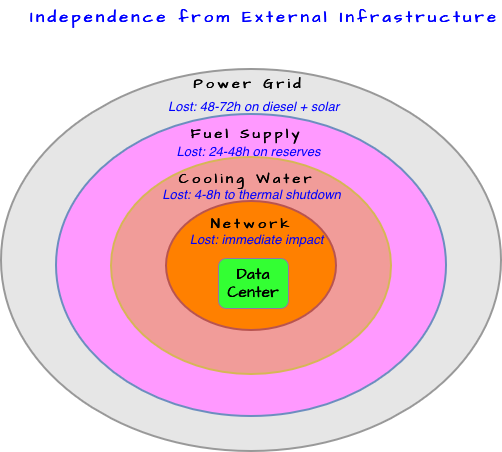
<p>Kinetic resilience accounts for three scenarios that traditional models treat as edge cases. The permanent loss of a facility. The prolonged inaccessibility of an entire region due to conflict, government shutdown, or sustained infrastructure damage. And the disruption of external dependencies that facilities rely on to function, particularly power grids, fuel supply chains, and network interconnects.</p>

<p>The objective is not to prevent damage. The objective is to ensure that the destruction of any single facility, or even an entire region, does not cause a corresponding destruction of the services running on it. Resilience becomes a property of the workload, not the building. The workload survives because it was designed to exist independently of any single location.</p>

<hr />

<h2 id="architectural-strategies-for-kinetic-resilience">Architectural Strategies for Kinetic Resilience</h2>

<p>If resilience is a property of the workload rather than the facility, then the architecture must reflect that. Four strategies form the foundation.</p>

<h3 id="geographic-distribution-beyond-availability-zones">Geographic Distribution Beyond Availability Zones</h3>

<p>Multi-region architectures are the strongest foundation for kinetic resilience. By distributing workloads across geographically separated regions, they isolate failures and reduce the blast radius of any single event. For workloads that face kinetic risk, multi-region is not optional. It is the starting point.</p>

<p>The next step is ensuring that the regions themselves are distributed across boundaries that matter. Regions that do not share the same power grid, the same government jurisdiction, or the same geopolitical risk profile provide stronger isolation than regions clustered within a single country. A workload running in three regions across two continents is harder to disable through physical attack than one running in three availability zones within the same metropolitan corridor.</p>

<p>The trade-off is <strong>latency</strong>. Synchronous replication across regions is impractical for latency-sensitive applications. Workloads that require strong consistency need conflict resolution mechanisms, eventual consistency models, or partitioned write domains that allow each region to operate independently while reconciling state asynchronously.</p>

<p>The other trade-off is <strong>regulatory</strong>. Data sovereignty laws require that certain categories of data remain within national or regional boundaries. Kinetic resilience does not require ignoring these constraints. It requires designing around them by separating the data layer from the compute and control layers. Regulated data stays within the required jurisdiction. The compute layer distributes across broader boundaries so the system continues to operate even if one jurisdiction’s facilities are compromised.</p>

<p><img src="/assets/images/20260502/SingleRegion-MultiRegion.png" alt="Geographic Distribution: Single-Region Multi-AZ vs Multi-Region" /></p>

<h3 id="elimination-of-single-points-of-failure">Elimination of Single Points of Failure</h3>

<p>No individual facility can be essential to the operation of the whole system. Single points of failure hide in unexpected places. A “multi-region” deployment where all DNS is managed from one provider in one jurisdiction. A primary write database that has never been promoted under load. A secrets manager or identity provider that runs in one location.</p>

<p>Eliminating these requires a systematic audit of every dependency in the stack. Each dependency must answer one question. If the facility hosting this component is destroyed in the next ten minutes, does the system continue to function? The implementation is active-active deployments where each site handles full production traffic, multi-writer databases or partitioned ownership models, and stateless service components wherever possible. A facility loss should result in reduced capacity, not systemic failure.</p>

<p><img src="/assets/images/20260502/SPOF.png" alt="Dependency Audit: Hidden Single Points of Failure" /></p>

<h3 id="graceful-degradation">Graceful Degradation</h3>

<p>A system that loses 30% of its infrastructure is not down. It is constrained. Graceful degradation means the system sheds non-essential functions to preserve essential ones. A financial platform disables analytics while maintaining transaction processing. A communications platform reduces video quality while maintaining voice and text.</p>

<p>This requires explicit decisions about service priority, made before the crisis, not during it. Every service needs a tier assignment. Load shedding strategies, circuit breakers, and feature flags become operational necessities. The data layer must also handle partial failure by serving requests with potentially stale data rather than returning errors, which means designing for eventual consistency from the start.</p>

<p><img src="/assets/images/20260502/GracefulDegradation.png" alt="Graceful Degradation: Service Tiering Under Constraint" /></p>

<h3 id="independence-from-external-infrastructure">Independence from External Infrastructure</h3>

<p>A data center that survives a military strike but loses power three hours later because the regional grid was also targeted has not achieved kinetic resilience. Physical disruptions affect the surrounding infrastructure, including power generation, fuel delivery, cooling water supply, and network connectivity.</p>

<p>Facilities in high-risk environments need independent power generation, cooling systems that operate without municipal water and power, and diverse network paths with multiple upstream providers and satellite backup links. Full independence is not feasible indefinitely. But extending the operational window from hours to days can mean the difference between a managed failover and a catastrophic loss.</p>

<p><img src="/assets/images/20260502/Independence.png" alt="Independence from External Infrastructure: Concentric Dependencies" /></p>

<hr />

<h2 id="physical-hardening-and-countermeasures">Physical Hardening and Countermeasures</h2>

<p>Architecture alone does not address the full threat surface. Physical hardening reduces the likelihood and severity of facility loss. Data center security has historically focused on the perimeter, with fences, bollards, and biometric access control protecting against ground-level entry. The roof has received far less attention, and the drone era has exposed that gap. FPV drones attack from above, cost a few hundred dollars, and are increasingly autonomous. Countermeasures proven in active conflict zones, including anti-drone netting, slat armor over rooftop equipment, electronic countermeasures, and visual obscuration, can be adapted for data center rooftops (<a href="https://www.lemonde.fr/en/international/article/2025/12/15/life-go-on-under-anti-drone-nets-for-izium-in-northeastern-ukraine_6748497_4.html">source</a>).</p>

<p>Structural reinforcement such as blast-resistant construction and subterranean placement further reduce vulnerability. The Mossville computer room from the opening of this post is an early example, placing infrastructure underground eliminates the roof as an attack surface entirely.</p>

<p>Physical hardening buys time, but it does not eliminate risk. It does not address regional disruptions that affect multiple facilities simultaneously, and it creates a false sense of security if the workload architecture underneath still has single points of failure. Hardening protects the facility. Architecture protects the workload. The correct approach is to pair both, harden the facility to reduce risk and architect the workload to absorb loss.</p>

<hr />

<h2 id="testing-and-validation">Testing and Validation</h2>

<p>An architecture designed for kinetic resilience is only as credible as the scenarios it has been tested against. Conventional DR testing simulates the loss of a component, verifies failover, and records a pass. It does not validate that the system can survive the permanent destruction of a facility.</p>

<p>Kinetic resilience testing requires three additional scenarios, incorporated into the DR program organizations already operate.</p>

<p><strong>Permanent facility loss.</strong> Remove a facility from the system entirely. Offline the DNS system supporting the region, withdraw its network routes, mark its data stores as permanently unavailable. The question is whether the system reaches a stable operating state and sustains production load for 48 to 72 hours without it.</p>

<p><strong>Extended regional outage.</strong> Simulate a full region offline condition. A 30-minute failover test does not reveal the challenges that emerge at hour 12 or hour 48, such as certificate expirations, token refreshes, cache warming, and the human fatigue of operating in degraded mode.</p>

<p><strong>Cascading dependency failure.</strong> This is very difficult scenario to test but nevertheless important. Simulate a facility loss while simultaneously disabling the network paths and monitoring system that would normally alert the on-call team. This surfaces the hidden dependencies and circular alerting paths that architecture reviews miss.</p>

<p>These scenarios belong inside existing DR programs, not alongside them. The investment is in expanding the scope of what gets tested, not in building a new process. And the tests must include the human response. The on-call engineer will be operating under stress, with incomplete information, without access to tools hosted in the destroyed facility. If the team cannot stabilize the system under those conditions, the architecture is not kinetically resilient regardless of what the design documents say.</p>

<hr />

<h2 id="conclusion">Conclusion</h2>

<p>Not every system needs kinetic resilience. Traditional high availability with regular backups remains appropriate for the majority of applications. This level of investment is justified when the consequences of failure extend beyond the organization itself, in systems like critical infrastructure, financial platforms, government services, and large-scale cloud providers where the impact of a facility loss reaches millions of downstream users.</p>

<h3 id="the-shift-in-perspective">The Shift in Perspective</h3>

<p>The underground computer room in Mossville was built by engineers who understood that the building above it could be destroyed by a tornado. They did not try to make the building tornado-proof. They placed the infrastructure where the tornado could not reach it.</p>

<p>That same principle applies today, at a different scale and against a different threat. Traditional availability practices remain necessary, but they are no longer sufficient for systems that face deliberate physical threats. Kinetic resilience builds on that foundation by shifting the unit of resilience from the facility to the workload, from the building to the system.</p>

<p>Harden the facility to reduce risk. Architect the workload to absorb loss. Test under realistic conditions. And design every system to answer one question. If this building is gone tomorrow, does the service continue?</p>

<hr />]]></content><author><name>Ramesh Rajan</name><email>info@rameshrajan.info</email></author><category term="cloud" /><category term="security" /><category term="security" /><summary type="html"><![CDATA[Traditional data center resilience assumes the building survives. Kinetic resilience assumes it does not. Kinetic resilience shifts the unit of survival from the facility to the workload, using geographic distribution, elimination of single points of failure, graceful degradation, and physical hardening to ensure services continue even when the building does not]]></summary></entry><entry><title type="html">Part-2: Who Said Yes? Designing User Consent for AI Agents</title><link href="https://r2rajan.github.io/agentic%20identity/ai/2026/04/21/Whosaidyes/" rel="alternate" type="text/html" title="Part-2: Who Said Yes? Designing User Consent for AI Agents" /><published>2026-04-21T00:00:00+00:00</published><updated>2026-04-21T00:00:00+00:00</updated><id>https://r2rajan.github.io/agentic%20identity/ai/2026/04/21/Whosaidyes</id><content type="html" xml:base="https://r2rajan.github.io/agentic%20identity/ai/2026/04/21/Whosaidyes/"><![CDATA[<h1 id="part-2-who-said-yes-designing-user-consent-for-ai-agents">Part-2: Who Said Yes? Designing User Consent for AI Agents</h1>

<p>In the <a href="/agentic identity/ai/2026/04/13/WhoaccessedmyAPI/">previous post</a>, Alice had a token with exactly the right scopes, and reporting-agent exchanged it for a narrower delegated token before calling downstream services. The whole flow <strong>assumed</strong> that first token already existed and already carried the <strong>right scopes</strong>.</p>

<p>This post rewinds to the step before that. How did Alice actually authorize <strong>reporting-agent</strong> to act for her? And what changes when she adds a second agent, <strong>coding-agent</strong>, that needs a completely different set of permissions? If consent is wrong here, every downstream token carries the mistake with it.</p>

<h2 id="why-oauth-consent-wasnt-designed-for-agents">Why OAuth Consent Wasn’t Designed for Agents</h2>

<p>The OAuth 2.0 authorization code flow was designed for a specific scenario: a human sitting at a browser, reviewing a consent screen for a single application, at one moment in time. “ExampleApp wants to read your reports. Allow or deny?”</p>

<p>Agents break three of those assumptions.</p>

<p><strong>Agents can be long-lived</strong>. Alice approves reporting-agent once and it runs for months, often without her watching.</p>

<p><strong>Agents can  accumulate capabilities</strong>. Coding-agent might start out reading code, then later need to open pull requests, then later need to trigger deployments. Each of those is a different scope.</p>

<p><strong>Agents come in populations</strong>. Alice doesn’t use one agent. She uses several, each with different purposes, different risk profiles, and different permission needs. The standard consent screen gives her no way to tell reporting-agent from coding-agent from the dozen other agents her team has rolled out.</p>

<p>Fixing this doesn’t require a new protocol. It requires using OAuth more deliberately.</p>

<h2 id="register-each-agent-as-its-own-client">Register Each Agent as Its Own Client</h2>

<p>The first fix is the most important: reporting-agent and coding-agent each get their own OAuth client registration. Not a single shared “agent platform” client that every agent authenticates through.</p>

<p><img src="/assets/images/20260421/1-per-agent-client-registration.png" alt="Per-agent client registration" /></p>

<p>This matters for four reasons.</p>

<p><strong>Onboarding is automated</strong>. RFC 7591 Dynamic Client Registration (DCR) lets an agent platform register new clients programmatically when a new agent is deployed. You attach metadata (owner, agent type, declared capabilities, lifecycle state) and treat the client registry as your source of truth for what agents exist and what they are allowed to ask for.</p>

<p><strong>Revocation is scoped</strong>. If coding-agent is compromised, you revoke its client registration and every token tied to it. Reporting-agent keeps working. Alice doesn’t get logged out.</p>

<p><strong>Scope ceilings are independent</strong>. Reporting-agent’s client is registered with a maximum scope set of <code class="language-plaintext highlighter-rouge">reports:read</code>. Coding-agent’s client has <code class="language-plaintext highlighter-rouge">code:read code:write</code>. Neither can ever request a scope it wasn’t registered for, regardless of what Alice approves at runtime.</p>

<p><strong>Audit attribution is clean</strong>. Every log line carries the specific client ID of the agent that made the call, not a shared identifier that spreads attribution across the whole fleet.</p>

<p>A registered agent client looks roughly like this:</p>

<div class="language-json highlighter-rouge"><div class="highlight"><pre class="highlight"><code><span class="p">{</span><span class="w">
  </span><span class="nl">"client_id"</span><span class="p">:</span><span class="w"> </span><span class="s2">"reporting-agent-prod"</span><span class="p">,</span><span class="w">
  </span><span class="nl">"client_name"</span><span class="p">:</span><span class="w"> </span><span class="s2">"Reporting Agent"</span><span class="p">,</span><span class="w">
  </span><span class="nl">"grant_types"</span><span class="p">:</span><span class="w"> </span><span class="p">[</span><span class="s2">"authorization_code"</span><span class="p">,</span><span class="w"> </span><span class="s2">"refresh_token"</span><span class="p">],</span><span class="w">
  </span><span class="nl">"scope"</span><span class="p">:</span><span class="w"> </span><span class="s2">"reports:read"</span><span class="p">,</span><span class="w">
  </span><span class="nl">"agent_metadata"</span><span class="p">:</span><span class="w"> </span><span class="p">{</span><span class="w">
    </span><span class="nl">"owner"</span><span class="p">:</span><span class="w"> </span><span class="s2">"data-platform-team"</span><span class="p">,</span><span class="w">
    </span><span class="nl">"agent_type"</span><span class="p">:</span><span class="w"> </span><span class="s2">"autonomous-reporting"</span><span class="p">,</span><span class="w">
    </span><span class="nl">"capability_version"</span><span class="p">:</span><span class="w"> </span><span class="s2">"2.3.0"</span><span class="w">
  </span><span class="p">}</span><span class="w">
</span><span class="p">}</span><span class="w">
</span></code></pre></div></div>

<p>The <code class="language-plaintext highlighter-rouge">agent_metadata</code> block is a custom extension. IdPs like Entra ID, Okta, and Cognito let you attach arbitrary metadata to client registrations, and it becomes useful later for policy decisions and incident response.</p>

<h2 id="the-consent-grant-what-alice-actually-approves">The Consent Grant: What Alice Actually Approves</h2>

<p>With per-agent clients in place, each agent runs its own authorization code flow. Alice sees a distinct consent screen for each one, and grants a distinct set of scopes.</p>

<p><img src="/assets/images/20260421/2-dual-agent-consent-flow.png" alt="Side-by-side consent flow for two agents" /></p>

<p>For reporting-agent, the authorization request looks like this:</p>

<div class="language-plaintext highlighter-rouge"><div class="highlight"><pre class="highlight"><code>GET /authorize
  ?response_type=code
  &amp;client_id=reporting-agent-prod
  &amp;redirect_uri=https://agents.example.com/callback
  &amp;scope=reports:read
  &amp;state=xyz123
</code></pre></div></div>

<p>Alice sees “Reporting Agent wants to read your reports” and approves. She gets a refresh token tied to reporting-agent’s client ID with a scope ceiling of <code class="language-plaintext highlighter-rouge">reports:read</code>.</p>

<p>For coding-agent, she runs a separate flow. Different client ID, different scope set (<code class="language-plaintext highlighter-rouge">code:read code:write</code>), different consent screen, different refresh token.</p>

<p>The key idea: the scope Alice approves at this step is the ceiling, not the per-call scope. The refresh token she grants reporting-agent carries <code class="language-plaintext highlighter-rouge">reports:read</code> as its maximum. When the agent later calls the token exchange service (as described in the previous post), the exchange narrows the scope further based on the specific downstream service being called. Alice’s consent sets the upper bound; the token exchange sets the actual permission on each call.</p>

<p>This separation is important. Alice is not approving every individual API call. She is approving a bounded capability, and trusting the delegation chain to narrow things appropriately.</p>

<h2 id="incremental-consent-for-evolving-agents">Incremental Consent for Evolving Agents</h2>

<p>Agents change. Six weeks after Alice first approved coding-agent, the agent’s capabilities expand. It now needs <code class="language-plaintext highlighter-rouge">deployments:trigger</code> to push code through to staging. Alice’s existing refresh token has <code class="language-plaintext highlighter-rouge">code:read code:write</code> as its ceiling and cannot cover the new scope.</p>

<p>You have two options.</p>

<p><strong>Prompt for the delta:</strong> The agent initiates a new authorization request that includes only the new scope. The consent screen shows Alice what is changing: “Coding Agent is requesting a new permission: trigger deployments.” She approves, and the refresh token is upgraded, or a second token is issued alongside the first.</p>

<div class="language-plaintext highlighter-rouge"><div class="highlight"><pre class="highlight"><code>GET /authorize
  ?response_type=code
  &amp;client_id=coding-agent-prod
  &amp;scope=deployments:trigger
  &amp;prompt=consent
  &amp;state=abc456
</code></pre></div></div>

<p><img src="/assets/images/20260421/3-incremental-consent-delta.png" alt="Incremental consent delta" /></p>

<p><strong>Force full re-consent:</strong> For sensitive scope escalations, anything that moves the agent from read to write or touches production systems, requiring a fresh grant from scratch makes the decision visible rather than incremental. The UX cost is real, but so is the risk of scope creep through small, easily-approved increments.</p>

<p><strong>A defensible policy</strong>: Allow delta consent for same-tier scopes, force full re-consent when crossing a sensitivity boundary (read to write, non-prod to prod, internal to external data). Record the consent decisions with timestamps and scope deltas so you can reconstruct how an agent’s permissions evolved.</p>

<h2 id="standing-authorization-vs-task-scoped-authorization">Standing Authorization vs. Task-Scoped Authorization</h2>

<p>Consent comes in two shapes, and agentic platforms need both.</p>

<p><strong>Standing authorization</strong> is the default most teams reach for. Think of it like setting up ACH autopay for your homeowners association (HOA) dues. You authorize the HOA once to pull a fixed amount from your bank account every month. The payments run on schedule without you approving each one. You set the ceiling (the monthly amount), and the HOA operates within it indefinitely until you revoke the mandate. That is exactly how standing authorization works for agents. Alice grants reporting-agent a refresh token valid for 90 days. The agent runs on a schedule, exchanges the refresh token for short-lived access tokens, and does its work without Alice being involved. This is the right model when the agent’s task is ongoing and the scope is stable.</p>

<p><img src="/assets/images/20260421/4-standing-scoped-authorization.png" alt="Standing vs. Task-Scoped Authorization" /></p>

<p><strong>Task-scoped authorization</strong> is narrower. Think of the one-time password your bank sends to your phone when you initiate a wire transfer. The OTP is bound to that specific transaction, expires in minutes, and cannot be reused for a second transfer. You need a fresh code each time. That is task-scoped authorization. Alice is in a chat session with coding-agent and asks it to deploy a specific branch to staging. The agent requests a grant bound to this session and this task: short TTL, single-use refresh, tied to a session ID in the grant metadata. When the session ends, the grant is dead. This is the right model for high-risk, user-present actions where standing authority would be excessive.</p>

<p>The two compose. The coding-agent might hold a standing grant for <code class="language-plaintext highlighter-rouge">code:read code:write</code> and request task-scoped grants on top of it for sensitive operations like <code class="language-plaintext highlighter-rouge">deployments:trigger</code>. The standing grant handles the common case; the task-scoped grant handles the exception that needs a fresh “yes” from Alice.</p>

<h2 id="comparing-the-two-client-models">Comparing the Two Client Models</h2>

<table>
  <thead>
    <tr>
      <th>Dimension</th>
      <th>Shared client for all agents</th>
      <th>Per-agent client registration</th>
    </tr>
  </thead>
  <tbody>
    <tr>
      <td>Revocation granularity</td>
      <td>All-or-nothing (affects every agent)</td>
      <td>Per-agent (isolated blast radius)</td>
    </tr>
    <tr>
      <td>Scope ceiling</td>
      <td>Union of all agent needs (over-broad)</td>
      <td>Tailored per agent (least-privilege)</td>
    </tr>
    <tr>
      <td>Audit attribution</td>
      <td>Shared client ID in every log</td>
      <td>Distinct client ID per agent</td>
    </tr>
    <tr>
      <td>Onboarding cost</td>
      <td>Low (one-time setup)</td>
      <td>Moderate (DCR automation required)</td>
    </tr>
    <tr>
      <td>Compromise blast radius</td>
      <td>Every agent that shares the client</td>
      <td>One agent only</td>
    </tr>
  </tbody>
</table>

<h2 id="conclusion">Conclusion</h2>

<p>The delegation pattern from the previous post is only as strong as the consent that seeds it. If every agent shares a client, the downstream token exchange has nothing meaningful to narrow from. If consent is granted once and never revisited, scope ceilings drift away from what Alice actually intended. If standing and task-scoped authorization are treated as the same thing, you end up over-authorizing routine work or under-authorizing sensitive actions.</p>

<p>Per-agent client registrations, explicit scope ceilings, incremental consent for evolving capabilities, and a clear line between standing and task-scoped grants give Alice real control and give your security team something defensible when someone asks how an agent came to hold the permissions it did.</p>

<p><strong>There is a third case</strong> where agents running with no user present at all, like a scheduled agent that triggers at 2am. Standing authorization gets you partway there, but the model starts to strain when the human is fully out of the loop. Watch out for the next post in this series.</p>]]></content><author><name>Ramesh Rajan</name><email>info@rameshrajan.info</email></author><category term="Agentic Identity" /><category term="AI" /><category term="genai" /><category term="AI" /><category term="iam" /><category term="llm" /><summary type="html"><![CDATA[OAuth consent wasn't built for long-lived agents that accumulate capabilities over time. Per-agent client registration, incremental consent, and the distinction between standing and task-scoped authorization give users real control without requiring approval for every API call.]]></summary></entry><entry><title type="html">Part-1: Who Called That API? Why AI Agents Need Delegation, Not Impersonation</title><link href="https://r2rajan.github.io/agentic%20identity/ai/2026/04/13/WhoaccessedmyAPI/" rel="alternate" type="text/html" title="Part-1: Who Called That API? Why AI Agents Need Delegation, Not Impersonation" /><published>2026-04-13T00:00:00+00:00</published><updated>2026-04-13T00:00:00+00:00</updated><id>https://r2rajan.github.io/agentic%20identity/ai/2026/04/13/WhoaccessedmyAPI</id><content type="html" xml:base="https://r2rajan.github.io/agentic%20identity/ai/2026/04/13/WhoaccessedmyAPI/"><![CDATA[<h1 id="part-1-who-called-that-api-why-ai-agents-need-delegation-not-impersonation">Part-1: Who Called That API? Why AI Agents Need Delegation, Not Impersonation</h1>

<p>When an AI agent accesses a service on behalf of a user, who shows up in the audit log? If the answer is <strong>just the user</strong> or <strong>just the agent</strong>, you have a gap that will surface during your next security review.</p>

<p>Most agentic platforms today use one of two flawed patterns: the agent impersonates the user (forwarding their token directly), or the agent authenticates as itself with no link to the user who initiated the request. Both patterns break down when you need to answer the question every incident responder asks, <strong>who did what?</strong> When AI agents are acting on behalf of a human user or another agent, you also need to ask another question. <strong>Through which system did they do it?</strong></p>

<p>This post explains why delegation with dual identity is the correct model for agentic systems, and how OAuth 2.0 Token Exchange (RFC 8693) provides the standard to implement it.</p>

<h2 id="the-problem-with-impersonation">The Problem with Impersonation</h2>

<p>In the impersonation model, the agent receives the user’s access token and presents it directly to downstream services. The service sees the user’s identity and grants access based on the user’s permissions.</p>

<p><img src="/assets/images/blog-1-impersonation-pattern.png" alt="Agent Impersonation Pattern" /></p>

<p>The token that reaches the downstream service looks like this:</p>

<div class="language-json highlighter-rouge"><div class="highlight"><pre class="highlight"><code><span class="p">{</span><span class="w">
  </span><span class="nl">"iss"</span><span class="p">:</span><span class="w"> </span><span class="s2">"https://idp.example.com"</span><span class="p">,</span><span class="w">
  </span><span class="nl">"sub"</span><span class="p">:</span><span class="w"> </span><span class="s2">"alice@example.com"</span><span class="p">,</span><span class="w">
  </span><span class="nl">"scope"</span><span class="p">:</span><span class="w"> </span><span class="s2">"reports:read tickets:read tickets:write"</span><span class="p">,</span><span class="w">
  </span><span class="nl">"aud"</span><span class="p">:</span><span class="w"> </span><span class="s2">"https://api.example.com"</span><span class="p">,</span><span class="w">
  </span><span class="nl">"exp"</span><span class="p">:</span><span class="w"> </span><span class="mi">1743120000</span><span class="w">
</span><span class="p">}</span><span class="w">
</span></code></pre></div></div>

<p>This creates three problems.</p>

<p>First, the downstream service cannot distinguish between Alice calling the API directly and an agent calling it on her behalf. The audit trail shows <code class="language-plaintext highlighter-rouge">alice@example.com</code> for both. During an incident, you cannot determine whether a human or an automated agent performed a specific action.</p>

<p>Second, the agent inherits all of Alice’s permissions. If Alice has <code class="language-plaintext highlighter-rouge">tickets:write</code> scope but the agent only needs <code class="language-plaintext highlighter-rouge">reports:read</code>, the agent still carries the full scope set. A compromised or misbehaving agent can exercise permissions it was never intended to use.</p>

<p>Third, revoking the agent’s access requires revoking Alice’s token, which locks Alice out of every system, not just the agent.</p>

<h2 id="delegation-the-agent-authenticates-as-itself">Delegation: The Agent Authenticates as Itself</h2>

<p>In the delegation model, the agent does not forward the user’s token. Instead, it presents both the user’s token and its own identity to a token exchange service. The service issues a new token that carries both identities: who authorized the action (the user) and who performed it (the agent).</p>

<p><img src="/assets/images/blog-2-delegation-pattern.png" alt="Agent Delegation Pattern" /></p>

<p>The delegated token carries dual identity:</p>

<div class="language-json highlighter-rouge"><div class="highlight"><pre class="highlight"><code><span class="p">{</span><span class="w">
  </span><span class="nl">"iss"</span><span class="p">:</span><span class="w"> </span><span class="s2">"https://idp.example.com"</span><span class="p">,</span><span class="w">
  </span><span class="nl">"sub"</span><span class="p">:</span><span class="w"> </span><span class="s2">"alice@example.com"</span><span class="p">,</span><span class="w">
  </span><span class="nl">"act"</span><span class="p">:</span><span class="w"> </span><span class="p">{</span><span class="w">
    </span><span class="nl">"sub"</span><span class="p">:</span><span class="w"> </span><span class="s2">"reporting-agent"</span><span class="w">
  </span><span class="p">},</span><span class="w">
  </span><span class="nl">"aud"</span><span class="p">:</span><span class="w"> </span><span class="s2">"https://api.example.com"</span><span class="p">,</span><span class="w">
  </span><span class="nl">"scope"</span><span class="p">:</span><span class="w"> </span><span class="s2">"reports:read"</span><span class="p">,</span><span class="w">
  </span><span class="nl">"exp"</span><span class="p">:</span><span class="w"> </span><span class="mi">1743120300</span><span class="w">
</span><span class="p">}</span><span class="w">
</span></code></pre></div></div>

<p>The <code class="language-plaintext highlighter-rouge">sub</code> claim identifies Alice as the authorizing user. The <code class="language-plaintext highlighter-rouge">act.sub</code> claim identifies the agent that performed the action. The <code class="language-plaintext highlighter-rouge">aud</code> claim restricts this token to a specific downstream service. The <code class="language-plaintext highlighter-rouge">scope</code> is narrowed to only what the agent needs for this particular call.</p>

<p>The downstream service now has everything it needs: authorize based on <code class="language-plaintext highlighter-rouge">sub</code>, attribute the action to <code class="language-plaintext highlighter-rouge">act.sub</code>, reject the token if the audience does not match, and log both identities for audit.</p>

<h2 id="how-rfc-8693-makes-this-work">How RFC 8693 Makes This Work</h2>

<p>RFC 8693 defines OAuth 2.0 Token Exchange, a standard protocol for exchanging one security token for another. It is the mechanism that turns impersonation into delegation.</p>

<p><img src="/assets/images/blog-3-rfc8693-token-exchange.png" alt="RFC 8693 Token Exchange Flow" /></p>

<p>The exchange takes two inputs:</p>

<ul>
  <li>A <code class="language-plaintext highlighter-rouge">subject_token</code>: the user’s JWT from the identity provider</li>
  <li>An <code class="language-plaintext highlighter-rouge">actor_token</code>: the agent’s workload identity credential</li>
</ul>

<p>The token exchange service validates both tokens and issues a new token with narrowed scope. The authorization policy determines how scopes are narrowed. A common pattern for agentic platforms is to compute the intersection of user permissions, agent permissions, and service requirements, ensuring the delegated token never exceeds what any single party allows. The resulting token is scoped to a specific downstream service audience.</p>

<p>Here is what the token exchange request looks like:</p>

<div class="language-plaintext highlighter-rouge"><div class="highlight"><pre class="highlight"><code>POST /token HTTP/1.1
Content-Type: application/x-www-form-urlencoded

grant_type=urn:ietf:params:oauth:grant-type:token-exchange
&amp;subject_token=eyJhbGciOiJSUzI1Alice...   (Alice's JWT)
&amp;subject_token_type=urn:ietf:params:oauth:token-type:jwt
&amp;actor_token=eyJhbGciOiJSUzI1Agent...     (Agent's credential)
&amp;actor_token_type=urn:ietf:params:oauth:token-type:jwt
&amp;audience=https://api.example.com
&amp;scope=reports:read
</code></pre></div></div>

<p>The response is a new token with the dual-identity structure shown above. The token exchange service can enforce several constraints:</p>

<ol>
  <li>
    <p><strong>Scope narrowing:</strong> the issued token’s scope can be limited to only the permissions required for the target service. An agent declared with <code class="language-plaintext highlighter-rouge">reports:read</code> cannot obtain a token with <code class="language-plaintext highlighter-rouge">tickets:write</code>, even if the user has that permission.</p>
  </li>
  <li>
    <p><strong>Audience restriction:</strong> each token is bound to a single downstream service via the <code class="language-plaintext highlighter-rouge">aud</code> claim. A token minted for the reporting service is rejected by the ticketing service. This limits blast radius if a single service is compromised.</p>
  </li>
  <li>
    <p><strong>Short TTL</strong>: delegated tokens are issued with short expiration times (typically 5 minutes). The agent caches them and re-requests transparently when they expire. If the agent is compromised, the window of exposure is limited to the token expiry.</p>
  </li>
</ol>

<h2 id="comparing-the-models">Comparing the Models</h2>

<table>
  <thead>
    <tr>
      <th>Dimension</th>
      <th>Impersonation</th>
      <th>Delegation (RFC 8693)</th>
    </tr>
  </thead>
  <tbody>
    <tr>
      <td>Audit trail</td>
      <td>User identity only</td>
      <td>User + agent identity</td>
    </tr>
    <tr>
      <td>Scope control</td>
      <td>Full user permissions</td>
      <td>Intersection of user, agent, and service scopes</td>
    </tr>
    <tr>
      <td>Token audience</td>
      <td>Broad (all services)</td>
      <td>Per-service restriction</td>
    </tr>
    <tr>
      <td>Revocation</td>
      <td>Revoke user token (locks out user)</td>
      <td>Revoke agent identity (user unaffected)</td>
    </tr>
    <tr>
      <td>Incident response</td>
      <td>Cannot distinguish human from agent actions</td>
      <td>Full attribution chain</td>
    </tr>
    <tr>
      <td>Token lifetime</td>
      <td>Matches user session (minutes to hours)</td>
      <td>Short-lived (5 minutes), auto-refreshed</td>
    </tr>
  </tbody>
</table>

<h2 id="conclusion">Conclusion</h2>

<p>If you are building an agentic platform where AI agents call services on behalf of users, the identity model you choose determines whether your audit trails hold up under scrutiny.</p>

<p>Impersonation is simpler to implement. Forward the user’s token and move on. But it creates a blind spot in every audit log, grants agents more permissions than they need, and couples agent lifecycle to user credentials.</p>

<p>Delegation with RFC 8693 requires a token exchange service and per-service audience management. The operational overhead is higher. But it gives you individual attribution on every call, least-privilege enforcement at the token level, and independent revocation of agent and user identities. For security-sensitive environments where compliance, auditability, and least-privilege access are requirements, RFC 8693 token exchange is the foundation to build on.</p>]]></content><author><name>Ramesh Rajan</name><email>info@rameshrajan.info</email></author><category term="Agentic Identity" /><category term="AI" /><category term="genai" /><category term="iam" /><category term="llm" /><summary type="html"><![CDATA[When an AI agent acts on behalf of a user, your audit log needs to show both identities, not just one. RFC 8693 token exchange makes that possible with scope-narrowed, audience-restricted delegation tokens.]]></summary></entry><entry><title type="html">Understanding OAuth Authentication in Amazon Bedrock AgentCore: A Deep Dive</title><link href="https://r2rajan.github.io/security/ai/2025/12/23/BedrockAgentcoreOauth/" rel="alternate" type="text/html" title="Understanding OAuth Authentication in Amazon Bedrock AgentCore: A Deep Dive" /><published>2025-12-23T00:00:00+00:00</published><updated>2025-12-23T00:00:00+00:00</updated><id>https://r2rajan.github.io/security/ai/2025/12/23/BedrockAgentcoreOauth</id><content type="html" xml:base="https://r2rajan.github.io/security/ai/2025/12/23/BedrockAgentcoreOauth/"><![CDATA[<h1 id="understanding-oauth-authentication-in-amazon-bedrock-agentcore-a-deep-dive">Understanding OAuth Authentication in Amazon Bedrock AgentCore: A Deep Dive</h1>

<h2 id="introduction">Introduction</h2>

<p>Amazon Bedrock AgentCore introduces a sophisticated authentication pattern that enables AI agents to securely access external services on behalf of users. This architecture implements a <strong>dual authentication pattern</strong> that separates inbound authentication (who can call your agent) from outbound authentication (how your agent accesses external services).</p>

<p>In this post, we’ll explore how this OAuth flow works, why it’s designed this way, and walk through a complete authentication cycle with detailed diagrams.</p>

<h2 id="the-dual-authentication-pattern">The Dual Authentication Pattern</h2>

<p>Traditional applications typically implement authentication in one direction: users authenticate to access the application. But AI agents introduce a new challenge: the agent itself needs to authenticate to external services <strong>on behalf of the user</strong>.</p>

<p>Bedrock AgentCore solves this with two separate authentication layers:</p>

<h3 id="1-inbound-authentication-user--agent">1. Inbound Authentication (User → Agent)</h3>
<p>Controls <strong>who</strong> can invoke your agent runtime. Uses JWT tokens validated against a Cognito User Pool.</p>

<h3 id="2-outbound-authentication-agent--external-services">2. Outbound Authentication (Agent → External Services)</h3>
<p>Controls <strong>how</strong> your agent accesses external services. Uses OAuth 2.0 with user federation to act on behalf of the authenticated user.</p>

<div class="mermaid">
graph LR
    subgraph Inbound["Inbound Authentication"]
        direction TB
        U[User] --&gt;|JWT Token| R[Agent Runtime]
        R --&gt;|Validates against| C1[Runtime Cognito Pool]
        R -.-&gt;|Executes| A[Agent Code] 
    end
    Inbound ~~~ Outbound

    subgraph Outbound["Outbound Authentication"]
        direction TB
        A --&gt;|Needs external access| TV[Token Vault]
        TV --&gt;|OAuth 2.0| C2[Identity Provider]
        C2 --&gt;|Returns token| TV
        TV --&gt;|Cached token| A
    end

    style U fill:#4dabf7
    style R fill:#51cf66
    style A fill:#fab005
    style TV fill:#7950f2
    style C1 fill:#4dabf7
    style C2 fill:#fab005
</div>

<h2 id="architecture-overview">Architecture Overview</h2>

<h3 id="two-cognito-pools-why">Two Cognito Pools: Why?</h3>

<p>At first glance, using two separate Cognito User Pools might seem like unnecessary complexity. However, this architectural decision is fundamental to implementing secure, scalable AI agents that can access external services on behalf of users. The key insight is that authenticating who can invoke your agent is conceptually different from authenticating which external services your agent can access. By separating these concerns into two distinct authentication layers, we achieve better security isolation, clearer audit trails, and the flexibility to integrate with multiple identity providers without coupling them together. Think of it as having two separate security checkpoints: one at the entrance to your building (who can use the agent) and another at specific rooms inside (which external services the agent can access).</p>

<p>The architecture uses two separate Cognito User Pools, each serving a distinct purpose:</p>

<p><strong>Runtime Pool (Inbound Authentication):</strong></p>
<ul>
  <li><strong>Purpose</strong>: Authenticate callers who invoke the agent</li>
  <li><strong>Users</strong>: Application users</li>
  <li><strong>Flow</strong>: User → JWT Token → Runtime validates token</li>
  <li><strong>Think of it as</strong>: “Who can talk to my agent?”</li>
</ul>

<p><strong>Identity Pool (Outbound Authentication):</strong></p>
<ul>
  <li><strong>Purpose</strong>: Store credentials for external services</li>
  <li><strong>Users</strong>: Service accounts</li>
  <li><strong>Flow</strong>: Agent → Request token → External service validates</li>
  <li><strong>Think of it as</strong>: “What can my agent access?”</li>
</ul>

<div class="mermaid">
graph TB
    subgraph "InboundAuth Cognito Pool"
        R1[Cognito Pool - InboundAuth]
        R2[Authenticates: Callers]
        R4[Validates: Inbound JWT tokens]
    end

    subgraph "OutboundAuth Cognito Pool"
        I1[Cognito Pool - OutboundAuth]
        I2[Authenticates: External Services]
        I4[Provides: OAuth tokens for agents]
    end

    User[End User] --&gt;|Authenticate| R1
    R1 --&gt;|JWT| Runtime[Agent Runtime]
    Runtime --&gt;|Execute| Agent[Agent Code]
    Agent --&gt;|Need token| Vault[Token Vault]
    Vault --&gt;|OAuth flow| I1
    I1 --&gt;|Access token| Vault

    style R1 fill:#4dabf7
    style I1 fill:#fab005
    style Runtime fill:#51cf66
</div>

<p>This separation provides several benefits:</p>
<ol>
  <li><strong>Security</strong>: Compromising user credentials doesn’t expose service credentials providing isolation</li>
  <li><strong>Scalability</strong>: Different user pools can scale independently of each other</li>
  <li><strong>Flexibility</strong>: Can integrate multiple external identity providers if you choose to do so</li>
  <li><strong>Audit</strong>: Clear separation between user actions and service actions</li>
</ol>

<h2 id="the-complete-oauth-flow">The Complete OAuth Flow</h2>

<p>Let’s walk through a complete authentication cycle, from initial invocation to cached token usage.</p>

<div class="mermaid">
sequenceDiagram
    participant User
    participant Browser
    participant CLI as AgentCore CLI
    participant Runtime as Bedrock AgentCore<br />Runtime
    participant Agent as Agent Code<br />(agent.py)
    participant TokenVault as Identity Token Vault
    participant RuntimeCognito as Cognito Pool - InboundAuth
    participant IdentityCognito as Cognito Pool - OutboundAuth

    rect rgb(200, 230, 255)
        Note over User,RuntimeCognito: PHASE 1: INBOUND AUTHENTICATION
        User-&gt;&gt;CLI: 1. Get authentication token
        CLI-&gt;&gt;RuntimeCognito: 2. Username/Password
        RuntimeCognito--&gt;&gt;CLI: 3. JWT Access Token
        Note right of CLI: Token contains:<br />• client_id<br />• username<br />• scopes<br />• expiry
        CLI-&gt;&gt;User: 4. Return JWT token
    end

    rect rgb(255, 230, 200)
        Note over User,Runtime: PHASE 2: INVOKE AGENT
        User-&gt;&gt;CLI: 5. Invoke agent with JWT
        CLI-&gt;&gt;Runtime: 6. InvokeAgentRuntime API call
        Runtime-&gt;&gt;RuntimeCognito: 7. Validate JWT against OIDC discovery
        RuntimeCognito--&gt;&gt;Runtime: 8. ✅ Token Valid
        Runtime-&gt;&gt;Agent: 9. Execute agent code
    end

    rect rgb(230, 255, 230)
        Note over Agent,IdentityCognito: PHASE 3A: OUTBOUND AUTH - FIRST CALL
        Agent-&gt;&gt;Agent: 10. Function with @requires_access_token
        Note right of Agent: Decorator parameters:<br />• provider_name<br />• callback_url<br />• auth_flow: USER_FEDERATION<br />• scopes: [openid]

        Agent-&gt;&gt;TokenVault: 11. Request token for provider
        TokenVault-&gt;&gt;TokenVault: 12. Check cache → Not found
        TokenVault-&gt;&gt;IdentityCognito: 13. Initiate OAuth authorization
        IdentityCognito--&gt;&gt;TokenVault: 14. Authorization URL
        TokenVault--&gt;&gt;Agent: 15. Return auth URL
        Agent-&gt;&gt;Agent: 16. on_auth_url callback fires
        Agent--&gt;&gt;Runtime: 17. Response: "Authorization Required"
        Runtime--&gt;&gt;CLI: 18. Forward response
        CLI--&gt;&gt;User: 19. Display authorization URL
    end

    rect rgb(255, 240, 230)
        Note over User,IdentityCognito: PHASE 3B: USER AUTHORIZATION
        User-&gt;&gt;Browser: 20. Opens authorization URL
        Browser-&gt;&gt;TokenVault: 21. GET authorization endpoint
        TokenVault-&gt;&gt;IdentityCognito: 22. Redirect to Cognito login
        User-&gt;&gt;Browser: 23. Enter credentials
        Browser-&gt;&gt;IdentityCognito: 24. Submit authentication
        IdentityCognito-&gt;&gt;IdentityCognito: 25. Validate credentials
        IdentityCognito-&gt;&gt;IdentityCognito: 26. Generate authorization code
        IdentityCognito-&gt;&gt;Browser: 27. Redirect with auth code
        Browser-&gt;&gt;TokenVault: 28. Callback with code
    end

    rect rgb(240, 230, 255)
        Note over TokenVault,IdentityCognito: PHASE 3C: TOKEN EXCHANGE
        TokenVault-&gt;&gt;IdentityCognito: 29. Exchange code for tokens
        Note right of TokenVault: Grant Type: authorization_code<br />Client credentials included
        IdentityCognito--&gt;&gt;TokenVault: 30. Return tokens
        Note right of IdentityCognito: Returns:<br />• access_token<br />• id_token<br />• refresh_token
        TokenVault-&gt;&gt;TokenVault: 31. Cache tokens by session_id
        TokenVault-&gt;&gt;Browser: 32. Redirect to callback_url
    end

    rect rgb(230, 255, 255)
        Note over User,IdentityCognito: PHASE 4: SUBSEQUENT CALLS (Cached)
        User-&gt;&gt;CLI: 33. Invoke agent again (same session)
        CLI-&gt;&gt;Runtime: 34. InvokeAgentRuntime with JWT
        Runtime-&gt;&gt;Runtime: 35. Validate JWT (cached)
        Runtime-&gt;&gt;Agent: 36. Execute agent code
        Agent-&gt;&gt;TokenVault: 37. Request token
        TokenVault-&gt;&gt;TokenVault: 38. Check cache → ✅ Found!
        TokenVault--&gt;&gt;Agent: 39. Return cached access_token
        Note right of Agent: Decorator injects token<br />directly into function
        Agent-&gt;&gt;Agent: 40. Execute function with token
        Agent--&gt;&gt;Runtime: 41. Success response
        Runtime--&gt;&gt;CLI: 42. Forward response
        CLI--&gt;&gt;User: 43. Display result
    end
</div>

<h3 id="understanding-the-flow-a-simplified-walkthrough">Understanding the Flow: A Simplified Walkthrough</h3>

<p>The sequence diagram above shows the complete technical flow, but let’s break it down into simple, digestible steps. Think of this as a story with four chapters: getting your ticket to use the agent, using the agent, getting permission for external access, and then enjoying fast subsequent access.</p>

<h4 id="chapter-1-getting-your-ticket-to-talk-to-the-agent-steps-1-4"><strong>Chapter 1: Getting Your Ticket to Talk to the Agent</strong> (Steps 1-4)</h4>

<p>Before you can ask your agent to do anything, you need to prove who you are. This is the <strong>inbound authentication</strong> step.</p>

<p><strong>Step 1: You ask for credentials</strong>
You run a command like <code class="language-plaintext highlighter-rouge">agentcore identity get-cognito-inbound-token</code>. Think of this as walking up to a ticket booth and asking for admission.</p>

<p><strong>Step 2: System checks your identity</strong>
Your username and password are sent to the Runtime Cognito Pool. This is like showing your ID to the ticket seller.</p>

<p><strong>Step 3: System gives you a JWT token</strong>
If your credentials are valid, you receive a JWT (JSON Web Token). This token is like a concert ticket or an all-access pass - it proves you’re allowed to invoke the agent. The token contains important information:</p>
<ul>
  <li>Your client ID (which application you’re using)</li>
  <li>Your username (who you are)</li>
  <li>Scopes (what you’re allowed to do)</li>
  <li>Expiry time (typically 1 hour)</li>
</ul>

<p><strong>Step 4: You hold onto your ticket</strong>
You’ll use this JWT token every time you talk to the agent.  you’ll need it for every invocation.</p>

<hr />

<h4 id="chapter-2-talking-to-the-agent-steps-5-9"><strong>Chapter 2: Talking to the Agent</strong> (Steps 5-9)</h4>

<p>Now that you have your JWT ticket, you can actually invoke the agent. This is still part of <strong>inbound authentication</strong> - proving you have the right to use the agent.</p>

<p><strong>Step 5: You show your ticket and make a request</strong>
You run: <code class="language-plaintext highlighter-rouge">agentcore invoke '{"prompt": "Check my external account"}' --bearer-token &lt;JWT&gt;</code>
You’re essentially saying: “Here’s my ticket, please do this task for me.”</p>

<p><strong>Step 6: Ticket gets validated</strong>
The Bedrock AgentCore Runtime receives your JWT and needs to verify it’s legitimate. Just like a bouncer at a concert scanning your ticket.</p>

<p><strong>Step 7: Runtime calls the ticket office</strong>
The Runtime asks the Runtime Cognito Pool: “Is this JWT token real? Is it still valid? Has it expired?”
This happens by checking against the OIDC discovery endpoint configured in your agent.</p>

<p><strong>Step 8: Cognito confirms</strong>
✅ “Yes, this token is valid. This user is authorized to invoke the agent.”
The signature is valid, the token hasn’t expired, and it was issued by the correct authority.</p>

<p><strong>Step 9: Agent begins execution</strong>
With authentication confirmed, the agent code starts executing with your request. Your prompt is passed to the agent, and it begins processing.</p>

<hr />

<h4 id="chapter-3a-agent-needs-external-access---first-time-steps-10-19"><strong>Chapter 3A: Agent Needs External Access - First Time</strong> (Steps 10-19)</h4>

<p>Now we switch to <strong>outbound authentication</strong>. Your agent needs to access an external service on your behalf, but it doesn’t have permission yet.</p>

<p><strong>Step 10: Agent encounters a protected function</strong>
Your agent code calls a function decorated with <code class="language-plaintext highlighter-rouge">@requires_access_token</code>. This decorator is the key to the OAuth flow.</p>

<p><strong>Step 11: Agent asks the Token Vault</strong>
The decorator automatically asks: “Do I have an access token for this external service provider for this session?”
The Token Vault is a secure storage system that caches OAuth tokens by session ID.</p>

<p><strong>Step 12: Vault checks its cache</strong>
The Token Vault looks up: Session ID → Provider → Token
Result: ❌ “No token found. This is the first time this session is accessing this provider.”</p>

<p><strong>Step 13: Vault initiates OAuth flow</strong>
Since there’s no cached token, the Token Vault starts the OAuth 2.0 authorization code flow with the Identity Cognito Pool.</p>

<p><strong>Step 14: External service creates authorization URL</strong>
The Identity Provider (Identity Cognito) generates a special authorization URL. This URL contains:</p>
<ul>
  <li>Encrypted state (including your session ID)</li>
  <li>Requested scopes (what permissions you’re asking for)</li>
  <li>Callback URL (where to redirect after authorization)</li>
  <li>Client ID (which application is requesting access)</li>
</ul>

<p><strong>Step 15: Vault returns the authorization URL to the agent</strong>
Instead of a token, the Vault returns: “Authorization required - here’s the URL”</p>

<p><strong>Step 16: Agent’s callback hook fires</strong>
The <code class="language-plaintext highlighter-rouge">on_auth_url</code> callback you specified in the decorator triggers. This gives your code a chance to handle the authorization URL appropriately.</p>

<p><strong>Step 17-19: Agent tells you authorization is needed</strong>
The agent responds with a message like:
<em>“🔐 Authorization Required - Please open this URL in your browser to authorize: [URL]”</em>
The Runtime forwards this response, and you see it in your CLI. The ball is now in your court - you need to authorize the access.</p>

<hr />

<h4 id="chapter-3b-you-grant-permission-steps-20-28"><strong>Chapter 3B: You Grant Permission</strong> (Steps 20-28)</h4>

<p>This is where <strong>you</strong> (the user) explicitly grant permission for the agent to access the external service on your behalf. This is the heart of USER_FEDERATION - you’re in control.</p>

<p><strong>Step 20: You open the authorization URL</strong>
You click the link (or copy-paste it into your browser). This opens the OAuth authorization flow in your web browser.</p>

<p><strong>Step 21: Browser navigates to the authorization endpoint</strong>
Your browser makes a GET request to the Token Vault’s authorization endpoint.</p>

<p><strong>Step 22: Redirected to the login page</strong>
The Token Vault redirects you to the Identity Cognito Pool login page. This is where you’ll authenticate to the external service.</p>

<p><strong>Step 23: You enter your credentials</strong>
You type in your username and password for the external service. In this demo, that’s the Identity Cognito user (like <code class="language-plaintext highlighter-rouge">externaluser24a901fd</code>).
<strong>Important</strong>: These are different credentials from your Runtime Cognito credentials! You’re now proving you own the external account.</p>

<p><strong>Step 24: You submit the login form</strong>
Browser sends your credentials to the Identity Cognito Pool.</p>

<p><strong>Step 25: Identity Cognito validates your credentials</strong>
The external service checks: “Is this the correct password for this user?” If valid, it proceeds.</p>

<p><strong>Step 26: Identity Cognito generates an authorization code</strong>
Instead of giving you the actual access token directly, OAuth uses an intermediate step: an authorization code. This is a short-lived, one-time-use code that can be exchanged for tokens.
<strong>Why a code?</strong> Security! The code is sent via the browser (less secure channel), but the actual tokens are exchanged server-to-server (more secure).</p>

<p><strong>Step 27: Browser redirected with the authorization code</strong>
Identity Cognito redirects your browser back to the Token Vault callback URL, including the authorization code in the URL parameters.</p>

<p><strong>Step 28: Token Vault receives the code</strong>
The Token Vault’s callback endpoint receives the authorization code. Now it’s ready for the final exchange.</p>

<hr />

<h4 id="chapter-3c-authorization-code-becomes-real-access-steps-29-32"><strong>Chapter 3C: Authorization Code Becomes Real Access</strong> (Steps 29-32)</h4>

<p>The Token Vault now exchanges the temporary authorization code for real, usable access tokens. This happens server-to-server, away from the browser.</p>

<p><strong>Step 29: Vault exchanges code for tokens</strong>
The Token Vault makes a server-to-server call to Identity Cognito:
<em>“Here’s the authorization code. Please give me access tokens. Here’s my client secret to prove I’m authorized.”</em></p>

<p>This exchange uses the <code class="language-plaintext highlighter-rouge">authorization_code</code> grant type and includes:</p>
<ul>
  <li>The authorization code (from step 27)</li>
  <li>Client ID (identifies your application)</li>
  <li>Client secret (proves your application is legitimate)</li>
  <li>Redirect URI (must match the original request)</li>
</ul>

<p><strong>Step 30: Identity Cognito returns three tokens</strong>
The Identity Provider responds with a token bundle:</p>

<ol>
  <li>
    <p><strong>access_token</strong>: This is the golden ticket! Your agent uses this to make API calls to the external service. It’s typically valid for 1 hour.</p>
  </li>
  <li>
    <p><strong>id_token</strong>: A JWT containing claims about the user’s identity (who they are, when they logged in, etc.). Useful for displaying user information.</p>
  </li>
  <li>
    <p><strong>refresh_token</strong>: A long-lived token used to obtain new access tokens when they expire. The agent can use this automatically to refresh access without asking you to re-authorize.</p>
  </li>
</ol>

<p><strong>Step 31: Vault caches the tokens</strong>
The Token Vault stores all three tokens in its cache, indexed by:</p>
<ul>
  <li>Session ID (e.g., <code class="language-plaintext highlighter-rouge">demo_session_ABC123</code>)</li>
  <li>Provider name (e.g., <code class="language-plaintext highlighter-rouge">ExternalServiceProvider</code>)</li>
</ul>

<p>This cache means future requests in the same session won’t need re-authorization!</p>

<p><strong>Step 32: Browser redirected to callback URL</strong>
Your browser is redirected to the <code class="language-plaintext highlighter-rouge">callback_url</code> specified in the decorator (e.g., <code class="language-plaintext highlighter-rouge">https://example.com/oauth/callback</code>).
In this demo, it’s a dummy URL that does nothing. In production, this would be your application’s URL that handles post-authorization logic (like showing a success message or closing the auth window).</p>

<hr />

<h4 id="chapter-4-subsequent-calls-are-lightning-fast-steps-33-43"><strong>Chapter 4: Subsequent Calls Are Lightning Fast!</strong> (Steps 33-43)</h4>

<p>This is where you see the real benefit of OAuth token caching. The second time you invoke the agent in the same session, everything is already set up.</p>

<p><strong>Step 33: You invoke the agent again</strong>
You run the same command: <code class="language-plaintext highlighter-rouge">agentcore invoke '{"prompt": "Check my account"}' --bearer-token &lt;JWT&gt;</code>
Crucially, you’re using the <strong>same session ID</strong> as before.</p>

<p><strong>Step 34: JWT validation (same as before)</strong>
The Runtime still validates your JWT token - you still need to prove you’re authorized to invoke the agent.</p>

<p><strong>Step 35: Validation is cached/fast</strong>
The Runtime may have cached the JWT validation results, making this step very quick.</p>

<p><strong>Step 36: Agent code executes</strong>
Your agent code runs, and again encounters the function with <code class="language-plaintext highlighter-rouge">@requires_access_token</code>.</p>

<p><strong>Step 37: Agent asks Token Vault for the token</strong>
The decorator asks: “Do I have an access token for this provider and session?”</p>

<p><strong>Step 38: Vault checks cache - SUCCESS!</strong>
✅ The Token Vault finds the cached token from Phase 3C:
<em>“Found it! Session <code class="language-plaintext highlighter-rouge">demo_session_ABC123</code> → Provider <code class="language-plaintext highlighter-rouge">ExternalServiceProvider</code> → access_token: <code class="language-plaintext highlighter-rouge">eyJraWQi...</code>”</em></p>

<p><strong>Step 39: Vault returns the cached access token</strong>
The Token Vault immediately returns the access token. No authorization URL, no user interaction needed!</p>

<p><strong>Step 40: Function executes with the token</strong>
The decorator automatically injects the token into your function’s <code class="language-plaintext highlighter-rouge">access_token</code> parameter. Your function code runs with the token available:</p>

<div class="language-python highlighter-rouge"><div class="highlight"><pre class="highlight"><code><span class="k">async</span> <span class="k">def</span> <span class="nf">get_identity_token</span><span class="p">(</span><span class="o">*</span><span class="p">,</span> <span class="n">access_token</span><span class="p">:</span> <span class="nb">str</span><span class="p">)</span> <span class="o">-&gt;</span> <span class="nb">str</span><span class="p">:</span>
    <span class="c1"># access_token is already here! No OAuth flow needed!
</span>    <span class="k">return</span> <span class="n">access_token</span>
</code></pre></div></div>

<p><strong>Step 41: Agent completes successfully</strong>
Your agent logic executes, possibly making API calls to the external service using the access token. It returns a success response.</p>

<p><strong>Step 42: Runtime forwards the response</strong>
The Bedrock AgentCore Runtime sends the response back to the CLI.</p>

<p><strong>Step 43: You see the result</strong>
You see: <em>“✅ Authenticated to external service. Token length: 847 characters. Status: Active and cached for this session”</em></p>

<p>The entire flow from step 33 to 43 takes just milliseconds because everything is cached!</p>

<hr />

<h3 id="why-this-two-step-process">Why This Two-Step Process?</h3>

<p>Now that we’ve walked through all four chapters of the OAuth flow, you can see how the architecture elegantly handles both authentication challenges. The first time through requires user interaction and multiple network calls, taking several seconds to complete. But subsequent invocations in the same session are blazingly fast because everything is cached - the JWT validation is quick, and the OAuth token is retrieved from memory rather than requiring another authorization flow. This pattern strikes a perfect balance between security (explicit user authorization) and user experience (fast, seamless subsequent operations). The question naturally arises: why go through this two-step process at all? Why not use a single token for everything? The answer lies in the fundamental separation of concerns between who can invoke your agent versus what your agent can access on your behalf.</p>

<ol>
  <li>
    <p><strong>Security Isolation</strong>: Compromising your inbound JWT doesn’t expose your external service credentials, and vice versa.</p>
  </li>
  <li>
    <p><strong>Different Lifetimes</strong>: Your JWT and OAuth tokens can expire independently and be refreshed separately.</p>
  </li>
  <li>
    <p><strong>Principle of Least Privilege</strong>: The agent only gets access to external services when you explicitly grant it.</p>
  </li>
  <li>
    <p><strong>Auditability</strong>: Clear separation between “who invoked the agent” (JWT) and “what external services were accessed” (OAuth).</p>
  </li>
  <li>
    <p><strong>Flexibility</strong>: You can revoke external service access without revoking agent access, or the other way around.</p>
  </li>
</ol>

<h3 id="why-cache-tokens">Why Cache Tokens?</h3>

<p>Another design decision that might seem obvious in retrospect but is critical to understand is the token caching mechanism. Without caching, every single agent invocation would require a complete OAuth authorization flow - you’d need to click an authorization link, log in, and grant permission every time you ask your agent a simple question. This would make the system practically unusable. Token caching solves this by storing the OAuth access tokens (and refresh tokens) in memory, indexed by session ID and provider name. When your agent needs to access an external service, it first checks the cache: if a valid token exists, it’s used immediately; if not, the OAuth flow kicks in. This approach transforms the user experience from “authorize every request” to “authorize once per session,” while maintaining security through session isolation and token expiration. Let’s examine why this caching strategy is so important:</p>

<p>The caching in Phase 4 is crucial for user experience:</p>

<ul>
  <li>
    <p><strong>Performance</strong>: Token exchange is slow (involves multiple network calls and redirects). Caching makes subsequent calls 10-100x faster.</p>
  </li>
  <li>
    <p><strong>User Experience</strong>: Imagine having to click an authorization link every single time you ask your agent a question! Caching means you authorize once per session.</p>
  </li>
  <li>
    <p><strong>Rate Limiting</strong>: Many OAuth providers have rate limits on token exchanges. Caching reduces the number of authorization flows.</p>
  </li>
  <li>
    <p><strong>Security</strong>: Tokens are cached per session ID, ensuring isolation between different users and contexts.</p>
  </li>
</ul>

<h3 id="session-isolation-why-it-matters">Session Isolation: Why It Matters</h3>

<p>A subtle but powerful aspect of the token caching architecture is session-based isolation. You might wonder: why not cache tokens globally per user, so that once you authorize, all future agent invocations by that user across any session can use the same token? While this would be more convenient, it would also create significant security risks. By tying tokens to specific session IDs rather than user identities, the system ensures that each invocation context is isolated from others. This means that if a session is compromised, only that session’s tokens are at risk - not all of the user’s access across all sessions. It also enables fine-grained control: you can revoke access for a specific session without affecting other active sessions, and audit logs can precisely track which session performed which action. Session isolation is the foundation that makes the entire caching mechanism both performant and secure.</p>

<h3 id="session-based-token-caching">Session-Based Token Caching</h3>

<p>Token caching is tied to session IDs, not user IDs. This provides important security and isolation benefits:</p>

<div class="mermaid">
graph TB
    subgraph "Session A: demo_session_ABC123"
        A1[First Invocation] --&gt;|No token| A2[User authorizes]
        A2 --&gt; A3[Token cached for Session A]
        A3 --&gt; A4[Second Invocation]
        A4 --&gt;|Token found| A5[✅ Use cached token]
        A5 --&gt; A6[Subsequent calls fast]
    end

    subgraph "Session B: demo_session_XYZ789"
        B1[First Invocation] --&gt;|Different session<br />No token| B2[User must authorize again]
        B2 --&gt; B3[Token cached for Session B]
        B3 --&gt; B4[Isolated from Session A]
    end

    subgraph "Token Vault Cache"
        Cache[Session → Token Map]
        Cache -.-&gt;|Lookup| A3
        Cache -.-&gt;|Lookup| B3
    end

    style A3 fill:#51cf66
    style A5 fill:#51cf66
    style B4 fill:#fab005
</div>

<p>Notice that tokens are tied to your session ID (e.g., <code class="language-plaintext highlighter-rouge">demo_session_ABC123</code>). This is a critical security feature:</p>

<ul>
  <li>
    <p><strong>Different session = Different tokens</strong>: If you start a new session (new session ID), you’ll need to re-authorize. The previous session’s tokens aren’t accessible.</p>
  </li>
  <li>
    <p><strong>Multi-user safety</strong>: In a shared environment, User A’s tokens never leak to User B because they have different session IDs.</p>
  </li>
  <li>
    <p><strong>Granular control</strong>: You can invalidate a single session’s access without affecting other sessions.</p>
  </li>
  <li>
    <p><strong>Audit trail</strong>: Every action is tied to a specific session, making it easy to trace who did what.</p>
  </li>
</ul>

<h2 id="conclusion">Conclusion</h2>

<p>AWS Bedrock AgentCore’s dual authentication pattern represents a thoughtful approach to one of the most challenging problems in AI agent development: how to enable agents to securely access external services on behalf of users while maintaining strong security boundaries, excellent user experience, and clear auditability. By separating inbound authentication (who can invoke your agent) from outbound authentication (what external services your agent can access), the architecture achieves the right balance between security and usability.</p>]]></content><author><name>Ramesh Rajan</name><email>info@rameshrajan.info</email></author><category term="security" /><category term="AI" /><category term="aws" /><category term="genai" /><category term="iam" /><category term="llm" /><summary type="html"><![CDATA[A comprehensive deep dive into Amazon Bedrock AgentCore's dual authentication pattern]]></summary></entry><entry><title type="html">Threat Modeling an AI Inference Pipeline on AWS</title><link href="https://r2rajan.github.io/security/2025/12/22/samplepost/" rel="alternate" type="text/html" title="Threat Modeling an AI Inference Pipeline on AWS" /><published>2025-12-22T00:00:00+00:00</published><updated>2025-12-22T00:00:00+00:00</updated><id>https://r2rajan.github.io/security/2025/12/22/samplepost</id><content type="html" xml:base="https://r2rajan.github.io/security/2025/12/22/samplepost/"><![CDATA[<h2 id="why-threat-modeling-matters-for-genai">Why Threat Modeling Matters for GenAI</h2>

<p>Generative AI inference pipelines introduce <strong>new attack surfaces</strong> beyond traditional web applications:</p>
<ul>
  <li>Prompt injection</li>
  <li>Model abuse and data exfiltration</li>
  <li>Over-privileged IAM roles</li>
  <li>Supply chain risks in model artifacts</li>
</ul>

<p>A structured threat model helps identify and mitigate these risks <strong>before</strong> production deployment.</p>

<hr />

<h2 id="reference-architecture">Reference Architecture</h2>

<p>The following architecture represents a common <strong>serverless GenAI inference flow on AWS</strong>.</p>

<div class="mermaid">
graph TD
  User --&gt;|HTTPS| CloudFront
  CloudFront --&gt; WAF
  WAF --&gt; API_Gateway
  API_Gateway --&gt; Lambda
  Lambda --&gt;|Invoke| Bedrock
  Lambda --&gt; DynamoDB
</div>]]></content><author><name>Ramesh Rajan</name><email>info@rameshrajan.info</email></author><category term="security" /><category term="aws" /><category term="genai" /><category term="threat-modeling" /><category term="iam" /><category term="llm" /><summary type="html"><![CDATA[A practical, security-first walkthrough of threat modeling a GenAI inference pipeline using AWS-native controls.]]></summary></entry><entry><title type="html">AI for Security and Security for AI</title><link href="https://r2rajan.github.io/ai/2025/01/01/template/" rel="alternate" type="text/html" title="AI for Security and Security for AI" /><published>2025-01-01T00:00:00+00:00</published><updated>2025-01-01T00:00:00+00:00</updated><id>https://r2rajan.github.io/ai/2025/01/01/template</id><content type="html" xml:base="https://r2rajan.github.io/ai/2025/01/01/template/"><![CDATA[]]></content><author><name>Ramesh Rajan</name><email>info@rameshrajan.info</email></author><category term="AI" /><category term="aws" /><category term="genai" /><category term="threat-modeling" /><category term="iam" /><category term="llm" /><summary type="html"><![CDATA[A practical, security-first walkthrough for deploying AI.]]></summary></entry></feed>